If
the v
oltage is
bet
ween
21.3 V
and 22.7
V,
the
supply
is
go
o
d.
Pro
ceed
with
either
of
the follo
wing:
a.
Refer
to
the
test
set
manual
to troublesho
ot the
test set
and its
interconnect
cable
(esp
ecially if
the test
set LEDs
don't ligh
t).
b.
Con
tin
ue
with
\T
roublesho
oting
Con
trol Problems
in S-P
arameter T
est Sets."
If
the
v
oltage
is not
as stated
abo
ve,
refer
to
Chapter
5,
\P
o
w
er
Supply
T
roublesho oting."
5.
Be certain
to press
N
N
N
N
NN
NN
NN
NN
N
N
POKE
4
0
54
2
1
54
PRESET
5
after
all troublesho
oting and
return
the
A9
CC
jump
er to
\normal" p
osition.
Troubleshooting
Control
Problems
in
S-P
arameter
T
est
Sets
The
analyzer
con
trols
the
test
set
atten
uator,
the
transfer
switc
h
(for
forw
ard
and
rev
erse
measuremen
ts),
and,
in
the
case
of
the
HP
85047A, b
ypasses the
frequency doubler.
The
asso
ciated
test
set
in
terconnect
connector
pins are
sho
wn
in
Figure
9-4
;
refer
to
it
as
needed.
Note
Before
con
tin
uing
with
these
pro
cedures,
be
sure the
A9 CC
jump
er
is
set
to
\alter"
and
the
v
alue
for
the
appropriate
test
set
has
b
een
\POKEd".
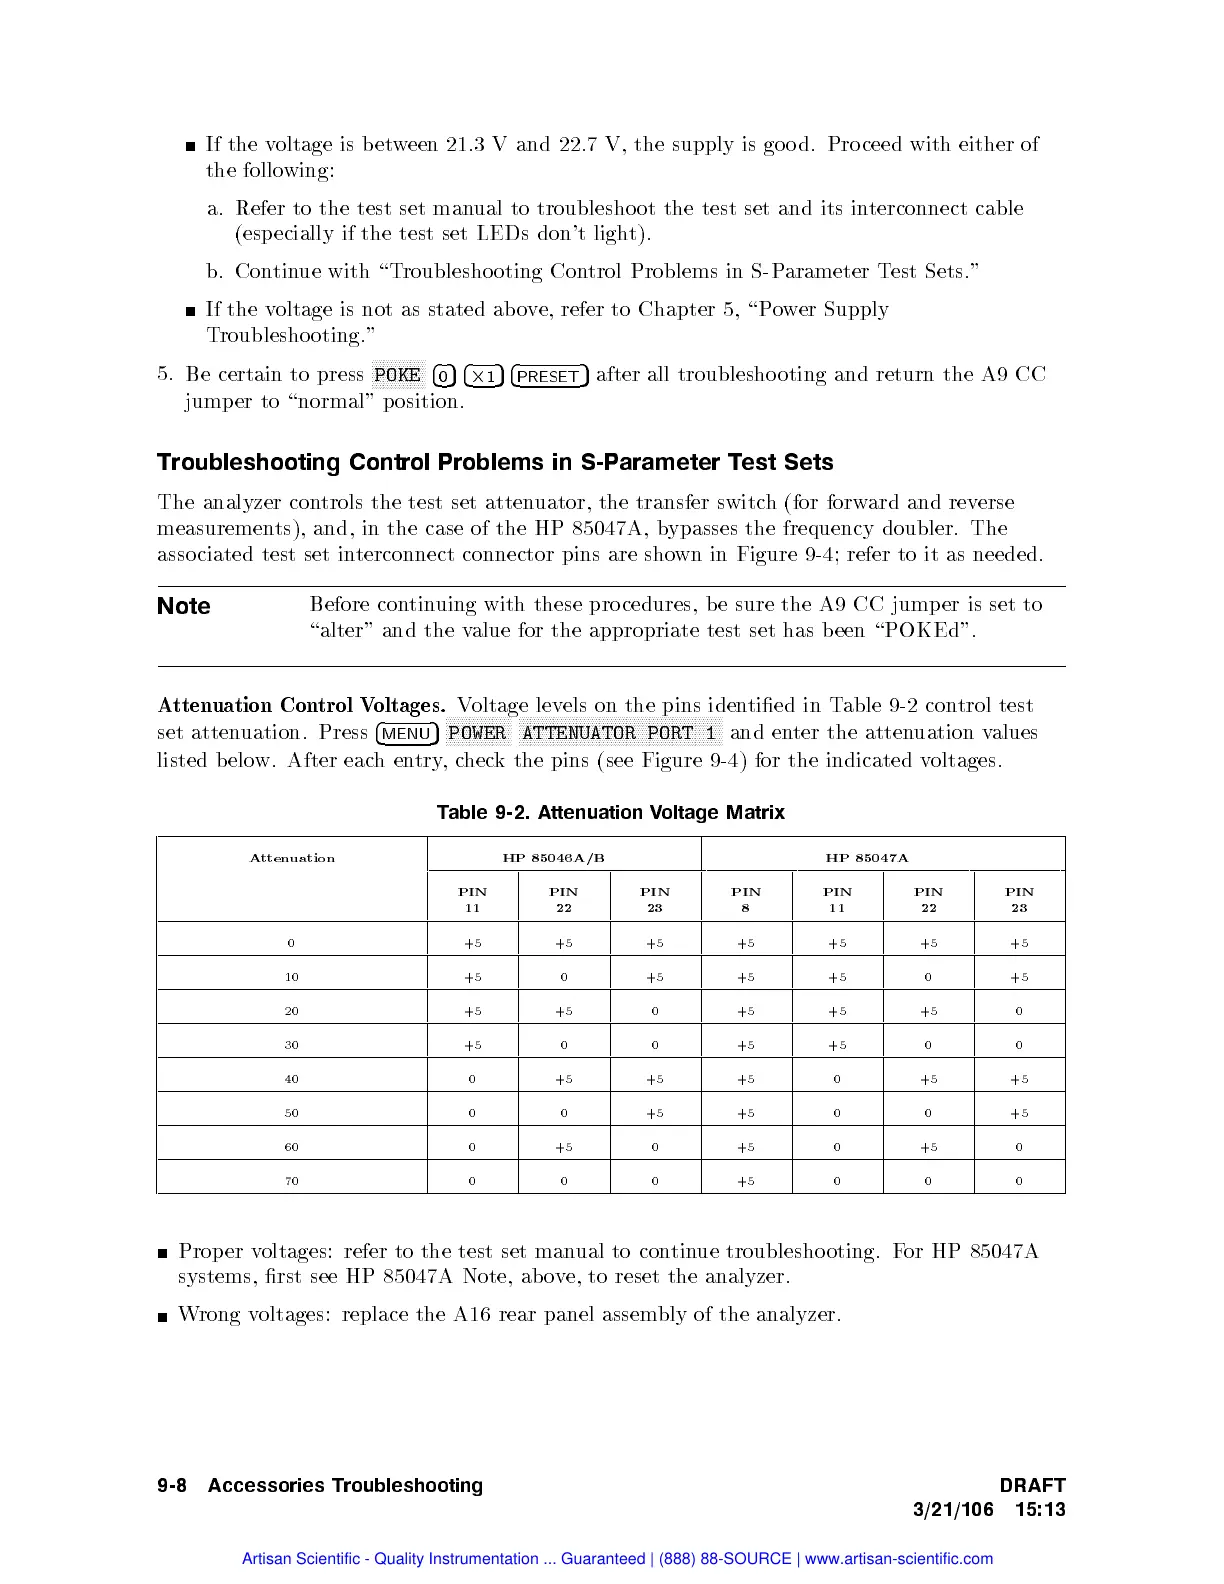
A
tten
uation
Con
trol
V
oltages.
Voltage
levels
on
the
pins
iden
tied
in
T
able
9-2
con
trol
test
set
atten
uation.
Press
4
MENU
5
N
N
N
N
N
N
N
N
N
N
N
N
N
N
N
N
N
POWER
N
N
N
N
N
N
N
N
N
N
N
N
N
N
N
N
N
NN
NN
N
N
N
N
N
N
N
N
N
N
N
N
N
N
N
N
N
N
N
N
N
NN
NN
N
N
N
N
N
N
N
ATTENUATOR
PORT
1
and
en
ter
the
attenuation
v
alues
listed
b
elo
w.
After eac
h
en
try
,
c
hec
k
the
pins
(see
Figure
9-4
)
for
the
indicated
v
oltages.
T
able
9-2.
A
ttenuation
V
oltage
Matrix
A
tten
uation
HP
85046A/B
HP
85047A
PIN
11
PIN
22
PIN
23
PIN
8
PIN
11
PIN
22
PIN
23
0 +5 +5 +5 +5 +5 +5 +5
10 +5 0 +5 +5 +5 0 +5
20 +5 +5 0 +5 +5 +5 0
30 +5 0 0 +5 +5 0 0
40 0 +5 +5 +5 0 +5 +5
50 0 0 +5 +5 0 0 +5
60 0 +5 0 +5 0 +5 0
70 0 0 0 +5 0 0 0
Prop er v
oltages: refer to the test set man
ual to con
tinue troublesho oting. F
or HP 85047A
systems, rst see HP 85047A Note, ab ove, to reset the analyzer.
Wrong voltages: replace the A16 rear panel assembly of the analyzer.
9-8 Accessories Troubleshooting DRAFT
3/21/106 15:13
Artisan Scientific - Quality Instrumentation ... Guaranteed | (888) 88-SOURCE | www.artisan-scientific.com
 Loading...


