Optimizing image performance (analog input) 17
Optimizing image performance (analog input)
Two controls in the on-screen display can be adjusted to improve image performance: Clock and Phase
(available in the OSD menu).
NOTE: The Clock and Phase controls are adjustable only when using an analog (VGA) input. These controls
are not adjustable for digital inputs.
The Clock must first be set correctly since the Phase settings are dependent on the main Clock setting. Use
these controls only when the auto-adjustment function does not provide a satisfactory image.
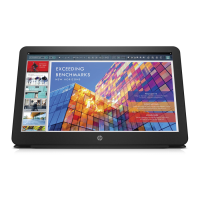
• Clock— Increases/decreases the value to minimize any vertical bars or stripes visible on the screen
background.
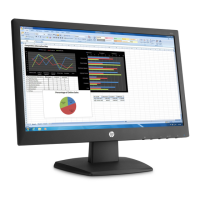
• Phase— Increases/decreases the value to minimize video flickering or blurring.
NOTE: When using the controls, you will obtain the best results by using the auto-adjustment pattern
software utility provided on the optical disc.
When adjusting the Clock and Phase values, if the monitor images become distorted, continue adjusting the
values until the distortion disappears. To restore the factory settings, select Yes from the Factory Reset
menu in the on-screen display.
To eliminate vertical bars (Clock):
1. Press the Menu button on the monitor to open the OSD menu, and then select Image Control > Clock
and Phase.
2. Use the buttons on the monitor to eliminate vertical bars. Press the buttons slowly so that you do not
miss the optimum adjustment point.
3. After adjusting the Clock, if blurring, flickering, or bars appear on the screen, proceed to adjust the
Phase.
To remove flickering or blurring (Phase):
1. Press the Menu button on the monitor to open the OSD menu, and then select Image Control > Clock
and Phase.
2. Press the buttons on the monitor to eliminate flickering or blurring. Flickering or blurring may not be
eliminated, depending on the computer or graphics controller card installed.
To correct screen position (Horizontal Position or Vertical Position):
1. Press the Menu button on the monitor to open the OSD menu, and then select Image Position.