EasyManua.ls Logo

Humanscale QUICKSTAND LITE User Manual

Humanscale QUICKSTAND LITE
8 pages
To Next Page IconTo Next Page
Page #1 background imageLoading...
Page #1 background image
humanscale.com 800.400.0625Humanscale Corporate HQ 1114 Ave. of the Americas, 15
th
Floor New York, NY 10036
QUICKSTAND LITE REWORK INSTRUCTIONS
OVERVIEW/BACKGROUND
Below are step-by-step instructions to rework your QuickStand Lite. If you have
any questions, contact Humanscale Support at QSLinquiry@humanscale.com
or 855-319-0315.
DIFFICULTY
Intermediate
REWORK TIME
25 Minutes
Item
Number
Description
Quantity
Included
1 M8 Long Dynamic Arm 1
2 Plastic Link Washer 1
3 Arm Link Pin 1
4 4 mm Set Screw 1
5 Arm Link Pin Collar 1
6 Spherical Washer 1
7 10 mm Washer 1
8 Lock Washer 1
9 Shoulder Bolt 1
10 2 mm Allen Key 1
11 2.5 mm Allen Key 1
12
5 mm Allen Key 1
REWORK KIT CONTENTS
1
10
11
12
9
8
7
6
5
4
22
3
REQUIRED TOOLS
M2 / M2.5 / M5 Allen Keys (provided)
Torque wrench w/ M5 Hex socket (recommended)
MATERIAL DISPOSITION
Leftover parts should be recycled locally if possible.
Question and Answer IconNeed help?

Do you have a question about the Humanscale QUICKSTAND LITE and is the answer not in the manual?

Humanscale QUICKSTAND LITE Specifications

General IconGeneral
CategoryRacks & Stands
Product NameQUICKSTAND LITE
BrandHumanscale
Warranty15 years
Product TypeSit-Stand Desk Converter
MaterialSteel
Color OptionsBlack, White
MechanismGas spring

Summary

Overview and Background

Rework Kit Contents

Required Tools

Material Disposition

Step-by-Step Rework Instructions

Prepare Workspace and Remove Peripherals

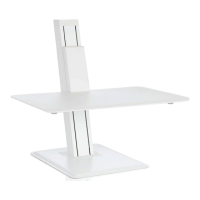
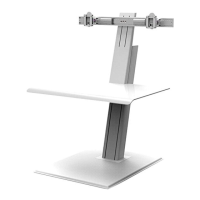
Find a safe place for peripherals and raise QSL to highest position before removing monitors.

Free QSL Head from Dynamic Arm

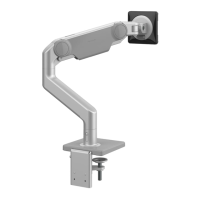
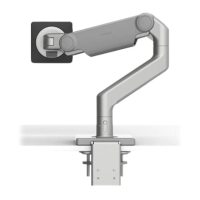
Remove the 2.5 mm allen screw on the front of the dynamic arm to free the arm link pin.

Detach QSL Head and Arm Link Pin

Lift QSL head upright, remove arm link pin from socket, and set QSL head aside.

Loosen Release Lever Cap Screw

Use a 5mm hex key to loosen the cap screw attaching the QSL head to the arm link pin.

Remove Cap Screw and Arm Link Pin

Remove the cap screw, release lever, washers, and arm link pin for replacement.

Dispose of Old Parts

Discard all parts except the dome washer, recycling locally if possible.

Install New Parts

Assemble lock washer, 10mm washer, spherical washer onto shoulder bolt and insert into QSL head.

Tighten Shoulder Bolt

Tighten the shoulder bolt with a 5mm hex key, ensuring the arm link pin is steady.

Remove Cable Cover

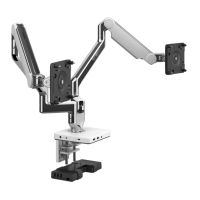
Slide the cable cover from the rear of the base upwards and set it aside.

Remove 2.5 mm Allen Screw

Remove the 2.5 mm allen screw.

Remove Old Dynamic Arm

Carefully lift the dynamic arm straight up to clear the base socket.

Install New Dynamic Arm

Install the new M8 Long Dynamic arm, ensuring the plastic washer stays on the link pin.

Reinstall QSL Head and Tighten Screws

Reinstall QSL head, ensure plastic link washer is in place, and re-tighten set screws.

Position Platform

Loosen 5mm shoulder bolt to position the platform flat on the desk.

Tighten Platform Bolt

Tighten the bolt with a 5mm Allen Key, ideally using a torque wrench to 15 ft. lbs.

Adjust Arm Tension

Adjust monitor arm tension using the 5mm hex key for balanced lift and tension.

Replace Cables and Covers

Replace all cables and plastic covers as they were before the rework.

Related product manuals