In addition, you will need fasteners designed to work with your
specific mounting surfaces:
Contents of the hardware package may vary depending upon
how the shading was ordered and whether the shading will be
inside or outside mounted.
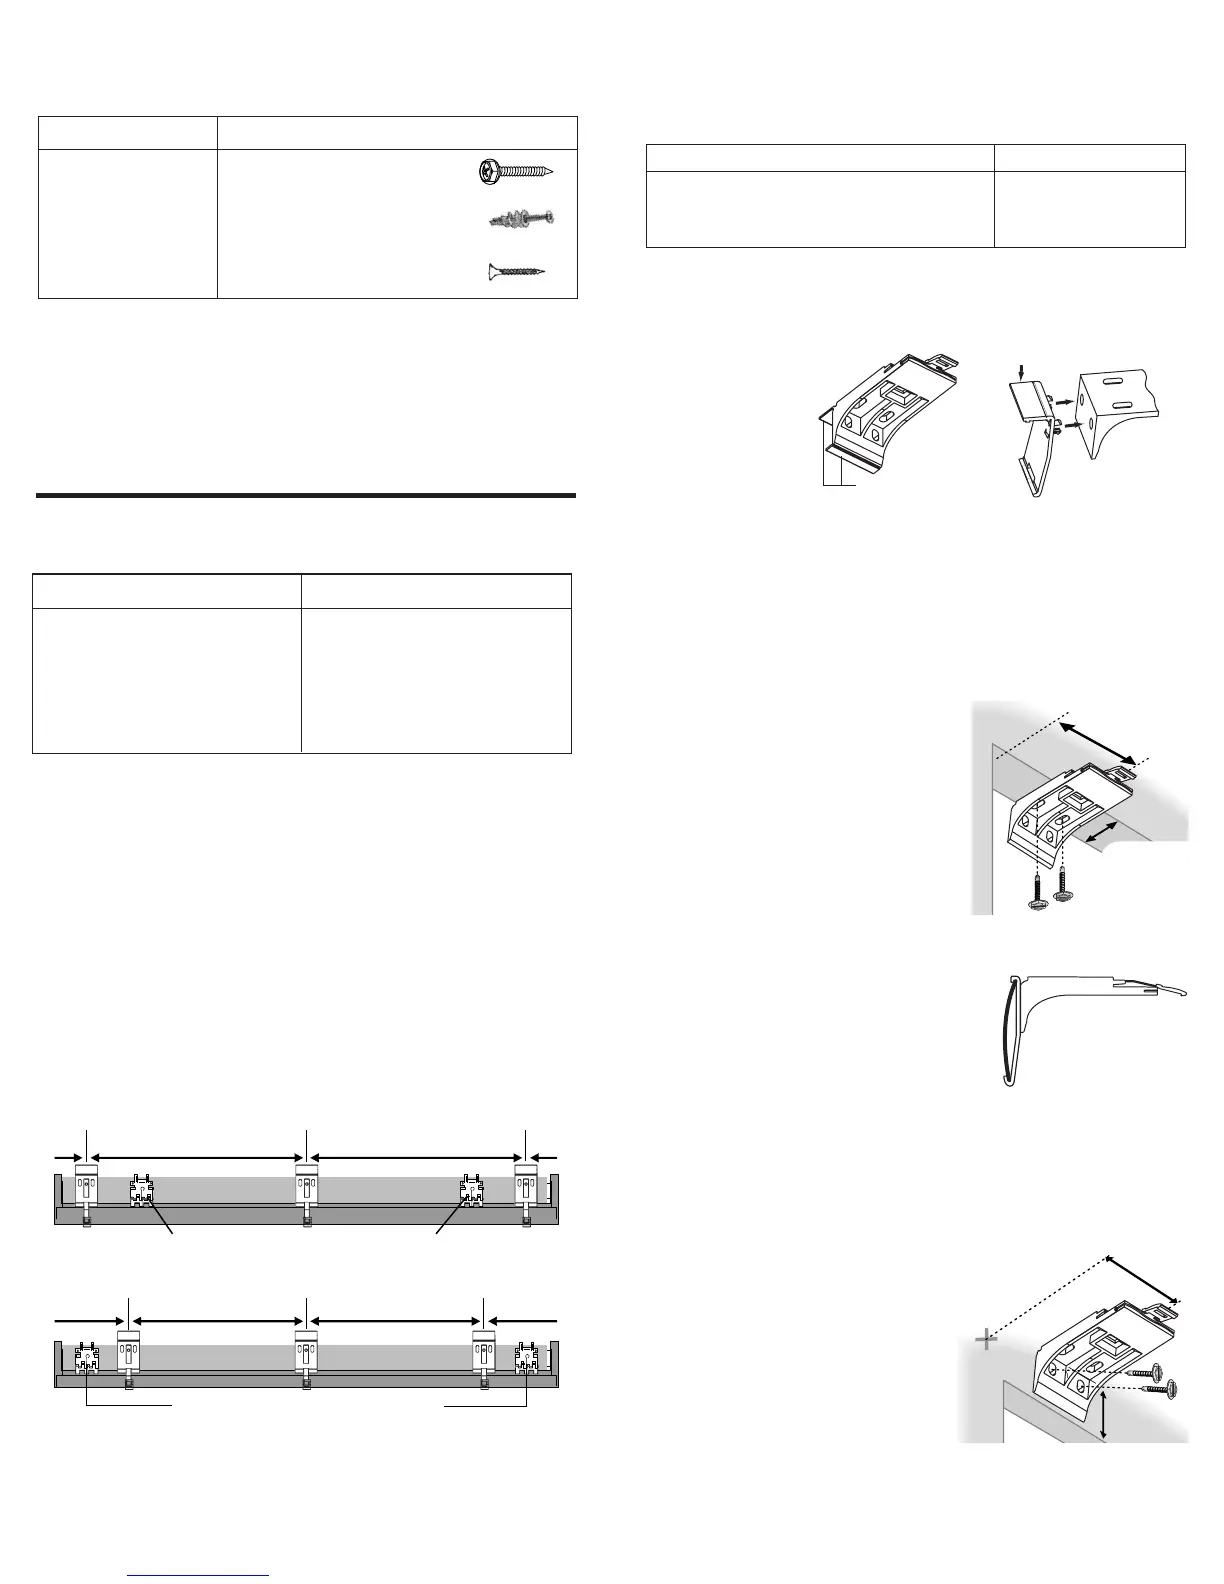
Mount the Installation Brackets
Bracket Requirements
Bracket Placement
• Bracket placement is the same for inside and outside mounts.
• Measure 2" in from the ends of the headrail and mark the
bracket location on the mounting surface.
• Space additional brackets evenly between the end brackets.
• Adjust bracket placement to accommodate any obstructions
to the bottom rail, such as window cranks or handles.
3
/
4
"
Minimum
2"
Mark
On Wall
Removable
Tabs
Back
Cover
Back Cover
Bracket
Installation
Bracket
Inside Mount Applications
Required depths for inside mount depend upon the application.
Back Cover Bracket Installation (Optional)
• If using the back cover bracket, break off both tabs on the
installation bracket.
• Insert the prongs
on the back
cover bracket
into the holes
on the
installation
bracket.
Bracket Installation
CAUTION:CAUTION:
CAUTION:CAUTION:
CAUTION: The brackets must be mounted level for proper
shading operation.
• Use pliers to break off the upper tab of each installation
bracket.
NOTE:NOTE:
NOTE:NOTE:
NOTE: Only remove the bottom tab on each installation
bracket if it interferes with the
bracket installation.
• Center each bracket over a
mark on the mounting surface.
• Check that each bracket is level
and their front edges are
aligned. Attach using two
screws.
Back Cover Installation (Optional)
• After bracket installation, install the cover into the back
bracket as shown.
Outside Mount
Applications
Outside mount minimum height measurement is
3
/
4
".
Bracket Installation
• Center the shading over the window and mark the ends of
the headrail.
• Measure 2" in from the marks on the wall and mark the
bracket locations.
• Use pliers to break off both tabs on each
mounting bracket.
• Center each bracket over a
bracket mark on the mounting
surface.
• Adjust bracket position to
accommodate any obstructions
to the bottom rail, such as
window cranks or handles.
• Check that each bracket is level and their tops are aligned.
Attach using two screws.
1
Minimum Mounting Depth
7
/
8
"
Minimum Mounting Depth, Fully Recessed 3
1
/
4
"
Application
Depth Required
Installation
Bracket
Remove This Tab
Back
Cover
Bracket
2"
2"
Limit Stops (5
1
/2" From The Ends)
Space EvenlySpace Evenly
Normal Spacing (Shadings Over 36" Wide):
5"
5"
Limit Stops (2" From The Ends)
Space Evenly
Obstruction Spacing (Maximum):
Space Evenly
2"
See Chart
For Depth
12" - 36"
36
1
/
8
" - 79"
79
1
/
8
" - 96"
96
1
/
8
" - 109"
Brackets Required
Shading Width
2
3
4
5
Mounting Surface
Fastener
No. 6 Hex Head Screws
(Provided)
Drywall, Plaster
Wood
Wall Anchors, Expansion Bolts
(Not Provided)
Sheet Metal Screws
(Not Provided)
Metal