Spacer
Blocks
1
/
2
"
1
/
2
"
Fabric Roll
Bottom Rail
Move Weight
Adjust the Shading
Testing
• Lower the shading and then slowly raise it.
• If the fabric rolls unevenly or rubs against the headrail,
check that the headrail is level. Level if necessary.
• If the headrail is level, adjust the bottom rail weight.
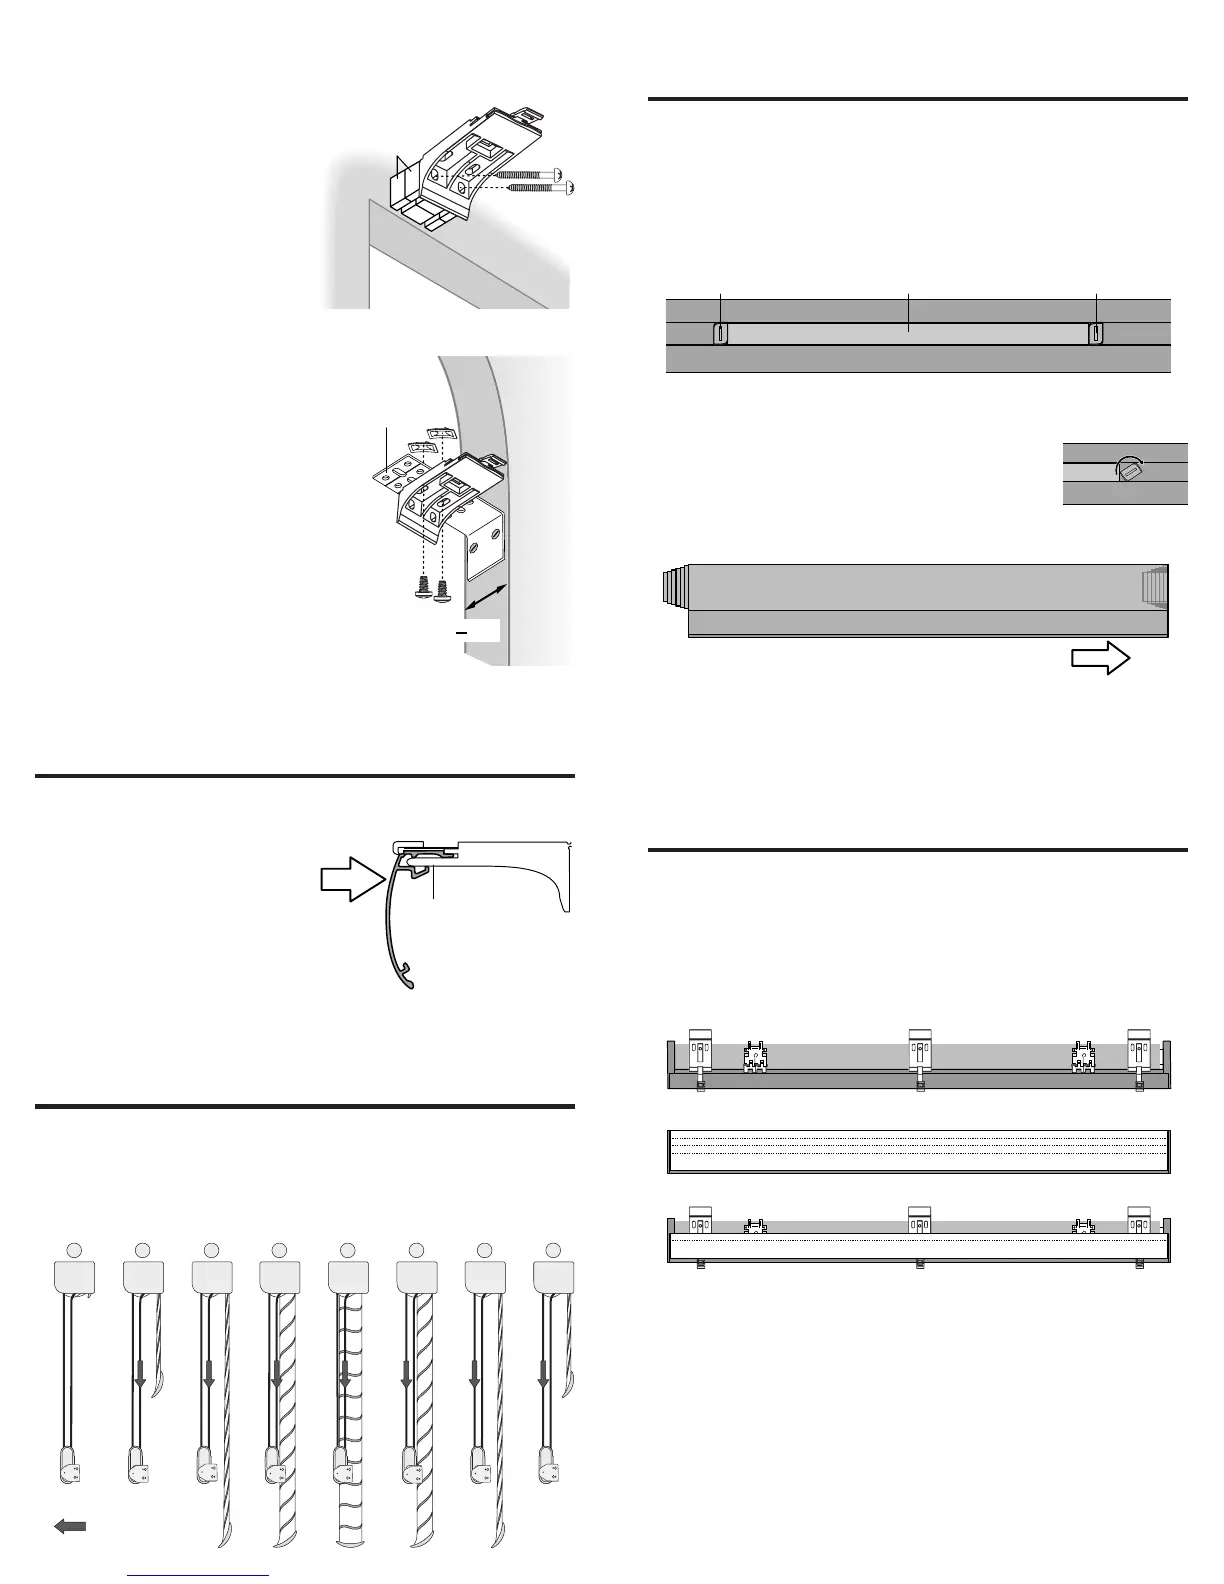
Adjust the Bottom Rail Weight
• To release, insert a flat blade screwdriver
into a weight lock and turn clockwise.
• Move the weight in 1" increments toward
the side where the fabric is gathering.
• Secure the weight locks in position by turning them
counterclockwise after making the adjustment.
• Test and, if necessary, adjust again.
Attach the Accessories
Attach the Dust Cover (Optional)
• Use the entire cover on outside mounts.
• On inside mounts, trim the cover along a score to fit over the
portion of the headrail that protrudes from the window frame.
• Cut the cover to fit between extension brackets, when used.
• Peel the backing from the double-sided tape to attach the
cover to the headrail.
Attach the Hold-Down Brackets (Optional)
Optional hold-down brackets secure the bottom rail to the sill
when the window shading is fully lowered. The bottom rail can
still pivot when opening and closing the vanes, but the shading
cannot be raised.
• With the shading fully lowered, insert the pin on the hold-
down bracket into the hole on the bottom rail end cap.
4
5
Weight
Weight
Lock
Weight
Lock
Overhead View – No Dust Cover
Dust Cover (Outside Mount)
Dust Cover (Inside Mount)
Cut Along A Score To Size The Dust Cover
To Fit Any Exposed Part Of The Headrail Assembly
Extension
Bracket
1
1
/2"
Minimum
Depth
Spacer Blocks (Optional)
Each spacer block projects brackets
1
/
2
" from the mounting
surface.
• Use pliers to break off both tabs
on each mounting bracket.
• Mount spacer blocks with the
solid side facing the
mounting surface.
• Use two mounting screws.
Screws should be long
enough to secure the bracket
to the mounting surface.
• Use a maximum of three spacer blocks per bracket.
End Mount Applications
End mount the headrail when
conventional mounting techniques
will not work, for example, in an
arched window.
• Mount extension brackets on a
surface at least 1
1
/
2
"
wide as shown.
• Attach the installation brackets to
the extension brackets using the
machine screws and nuts provided.
NOTE: Maximum width for an end
mount application is 48".
Install the Shading
• Hold the shading so the front faces you.
• Push the top edge of the
headrail into the
installation bracket until
it snaps into place.
Tip:Tip:
Tip:Tip:
Tip: Insert the Quick
Release Card under the
Locking Tab to help ease
the headrail into the bracket.
Operate the Shading
• Pull on the rear cord of the cord loop to lower the shading.
• With the shading fully lowered, continue to pull on the rear
cord to tilt the bottom rail and open the vanes.
• Pull on the front cord of the cord loop to close the vanes and
raise the shading.
2
3
Headrail
Flange
Locking Tab
Installation
Bracket
Push Until
Locking Tab
Secures
Headrail
Front Side
Of Shading
1
2
4
5
7
83 6
HunterDouglas
®
HunterDouglas
®
HunterDouglas
®
HunterDouglas
®
HunterDouglas
®
HunterDouglas
®
HunterDouglas
®
HunterDouglas
®
 Loading...