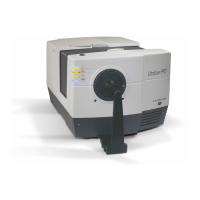
UltraScan VIS Supplemental Manual for EasyMatch QC ver 2.0
13
UltraScan VIS Installation
The UltraScan VIS is simple to set up and attach to your computer. The following instructions guide you
through the initial installation of your UltraScan VIS system.
1. Unpack all cartons and remove wrappings and cable ties. Inspect for damage and notify the
carrier and HunterLab immediately if any is discovered. Save the packing material in case it
becomes necessary to return the instrument to the factory.
2. Place the UltraScan VIS on a flat working surface where the measurements will be made.
Place the computer near the sensor.
3. Ensure that the on/off switch on the back of the sensor is set to off.
4. Connect the power cord to the sensor and plug it into a power outlet.
Note: Refer to the UltraScan VIS Specifications section for recommendations concerning
the power line and its conditioning.
CAUTION: Use only the power cord included with this instrument or a replacement
obtained from HunterLab (HL#A13-1002-655 for 110V, A13-1002-656 for 220V). Be certain
that the power cord is in good condition before connecting it. The UltraScan VIS is
grounded using the grounding portion of this power cord. Only plug this cord into a
properly grounded power outlet. Do not use an inappropriate adapter to plug the
instrument into an ungrounded outlet or electric shock may occur. More information on
the wiring of the power cord can be found in the UltraScan VIS Specifications section.
5. If you are using SERIAL COMMUNICATIONS, connect the female end of the 9-pin
communications cable to the appropriate communications port of the computer. Connect
the male end of the 9-pin cable to the sensor. If you are using USB COMMUNICATIONS,
connect the computer via a USB cable to the serial adapter and then to the serial cable
connected to serial port on the UltraScan VIS. It does not matter if the instrument is turned
on or off.
Note: The UltraScan VIS should be lifted from under the base plate, near the center of the
unit. It should not be carried by grasping any part of the plastic housing.
Install EasyMatch QC Software
Complete the following steps:
1. Log into the system using an account that has ADMINISTRATOR privileges for the PC —
network or local.
2. Insert the installation CD into the CD-ROM drive. If the system is setup to automatically
run CD programs, the menu will appear and you may skip to Step 5. Otherwise, continue
with Step 3.
3. Select the Easy Match QC Icon or from Windows, go to START > RUN >EZMQC_MENU and

 Loading...