4. “Creating an Ethernet connection and logging in” on page 19
5. “Modifying the domain ID (optional)” on page 19
6. “Installing the SFP transceivers” on page 19
7. “Connecting the cables” on page 20
Creating a serial connection
Before you can begin configuring the switch, you must create a connection by way
of the serial port. To create a serial connection to the switch, perform the following
steps:
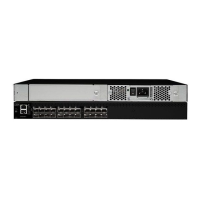
1. Using the provided serial cable, connect a workstation to the serial port on the
switch. (see 2 in Figure 8)
2. Disable any serial communication programs running on the workstation.
3. Open a terminal emulator application (such as HyperTerminal on a PC or TERM
in a UNIX
®
environment) and configure the application as follows:
v In a Windows 95, 98, 2000, or NT environment:
Bits per second 9600
Databits 8
Parity None
Stop bits 1
Flow control None
v
In a UNIX environment, type the following string at the prompt:
tip /dev/ttyb -9600
scale: 5/1 6" = 1"
!
IOIOI
0
4
3
7
1
5
2
6
8
12
11
15
9
13
10
14
0
4
1
5
IOIOI
!
2
6
3
7
1
2
3
4
5
6
7
8
9
10
11
b1600008
Figure 8. SAN16B-2 port side details
Chapter 2. Installing and configuring the SAN16B-2 17

 Loading...