12
Counter and timer function:
Counter function:
When the heating function is started, the counter will start
automatically. The counter is displayed with 4 digits.
When the operating time is less than 1 hour, the counter
work with minute/second (mm:ss) mode and LED (M, see
Fig. 11) lights.
If the operating time exceeds 1 hour, the display switches
from minute/second mode to hour/minute (hh:mm) mode.
LED (L, see Fig. 11) lights indicate the status.
If the operating time exceeds 100 hours, the display switch-
es from hour/minute mode to hour mode .
In hour mode, only whole hours are displayed.
In day mode, only whole days are displayed.
Hour mode
Day mode
Stirring function:
The stirring function can be started or stopped by pressing
the right rotating/pressing knob (A). The speed can be ad-
justed during operation.
The displayed value will flash until reaching the target speed.
Timer function:
The Time (+) button (D
, see Fig. 11
) or Time (-) button (D
,
see Fig. 11
) is used to adjust the heating time. If the timer
value is more than 1 hour, the display switch to hour/minute
(hh:mm) mode from minute/second (mm:ss) mode. The
LED (L) lights.
The max. value for timer is 99:59 (hh:mm).
Switching between “Counter” and “Timer” function:
The “Counter” function could be switch to “Timer“ func-
tion by pressing the Counter/Timer key (C
, see Fig. 11
).
The timer LED (J
, see Fig. 11
) indicates the “Timer“ func-
tion is activated.
Press the Counter/Timer key (C) again, the “Counter“ func-
tion will be activated and counter LED (K, see Fig. 11) lights.
•
LR 1000 control:
Switch on the device:
After switching on the device using the power switch on
the front panel the device name and the software version
are displayed on the screen.
After a few seconds, the working screen is shown on the
screen,
device
is ready for operation.
Lab Reactor
LR 1000 Control
Version X.X.XXX/X.XX
Fig. 14
A
25.0
actual °C
0 10
set °C set rpm
Safe Temp.: 210 °C
0
actual rpm
Fig. 15
Turn the rotating/pressing knob (A), the target speed set-
ting can be adjusted on the working screen. Press rotating/
pressing knob (A, see Fig. 12), the stirrer start to running.
Turn the rotating/pressing knob (B), the temperature set-
point can be adjusted. Press rotating/pressing knob (B, see
Fig. 12) to activate the heating function.
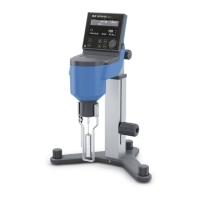
Explanation of symbols on the working screen:
The symbols displayed change depending on the status and
settings of the instrument. The screen below shows the
most significant symbols on the working screen.
PC
A
Safe Temp.: 200 °C Timer: 00:00:00
pH-Value: 0.0 Δ Torque:
0%
100.0
actual °C
100
actual rpm
100.0
set °C
100
set rpm
Fig. 12
Fig. 16