DEUTSCH 21
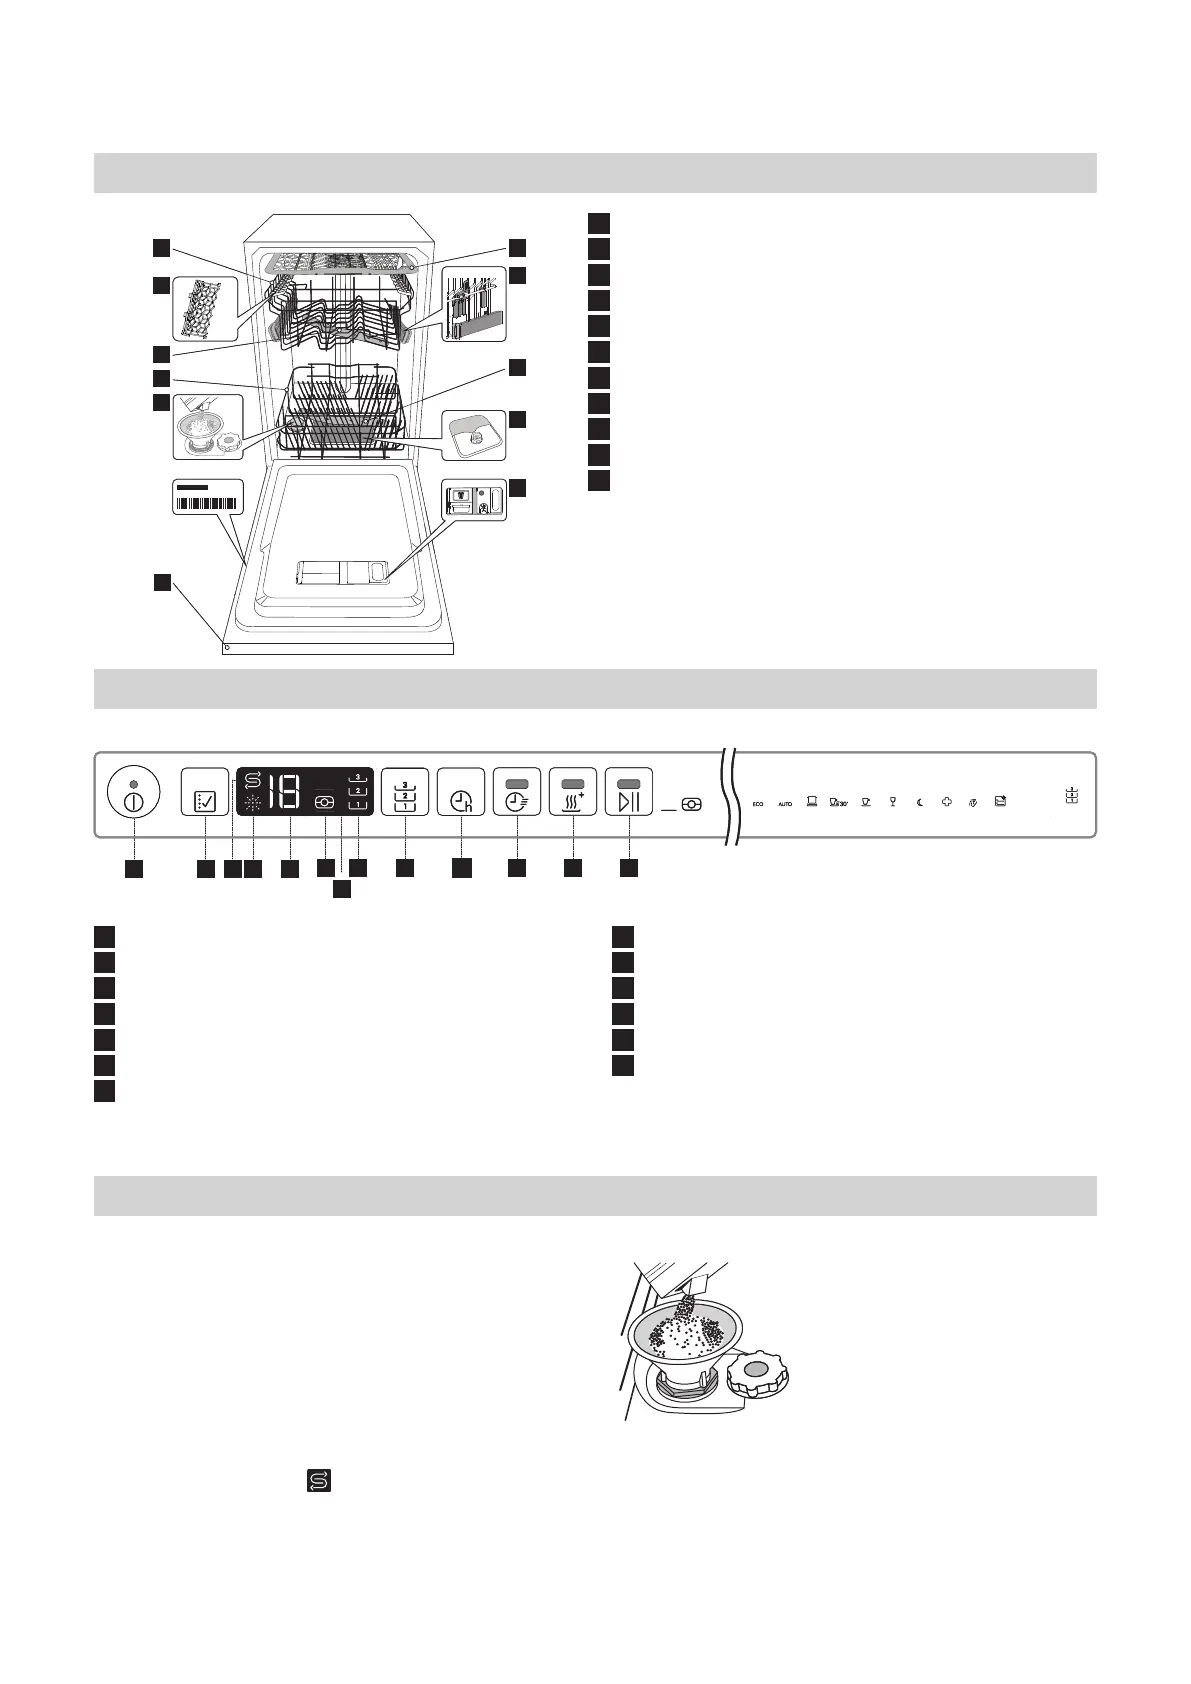
Produktbeschreibung
1
Oberkorb
2
Besteckschublade
3
Oberkorb Höhenversteller
4
Oberer Sprüharm
5
Unterkorb
6
Besteckkorb
7
Unterer Sprüharm
8
Filtereinheit
9
Salzbehälter
10
Spülmittel und Klarspülerspender
11
Bedienblende
Bedienblende
Erster Gebrauch
Hinweise zur ersten Inbetriebnahme
Nach Abschluss der Installation die Puer an den Körben und
die Rückhaltegummis vom oberen Korb entfernen.
Salzbehälter befüllen
Mit der Verwendung von Salz werden KALKABLAGERUNGEN
auf dem Geschirr und den funktionalen Komponenten des
Geschirrspülers verhindert.
• DER SALZBEHÄLTER DARF NIE LEER SEIN.
• Es ist wichtig, die Wasserhärte einzustellen.
Der Salzbehälter bendet sich im Geschirrspülerboden (siehe
PRODUKTBESCHREIBUNG) und muss aufgefüllt werden, wenn
die SALZNACHFÜLLANZEIGE
ENGLISH
7
Control panel
Product description
1. Upper rack
2. �������
3. Upper rack height adjuster
4. Upper sprayer arm
5. Lower rack
6. Cutlery basket
7. Lower sprayer arm
8. Filter Assembly
9. Salt reservoir
10. Detergent and Rinse Aid dispensers
11. Rating plate
12. Control panel
1
2
3
4
5
6
10
7
11
9
8
First use
ADVICE REGARDING THE FIRST TIME USE
After installation, remove the stoppers from the racks and the
retaining elastic elements from the upper rack.
FILLING THE SALT RESERVOIR
The use of salt prevents the formation of LIMESCALE on the
dishes andon the machine’s functional components.
• It is important that the salt reservoir be never empty.
• It is important to set the water hardness.
The salt reservoir is located in the lower part of the
dishwasher (see PRODUCT DESCRIPTION) and should be
filled when the SALT REFILL indicator light in the
control panel is lit .
1. Remove the lower rack and
unscrew the reservoir cap
(anticlockwise).
2. Only the first time you do this: fill
the salt reservoir with water.
3. Position the funnel (see figure)
and fill the salt reservoir right up
to its edge (approximately 1 kg);
it is not unusual for a little water to
leak out.
4. Remove the funnel and wipe any
salt residue away from the
opening.
1. On-Off/Reset button with indicator light
2. Program selection button
3. Salt refill indicator ligh
4. Rinse Aid refill indicator ligh
5. Program number and delay time indicator
6. Tablet indicator light
7. Display
8. Half Load indicator light
9. Half Load button
10. Delay button
11. START/Pause button with indicator light / Tab
1 2 3 4 5 6 7 8 9 10
11
3sec
h
der Bedienblende leuchtet.
1. Ziehen Sie den Unterkorb
heraus und schrauben Sie den
Salzbehälterdeckel gegen den
Uhrzeigersinn ab.
2. Nur beim ersten Mal: Befüllen Sie
den Salzbehälter mit Wasser.
3. Setzen Sie den Trichter auf (siehe
Abbildung) und füllen Sie den
Behälter bis zum Rand mit Salz (ca.
1 kg); es ist normal, wenn etwas
Wasser ausläuft.
4. Den Trichter abnehmen und die
Salzreste vom Önungsrand
entfernen.
1
Ein-Aus/Reset Taste mit Anzeigelicht
2
Programmwahl-Taste
3
Anzeigelicht zum Salz auüllen
4
Anzeigelicht zum Klarspüler auüllen
5
Programmnummer und Verzögerungszeit-Anzeige
6
Tab-Anzeigelicht
7
Display
8
Flexibles Spülen Anzeigelicht
9
Flexibles Spülen-Taste
10
Startvorwahl-Taste
11
Kurzzeit-Taste mit Anzeigelicht
12
Extra Dry-Taste mit Anzeigelicht
13
START/Pause-Taste mit Anzeigelicht/Tab
ENGLISH
7
Control panel
Product description
1. Upper rack
2. �������
3. Upper rack height adjuster
4. Upper sprayer arm
5. Lower rack
6. Cutlery basket
7. Lower sprayer arm
8. Filter Assembly
9. Salt reservoir
10. Detergent and Rinse Aid dispensers
11. Rating plate
12. Control panel
1
2
3
4
5
6
10
7
11
9
8
First use
ADVICE REGARDING THE FIRST TIME USE
After installation, remove the stoppers from the racks and the
retaining elastic elements from the upper rack.
FILLING THE SALT RESERVOIR
The use of salt prevents the formation of LIMESCALE on the
dishes andon the machine’s functional components.
• It is important that the salt reservoir be never empty.
• It is important to set the water hardness.
The salt reservoir is located in the lower part of the
dishwasher (see PRODUCT DESCRIPTION) and should be
filled when the SALT REFILL indicator light in the
control panel is lit .
1. Remove the lower rack and
unscrew the reservoir cap
(anticlockwise).
2. Only the first time you do this: fill
the salt reservoir with water.
3. Position the funnel (see figure)
and fill the salt reservoir right up
to its edge (approximately 1 kg);
it is not unusual for a little water to
leak out.
4. Remove the funnel and wipe any
salt residue away from the
opening.
1. On-Off/Reset button with indicator light
2. Program selection button
3. Salt refill indicator ligh
4. Rinse Aid refill indicator ligh
5. Program number and delay time indicator
6. Tablet indicator light
7. Display
8. Half Load indicator light
9. Half Load button
10. Delay button
11. START/Pause button with indicator light / Tab
1 2 3 4 5 6 7 8 9 10
11
3sec
h
1 2 3 4 5
6 8 9 10 11 12 13
7
2
65°
1
50°
5
6
10 PROGRAMS
3
50°
4
45°
7
50°
8
65°
10
50°-60° 50°
9
65°
h
3sec
4
2
7
8
10
1
3
5
6
9
11
0000 000 00000
Service:
1 2 3 4 5
6 8 9 10 11 12 13
7
2
65°
1
50°
5
6
10 PROGRAMS
3
50°
4
45°
7
50°
8
65°
10
50°-60° 50°
9
65°
h
3sec
4
2
7
8
10
1
3
5
6
9
11
0000 000 00000
Service:
 Loading...