FRANÇAIS 42
ATTENTION : Toujours débrancher l’appareil pour le nettoyer et
eectuer de l’entretien. N’utilisez pas de liquides inammables
pour nettoyer l’appareil.
Nettoyer le lave-vaisselle
Les marques sur les côtés de l’appareil peuvent être enlevées en
utilisant un linge humide, de l’eau, et un peu de vinaigre.
Les surfaces externes de l’appareil et le panneau de contrôle
peuvent être nettoyés en utilisant un linge non abrasif humide.
N’utilisez pas de solvants ou de produits abrasifs.
Prévenir les mauvaises odeurs
Gardez toujours la porte de l’appareil entrouverte pour éviter
que la moisissure ne se forme et ne s’accumule à l’intérieur de
l’appareil. Nettoyez régulièrement les joints autour de la porte et
des distributeurs de détergent en utilisant une éponge humide.
Ainsi, les résidus de nourriture ne s’accumuleront pas dans les
joints (principale cause de la formation de mauvaises odeurs).
Vérier le tuyau d’alimentation d’eau
Vériez régulièrement le tuyau d’arrivée pour déceler de la
friabilité et des ssures. S’il est endommagé, remplacez-le avec
un nouveau tuyau disponible auprès de notre Service Après-
vente ou votre détaillant spécialisé. Selon le type de tuyau :
ENGLISH
10
Cleaning and maintenance
ATTENTION: Always unplug the appliance when cleaning it
and when performing maintenance work. Do not use flammable
liquids to clean the machine.
CLEANING THE DISHWASHER
Any marks on the inside of the appliance may be
removed using a cloth dampened with water and
a little vinegar.
The external surfaces of the machine and the
control panel can be cleaned using a non-abrasive
cloth which has been dampened with water. Do
not use solvents or abrasive products.
PREVENTING UNPLEASANT ODOURS
Always keep the door of the appliance ajar in order to avoid mo-
isture from forming and being trapped inside the machine.
Clean the seals around the door and detergent dispensers regu-
larly using a damp sponge. This will avoid food becoming trapped
in the seals, which is the main cause behind the formation of
unpleasant odours.
CHEKING THE WATER SUPPLY HOSE
Check the inlet hose regularly for brittleness and cracks. If dama-
ged, replace it by a new hose available through our After-Sales
Service or your specialist dealer. Depending on the hose type:
If the inlet hose has a transparent coating, periodically check if
the colour intensifies locall . If yes, the hose may have a leak and
should be replaced.
For water stop hoses: check the small safety valve inspection
window (see arrow). If it is red, the water stop function was trig-
gered, and the hose must be replaced by a new one.
For unscrewing this hose, press the release button while unscre-
wing the hose.
CLEANING THE WATER INLET HOSE
If the water hoses are new or have not been used for an exten-
ded period of time, let the water run to make sure it is clear and
free of impurities before performing the necessary connections. If
this precaution is not taken, the water inlet could become blocked
and damage the dishwasher.
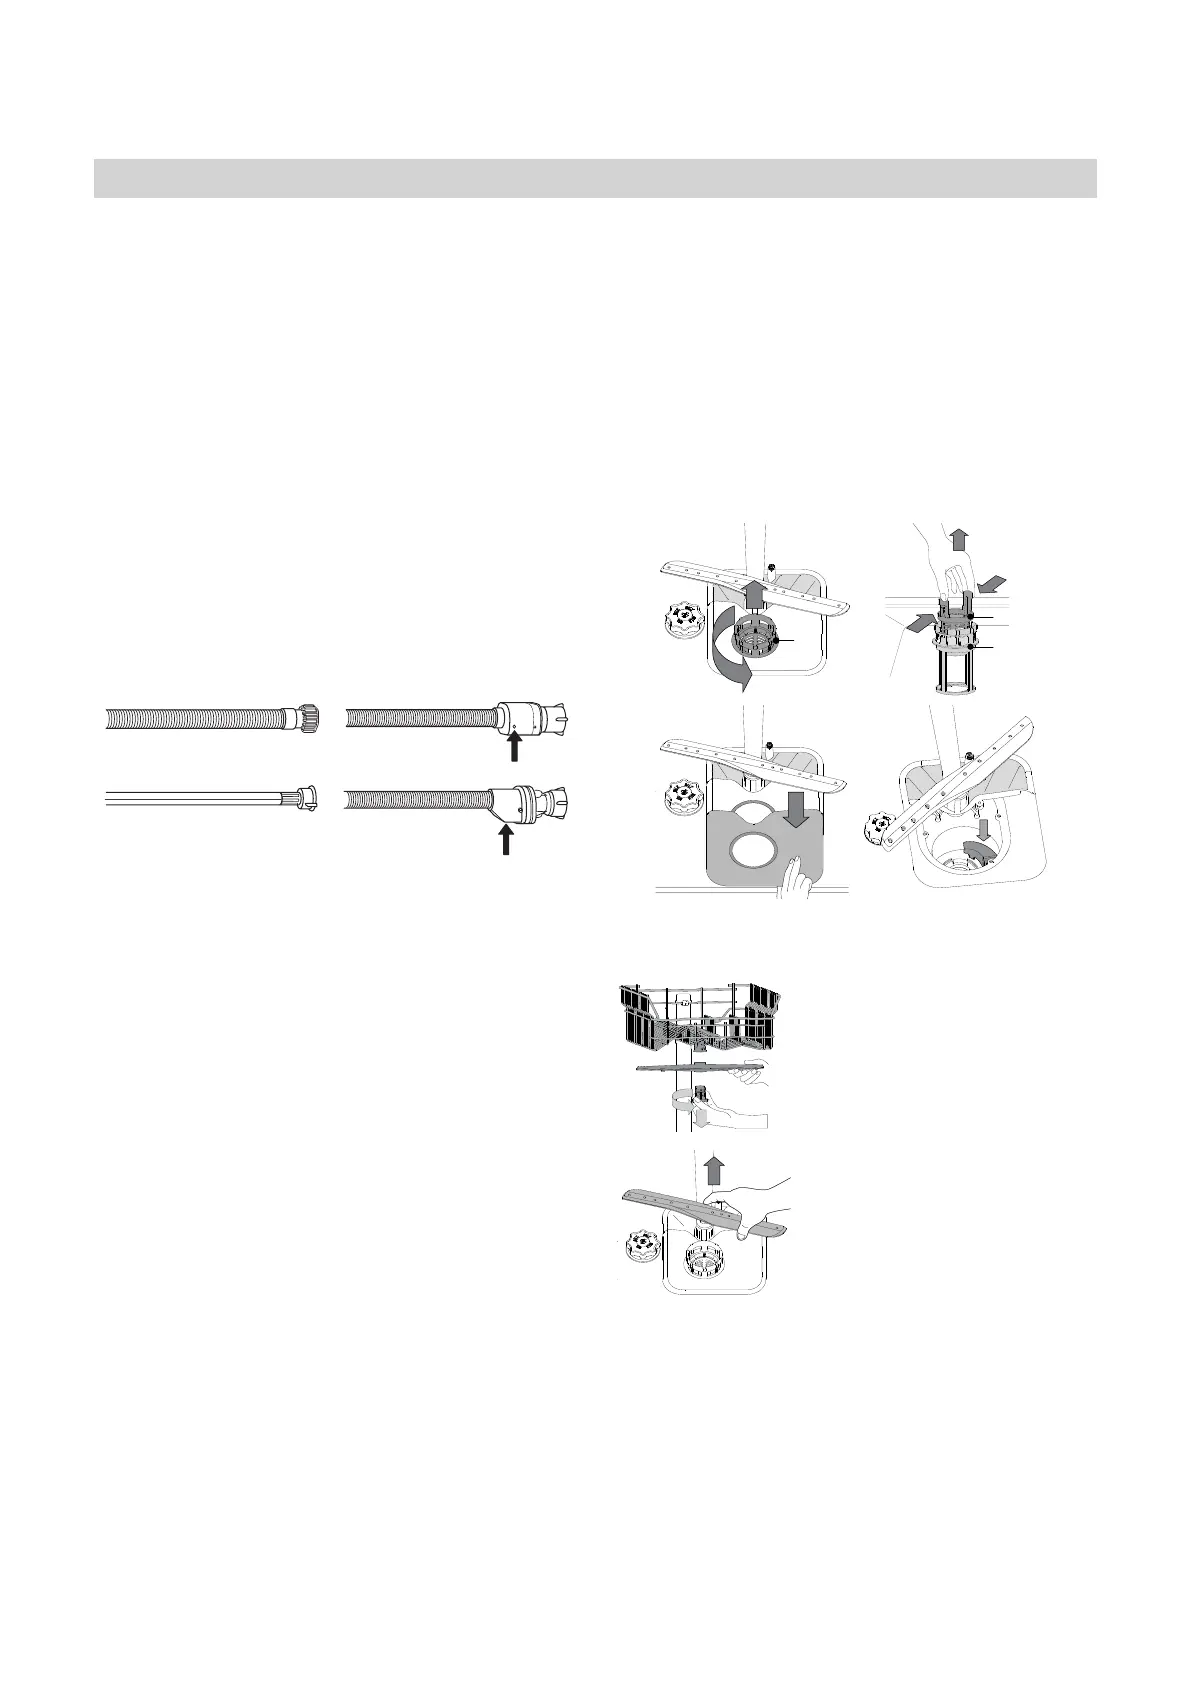
CLEANING THE FILTER ASSEMBLY
Regularly clean the filter assembly so that the filters do not clo
and that the waste water flows away correctl .
Using dishwasher with clogged lters or foreign objects inside l-
tration system or sprayarms may cause unit malfunction resulting
in lose of performance, noisy work or higher resources usage.
The filter assembly consists of three filters which remove foo
residues from the washing water and then recirculate the water:
to obtain the best washing results, you need to keep them clean.
The dishwasher must not be used without lters or if the
lter is loose.
At least once per month or after each 30 cycles, check the filter
assembly and if necessary clean it thoroughly under running
water, using a non-metallic brush and following the instructions
below:
1. Turn the cylindrical filter A in an anti-clockwise direction and
pull it out (Fig 1).
2. Remove the cup filter B by exerting a slight pressure on the
side flaps (Fig 2).
3. Slide out the stainless-steel plate filter C (Fig 3).
4. In case you find foreign objects (such as broken glass, porc -
lain, bones, fruit seeds etc.) please remove them carefully.
5. Inspect the trap and remove any food residues. NEVER RE-
MOVE the wash-cycle pump protection (black detail) (Fig 4).
After cleaning the filters, replace the filter assembly and fix it
position correctly; this is essential for maintaining the efficient
operation of the dishwasher.
CLEANING THE SPRAY ARMS
On occasions, food residue may
become encrusted onto the
spray arms and block the holes
used to spray the water. It is
therefore recommended that you
check the arms from time to time
and clean them with a small
non-metallic brush.
To remove the upper spray arm,
turn the plastic locking ring in an
anti-clockwise direction.
The upper spray arm should be
replaced so that the side with
the greater number of holes is
facing upwards.
The lower spray arm may be
removed by pulling it upwards.
WATER SOFTENING SYSTEM
Water softener automatically reduces water hardness, conse-
quently preventing scale buildup on heater, contributing also to
better cleaning efficienc . This system regenerates itself with salt,
therefore it is required to refill salt container when empt . Frequen-
cy
of regeneration depends on water hardness level setting - by
default regeneration takes place once per 5 Eco cycles with water
hardness level set to 3. Regeneration process starts in final rins
and finishes in drying phase, before cycle ends
Single regeneration consumes: ~3.5L of water; takes up to 5 addi-
tional minutes for the cycle; consumes below 0.005kWh of energy.
A
A
B
C
12
34
Si le tuyau d’arrivée a un revêtement transparent, vériez si la
couleur est plus prononcée à certains endroits. Si c’est le cas, il
pourrait y avoir une fuite et il doit être remplacé.
Pour les tuyaux d’arrêt d’eau : vériez la petite fenêtre
d’inspection de la soupape de sécurité (voir la èche). Si elle est
rouge, la fonction d’arrêt d’eau a été déclenchée et le tuyau doit
être remplacé avec un nouveau. Pour dévisser ce tuyau, appuyez
le bouton déclencheur tout en dévissant le tuyau.
Nettoyer le tuyau d’arrivée d’eau
Si les tuyaux d’eau sont neufs ou s’ils n’ont pas été utilisés
depuis longtemps, laissez l’eau couler pour vous assurer qu’il
n’y a pas d’impureté ou de saleté avant de les brancher. Si
vous n’eectuez pas cette opération, l’arrivée d’eau pourrait se
boucher et endommager le lave-vaisselle.
Nettoyer l’ensemble ltre
Nettoyez régulièrement l’ensemble ltre pour éviter qu’il ne se
bouche et pour permettre aux eaux usées de bien s’éliminer.
L’utilisation du lave-vaisselle avec des ltres obstrués ou des
objets étrangers à l’intérieur du système de ltration ou des
bras de pulvérisation peut provoquer un dysfonctionnement
donnant lieu à une perte de performances, un fonctionnement
bruyant ou une utilisation supérieure des ressources.
L’ensemble ltre comprend trois ltres qui séparent les résidus
de nourriture de l’eau de lavage pour ensuite faire circuler l’eau :
vous devez les garder propre pour obtenir les meilleurs résultats
lors du lavage.
N’utilisez pas le lave-vaisselle sans les ltres ou si un ltre
est mal ajusté.
Au moins une fois par mois, ou tous les 30 cycles, vériez
l’ensemble ltre et si nécessaire, nettoyez-le minutieusement sous
l’eau courante, en utilisant une brosse non-métallique et en suivant
les instructions ci-dessous :
1. Tournez le ltre cylindrique A dans le sens antihoraire et
retirez-le (Fig. 1).
2. Enlevez le panier du ltre B en appliquant une légère
pression sur les volets latéraux (Fig. 2).
3. Retirez la plaque du ltre en acier inoxydable C (Fig. 3).
4. Si vous trouvez des objets étrangers (comme du verre
cassé, de la porcelaine, des os, des grains de fruits, etc) il
convient de les enlever minutieusement.
5. Inspecter la cavité et enlever les résidus de nourriture. NE
JAMAIS ENLEVER la protection de la pompe du cycle de
lavage (détails en couleur noir) (Fig 4).
EN
13
CLEANING THE FILTER ASSEMBLY
Regularly clean the lter assembly so that the lters do not clog
and that the waste water ows away correctly.
Using dishwasher with clogged lters or foreign objects inside l-
tration system or sprayarms may cause unit malfunction resulting
in lose of performance, noisy work or higher resources usage.
The lter assembly consists of three lters which remove food
residues from the washing water and then recirculate the water:
to obtain the best washing results, you need to keep them clean.
The dishwasher must not be used without lters or if the
lter is loose.
At least once per month or after each 30 cycles, check the lter
assembly and if necessary clean it thoroughly under running water,
using a non-metallic brush and following the instructions below:
1. Turn the cylindrical lter A in an anti-clockwise direction and
pull it out (Fig 1).
2. Remove the cup lter B by exerting a slight pressure on the
side aps (Fig 2).
3. Slide out the stainless-steel plate lter C (Fig 3).
4. In case you nd foreign objects (such as broken glass, porce-
lain, bones, fruit seeds etc.) please remove them carefully.
5. Inspect the trap and remove any food residues. NEVER
REMOVE the wash-cycle pump protection (black detail) (Fig 4).
After cleaning the lters, re-place the lter assembly and x it in
position correctly; this is essential for maintaining the efcient
operation of the dishwasher.
CLEANING THE SPRAY ARMS
On occasions, food residue may
become encrusted onto the spray
arms and block the holes used
to spray the water. It is therefore
recommended that you check the
arms from time to time and clean
them with a small non-metallic
brush.
To remove the upper spray arm,
turn the plastic locking ring in an
anti-clockwise direction.
The upper spray arm should be replaced so that the side with the
greater number of holes is facing upwards.
The lower spray arm may be
removed by pulling it upwards.
WATER SOFTENING SYSTEM
Water softener automatically reduces water hardness, conse-
quently preventing scale buildup on heater, contributing also to
better cleaning efciency. This system regenerates itself with
salt,
therefore it is required to rell salt container when empty.
Frequency
of regeneration depends on water hardness level set-
ting - by default regeneration takes place once per 5 Eco cycles
with water hardness level set to 3. Regeneration process starts in
nal rinse and nishes in drying phase, before cycle ends.
• Single regeneration consumes: ~3.5L of water;
• Takes up to 5 additional minutes for the cycle;
• Consumes below 0.005kWh of energy.
1 2
3 4
A
A
B
C
TROUBLESHOOTING
In case your dishwasher doesn’t work properly, check if the problem can be solved by going through the following list.
For other errors or issues please contact authorized After-sales Service which contact details can be found in the warranty
booklet. The manufacturer ensures the availability of spare parts for at least 10 years after production date of this appliance.
PROBLEMS POSSIBLE CAUSES SOLUTIONS
Salt indicator is lit
Salt reservoir is empty. (After rell
the salt indicator may remain lit for
several wash cycles).
Rell reservoir with salt (for more information - see page 8).
Adjust water hardness - see table, page 8.
Rinse aid indicator is lit
Rinse aid dispenser is empty. (After
rell the rinse aid indicator may
remain lit for several wash cycles).
Rell dispenser with rinse aid (for more information - see page 8).
The dishwasher won’t start or
does not respond to com-
mands.
The appliance has not been
plugged in properly.
Insert the plug into the socket.
Power outage. The dishwasher starts automatically when the power returns.
The dishwasher door is not closed. Vigorously push the door until you hear the “click”.
It does not respond to commands.
Display shows: 9 or 12 and
On/Off LED is blinking rapidly.
Switch off the appliance by pressing the ON/OFF button, switch it back
on after approximately one minute and reset the program.
If problem persists, unplug the appliance for 1 minute, then plug it back in.
Après avoir nettoyé les ltres, remplacez l’ensemble ltre et
xez-le correctement en position ; c’est très important pour que
le lave-vaisselle garde son ecacité.
EN
13
CLEANING THE FILTER ASSEMBLY
Regularly clean the lter assembly so that the lters do not clog
and that the waste water ows away correctly.
Using dishwasher with clogged lters or foreign objects inside l-
tration system or sprayarms may cause unit malfunction resulting
in lose of performance, noisy work or higher resources usage.
The lter assembly consists of three lters which remove food
residues from the washing water and then recirculate the water:
to obtain the best washing results, you need to keep them clean.
The dishwasher must not be used without lters or if the
lter is loose.
At least once per month or after each 30 cycles, check the lter
assembly and if necessary clean it thoroughly under running water,
using a non-metallic brush and following the instructions below:
1. Turn the cylindrical lter A in an anti-clockwise direction and
pull it out (Fig 1).
2. Remove the cup lter B by exerting a slight pressure on the
side aps (Fig 2).
3. Slide out the stainless-steel plate lter C (Fig 3).
4. In case you nd foreign objects (such as broken glass, porce-
lain, bones, fruit seeds etc.) please remove them carefully.
5. Inspect the trap and remove any food residues. NEVER
REMOVE the wash-cycle pump protection (black detail) (Fig 4).
After cleaning the lters, re-place the lter assembly and x it in
position correctly; this is essential for maintaining the efcient
operation of the dishwasher.
CLEANING THE SPRAY ARMS
On occasions, food residue may
become encrusted onto the spray
arms and block the holes used
to spray the water. It is therefore
recommended that you check the
arms from time to time and clean
them with a small non-metallic
brush.
To remove the upper spray arm,
turn the plastic locking ring in an
anti-clockwise direction.
The upper spray arm should be replaced so that the side with the
greater number of holes is facing upwards.
The lower spray arm may be
removed by pulling it upwards.
WATER SOFTENING SYSTEM
Water softener automatically reduces water hardness, conse-
quently preventing scale buildup on heater, contributing also to
better cleaning efciency. This system regenerates itself with
salt,
therefore it is required to rell salt container when empty.
Frequency
of regeneration depends on water hardness level set-
ting - by default regeneration takes place once per 5 Eco cycles
with water hardness level set to 3. Regeneration process starts in
nal rinse and nishes in drying phase, before cycle ends.
• Single regeneration consumes: ~3.5L of water;
• Takes up to 5 additional minutes for the cycle;
• Consumes below 0.005kWh of energy.
1 2
3 4
A
A
B
C
TROUBLESHOOTING
In case your dishwasher doesn’t work properly, check if the problem can be solved by going through the following list.
For other errors or issues please contact authorized After-sales Service which contact details can be found in the warranty
booklet. The manufacturer ensures the availability of spare parts for at least 10 years after production date of this appliance.
PROBLEMS POSSIBLE CAUSES SOLUTIONS
Salt indicator is lit
Salt reservoir is empty. (After rell
the salt indicator may remain lit for
several wash cycles).
Rell reservoir with salt (for more information - see page 8).
Adjust water hardness - see table, page 8.
Rinse aid indicator is lit
Rinse aid dispenser is empty. (After
rell the rinse aid indicator may
remain lit for several wash cycles).
Rell dispenser with rinse aid (for more information - see page 8).
The dishwasher won’t start or
does not respond to com-
mands.
The appliance has not been
plugged in properly.
Insert the plug into the socket.
Power outage. The dishwasher starts automatically when the power returns.
The dishwasher door is not closed. Vigorously push the door until you hear the “click”.
It does not respond to commands.
Display shows: 9 or 12 and
On/Off LED is blinking rapidly.
Switch off the appliance by pressing the ON/OFF button, switch it back
on after approximately one minute and reset the program.
If problem persists, unplug the appliance for 1 minute, then plug it back in.
Nettoyage des bras d’aspersion
À l’occasion, des résidus de nourriture
s’incrustent dans les gicleurs et
bloquent les trous utilisés pour
asperger de l’eau. Il est donc conseillé
de vérier les gicleurs de temps en
temps et de les nettoyer avec une
petite brosse non métallique.
Pour enlever le bras d’aspersion
supérieur, tournez l’anneau de
verrouillage en plastique dans le
sens antihoraire. Le bras d’aspersion
supérieur doit être replacé de façon
que le côté avec le plus grand nombre
de trous est placé vers le haut.
Le gicleur inférieur peut être enlevé en
le tirant vers le haut.
Système d’adoucisseur d’eau
Un adoucisseur d’eau réduit automatiquement la dureté de
l’eau, en évitant ainsi la formation de calcaire sur la résistance,
et en contribuant également à une meilleure ecacité de
nettoyage. Ce système se régénère automatiquement avec
du sel, il est donc requis de remplir le récipient de sel lorsqu’il
est vide. La fréquence de régénération dépend du réglage du
niveau de dureté de l’eau - la régénération par défaut a lieu une
fois tous les 5 cycles Éco avec un niveau de dureté de l’eau réglé
à 3. Le processus de régénération démarre lors des rinçages
naux et prend n en phase de séchage, an la n du cycle. La
régénération seule consomme :
- ~3,5L d’eau ;
- elle prend 5 minutes de plus pour le cycle ;
- elle consomme moins de 0,005kWh d’énergie.
Nettoyage et entretien
 Loading...