FRANÇAIS 36
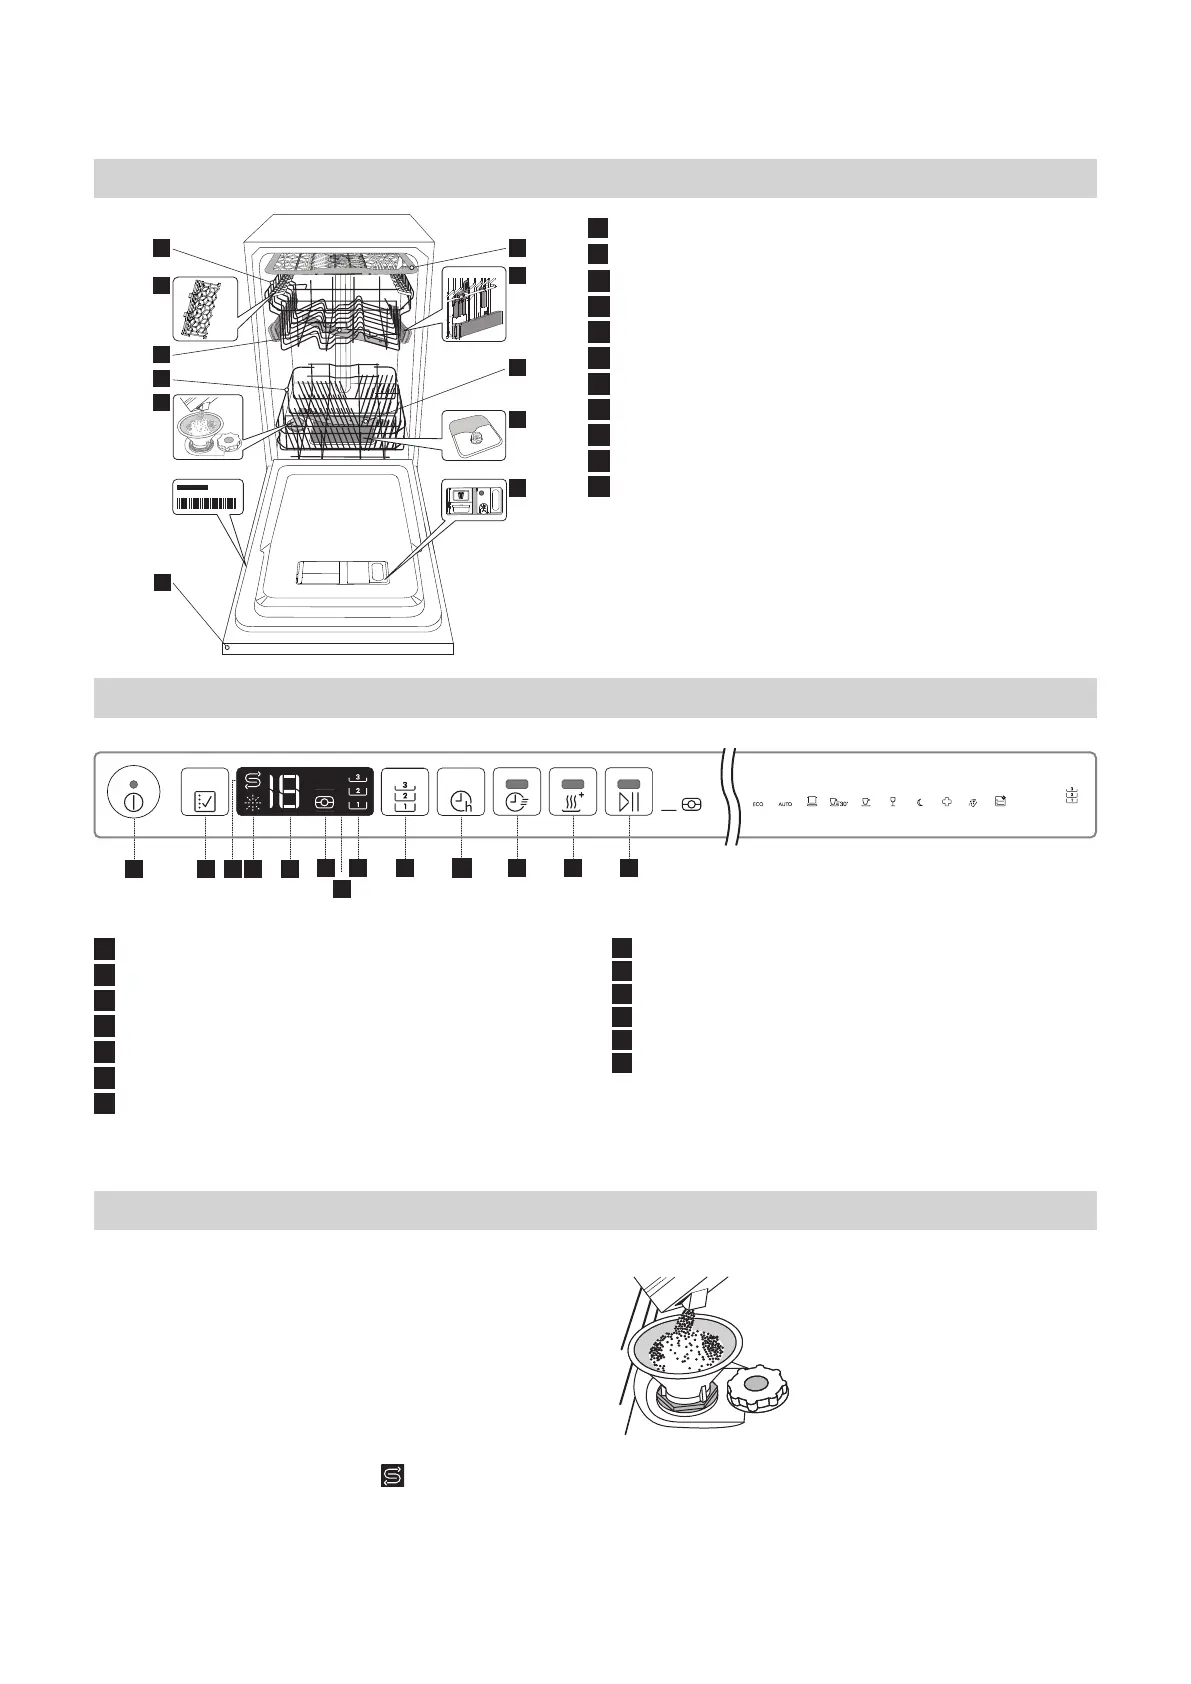
Description du produit
1
Panier supérieur
2
Plateau à couverts
3
Bouton de réglage de la hauteur du panier supérieur
4
Bras d’aspersion supérieur
5
Panier inférieur
6
Panier à couvert
7
Bras d’aspersion inférieur
8
Ensemble ltre
9
Réservoir à sel
10
Distributeurs de détergent et liquide de rinçage
11
Panneau de commande
Panneau de conguration
Première utilisation
Conseils au sujet de la première utilisation
Après l’installation, enlevez les boulons d’arrêt sur les paniers et
les éléments élastiques qui retiennent le panier supérieur
Remplissage du réservoir à sel
’utilisation de sel empêche la formation de CALCAIRE sur la
vaisselle et sur les composantes fonctionnelles de l’appareil.
• LE RÉSERVOIR DE SEL NE DOIT JAMAIS ÊTRE VIDE.
• Il est important de régler la dureté de l’eau.
Le réservoir de sel est situé dans la partie inférieure du lave-
vaisselle (voir DESCRIPTION DU PRODUIT) et il doit être rempli
quand le voyant REMPLISSAGE DE SEL
ENGLISH
7
Control panel
Product description
1. Upper rack
2. �������
3. Upper rack height adjuster
4. Upper sprayer arm
5. Lower rack
6. Cutlery basket
7. Lower sprayer arm
8. Filter Assembly
9. Salt reservoir
10. Detergent and Rinse Aid dispensers
11. Rating plate
12. Control panel
1
2
3
4
5
6
10
7
11
9
8
First use
ADVICE REGARDING THE FIRST TIME USE
After installation, remove the stoppers from the racks and the
retaining elastic elements from the upper rack.
FILLING THE SALT RESERVOIR
The use of salt prevents the formation of LIMESCALE on the
dishes andon the machine’s functional components.
• It is important that the salt reservoir be never empty.
• It is important to set the water hardness.
The salt reservoir is located in the lower part of the
dishwasher (see PRODUCT DESCRIPTION) and should be
filled when the SALT REFILL indicator light in the
control panel is lit .
1. Remove the lower rack and
unscrew the reservoir cap
(anticlockwise).
2. Only the first time you do this: fill
the salt reservoir with water.
3. Position the funnel (see figure)
and fill the salt reservoir right up
to its edge (approximately 1 kg);
it is not unusual for a little water to
leak out.
4. Remove the funnel and wipe any
salt residue away from the
opening.
1. On-Off/Reset button with indicator light
2. Program selection button
3. Salt refill indicator ligh
4. Rinse Aid refill indicator ligh
5. Program number and delay time indicator
6. Tablet indicator light
7. Display
8. Half Load indicator light
9. Half Load button
10. Delay button
11. START/Pause button with indicator light / Tab
1 2 3 4 5 6 7 8 9 10
11
3sec
h
sur le panneau de
commande est allumé.
1. Enlevez le panier inférieur et
dévissez le bouchon du réservoir
(sens antihoraire).
2. Seulement lors de la première
opération: remplissez le réservoir
de sel avec de l’eau.
3. Placez l’entonnoir (voir gure)
et remplissez le réservoir de sel
jusqu’au bord (environ 1 kg); il est
normal qu’un peu d’eau déborde.
4. Enlevez l’entonnoir et essuyez les
résidus de sel autour de l’ouverture.
1
Touche et voyant Marche-Arrêt/Réinitialisation
2
Bouton de sélection de programme
3
Témoin de remplissage de sel
4
Témoin de remplissage de liquide de rinçage
5
Voyant pour le numéro du programme et le temps restant
6
Voyant tablette
7
Écran
8
Témoin de lavage exible
9
Bouton de lavage exible
10
Bouton de démarrage diéré
11
Touche Programme court avec voyant
12
Touche Extra Dry avec le voyant
13
Bouton DÉPART/Pause avec témoin / Tablette
ENGLISH
7
Control panel
Product description
1. Upper rack
2. �������
3. Upper rack height adjuster
4. Upper sprayer arm
5. Lower rack
6. Cutlery basket
7. Lower sprayer arm
8. Filter Assembly
9. Salt reservoir
10. Detergent and Rinse Aid dispensers
11. Rating plate
12. Control panel
1
2
3
4
5
6
10
7
11
9
8
First use
ADVICE REGARDING THE FIRST TIME USE
After installation, remove the stoppers from the racks and the
retaining elastic elements from the upper rack.
FILLING THE SALT RESERVOIR
The use of salt prevents the formation of LIMESCALE on the
dishes andon the machine’s functional components.
• It is important that the salt reservoir be never empty.
• It is important to set the water hardness.
The salt reservoir is located in the lower part of the
dishwasher (see PRODUCT DESCRIPTION) and should be
filled when the SALT REFILL indicator light in the
control panel is lit .
1. Remove the lower rack and
unscrew the reservoir cap
(anticlockwise).
2. Only the first time you do this: fill
the salt reservoir with water.
3. Position the funnel (see figure)
and fill the salt reservoir right up
to its edge (approximately 1 kg);
it is not unusual for a little water to
leak out.
4. Remove the funnel and wipe any
salt residue away from the
opening.
1. On-Off/Reset button with indicator light
2. Program selection button
3. Salt refill indicator ligh
4. Rinse Aid refill indicator ligh
5. Program number and delay time indicator
6. Tablet indicator light
7. Display
8. Half Load indicator light
9. Half Load button
10. Delay button
11. START/Pause button with indicator light / Tab
1 2 3 4 5 6 7 8 9 10
11
3sec
h
1 2 3 4 5
6 8 9 10 11 12 13
7
2
65°
1
50°
5
6
10 PROGRAMS
3
50°
4
45°
7
50°
8
65°
10
50°-60° 50°
9
65°
h
3sec
4
2
7
8
10
1
3
5
6
9
11
0000 000 00000
Service:

 Loading...