ENGLISH 7
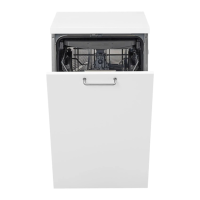
Product description
1
Upper rack
2
Cutlery rack
3
Foldable aps
4
Upper rack height adjuster
5
Upper sprayer arm
6
Lower rack
7
Lower sprayer arm
8
Filter Assembly
9
Salt reservoir
10
Detergent and Rinse Aid dispensers
11
Control pannel
Control panel
First Use
Advice regarding the rst time use
After installation, remove the stoppers from the racks and the
retaining elastic elements from the upper rack
Filling the salt reservoir
The use of salt prevents the formation of LIMESCALE on the
dishes andon the machine’s functional components.
• It is mandatory that THE SALT RESERVOIR BE NEVER EMPTY.
• It is important to set the water hardness.
The salt reservoir is located in the lower part of the dishwasher
(see PRODUCT DESCRIPTION) and should be lled when the
SALT REFILL indicator light
ENGLISH
7
Control panel
Product description
1. Upper rack
2. �������
3. Upper rack height adjuster
4. Upper sprayer arm
5. Lower rack
6. Cutlery basket
7. Lower sprayer arm
8. Filter Assembly
9. Salt reservoir
10. Detergent and Rinse Aid dispensers
11. Rating plate
12. Control panel
1
2
3
4
5
6
10
7
11
9
8
First use
ADVICE REGARDING THE FIRST TIME USE
After installation, remove the stoppers from the racks and the
retaining elastic elements from the upper rack.
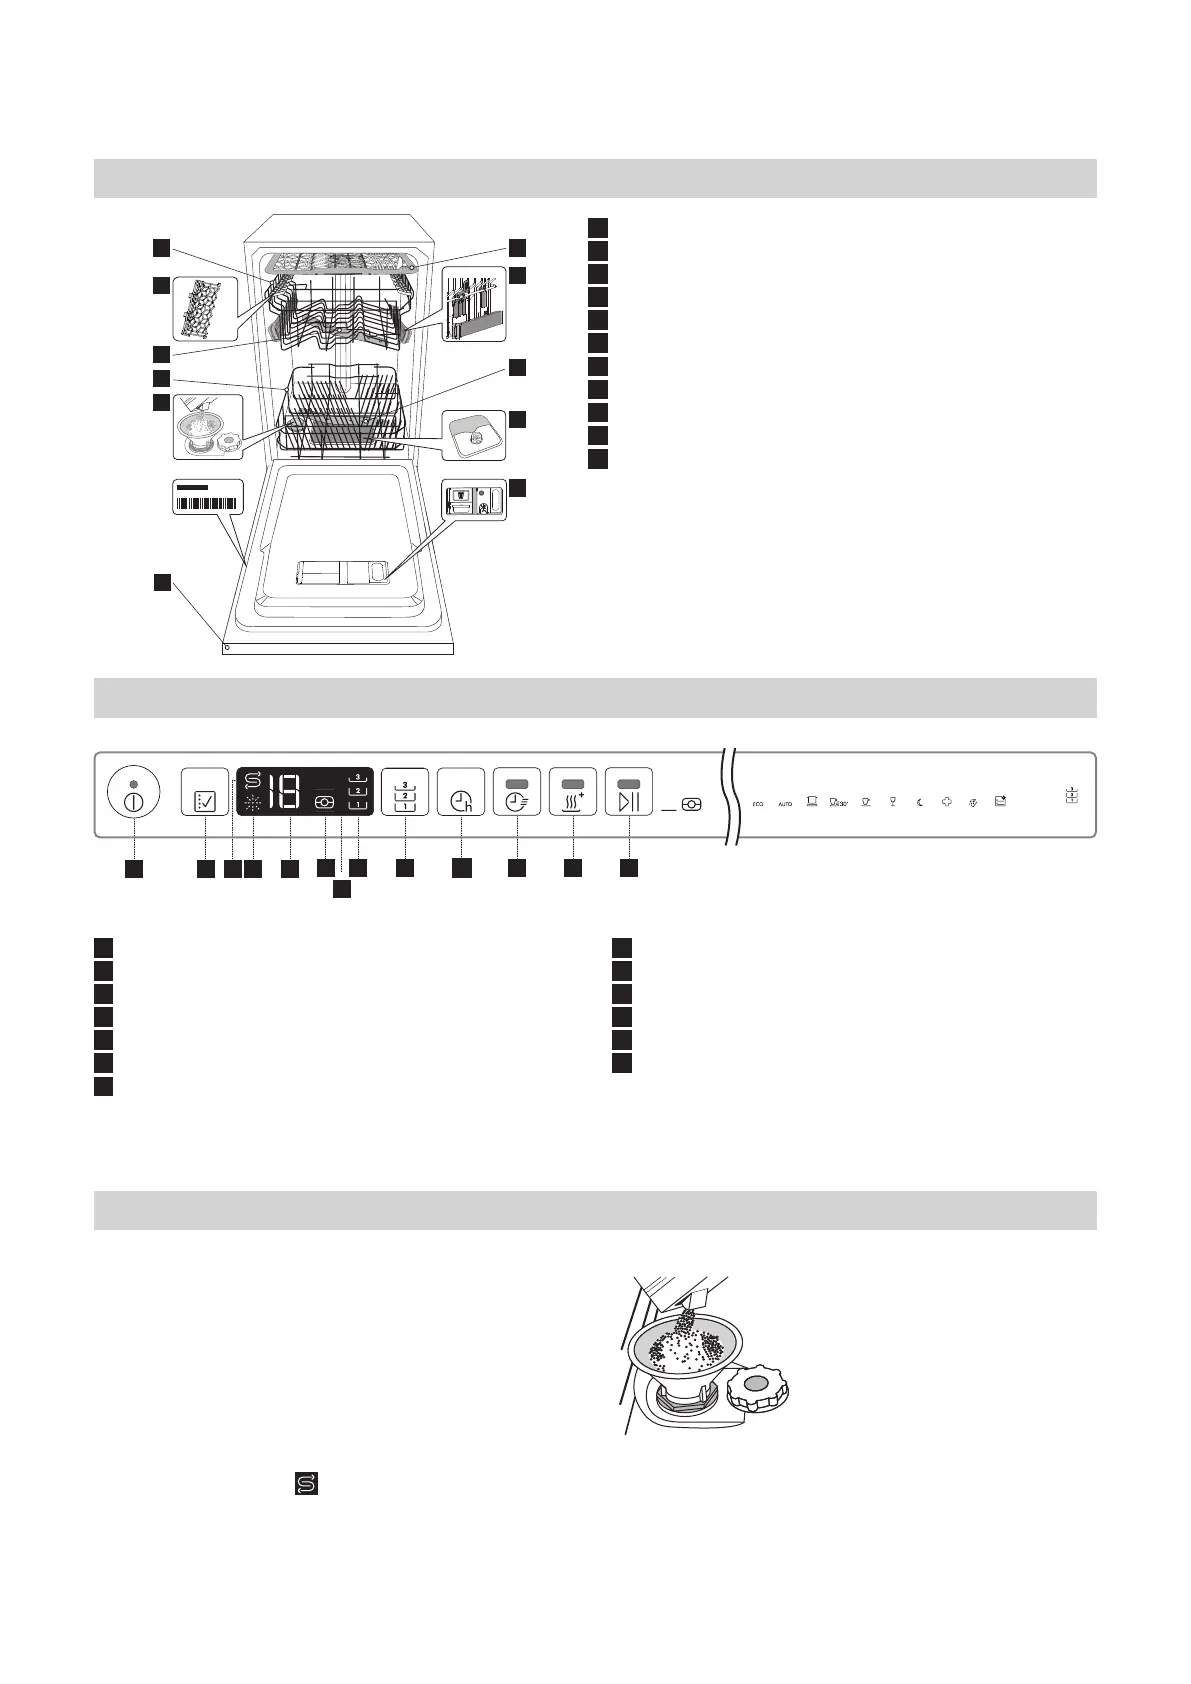
FILLING THE SALT RESERVOIR
The use of salt prevents the formation of LIMESCALE on the
dishes andon the machine’s functional components.
• It is important that the salt reservoir be never empty.
• It is important to set the water hardness.
The salt reservoir is located in the lower part of the
dishwasher (see PRODUCT DESCRIPTION) and should be
filled when the SALT REFILL indicator light in the
control panel is lit .
1. Remove the lower rack and
unscrew the reservoir cap
(anticlockwise).
2. Only the first time you do this: fill
the salt reservoir with water.
3. Position the funnel (see figure)
and fill the salt reservoir right up
to its edge (approximately 1 kg);
it is not unusual for a little water to
leak out.
4. Remove the funnel and wipe any
salt residue away from the
opening.
1. On-Off/Reset button with indicator light
2. Program selection button
3. Salt refill indicator ligh
4. Rinse Aid refill indicator ligh
5. Program number and delay time indicator
6. Tablet indicator light
7. Display
8. Half Load indicator light
9. Half Load button
10. Delay button
11. START/Pause button with indicator light / Tab
1 2 3 4 5 6 7 8 9 10
11
3sec
h
in the control panel is lit .
1. Remove the lower rack and
unscrew the reservoir cap
(anticlockwise).
2. Only the rst time you do this:
ll the salt reservoir with water.
3. Position the funnel (see gure)
and ll the salt reservoir right up
to its edge (approximately 1 kg); it
is not unusual for a little water to
leak out.
4. Remove the funnel and wipe
any salt residue away from the
opening.
1
On-O/Reset button with indicator light
2
Program selection button
3
Salt rell indicator ligh
4
Rinse Aid rell indicator ligh
5
Program number and delay time indicator
6
Tablet indicator light
7
Display
8
Flexible Wash indicator light
9
Flexible Wash button
10
Delay button
11
Short Time button with indicator light
12
Extra Dry button with indicator light
13
START/Pause button with indicator light / Tab
ENGLISH
7
Control panel
Product description
1. Upper rack
2. �������
3. Upper rack height adjuster
4. Upper sprayer arm
5. Lower rack
6. Cutlery basket
7. Lower sprayer arm
8. Filter Assembly
9. Salt reservoir
10. Detergent and Rinse Aid dispensers
11. Rating plate
12. Control panel
1
2
3
4
5
6
10
7
11
9
8
First use
ADVICE REGARDING THE FIRST TIME USE
After installation, remove the stoppers from the racks and the
retaining elastic elements from the upper rack.
FILLING THE SALT RESERVOIR
The use of salt prevents the formation of LIMESCALE on the
dishes andon the machine’s functional components.
• It is important that the salt reservoir be never empty.
• It is important to set the water hardness.
The salt reservoir is located in the lower part of the
dishwasher (see PRODUCT DESCRIPTION) and should be
filled when the SALT REFILL indicator light in the
control panel is lit .
1. Remove the lower rack and
unscrew the reservoir cap
(anticlockwise).
2. Only the first time you do this: fill
the salt reservoir with water.
3. Position the funnel (see figure)
and fill the salt reservoir right up
to its edge (approximately 1 kg);
it is not unusual for a little water to
leak out.
4. Remove the funnel and wipe any
salt residue away from the
opening.
1. On-Off/Reset button with indicator light
2. Program selection button
3. Salt refill indicator ligh
4. Rinse Aid refill indicator ligh
5. Program number and delay time indicator
6. Tablet indicator light
7. Display
8. Half Load indicator light
9. Half Load button
10. Delay button
11. START/Pause button with indicator light / Tab
1 2 3 4 5 6 7 8 9 10
11
3sec
h
1 2 3 4 5
6 8 9 10 11 12 13
7
2
65°
1
50°
5
6
10 PROGRAMS
3
50°
4
45°
7
50°
8
65°
10
50°-60° 50°
9
65°
h
3sec
4
2
7
8
10
1
3
5
6
9
11
0000 000 00000
Service:
 Loading...