ITALIANO 54
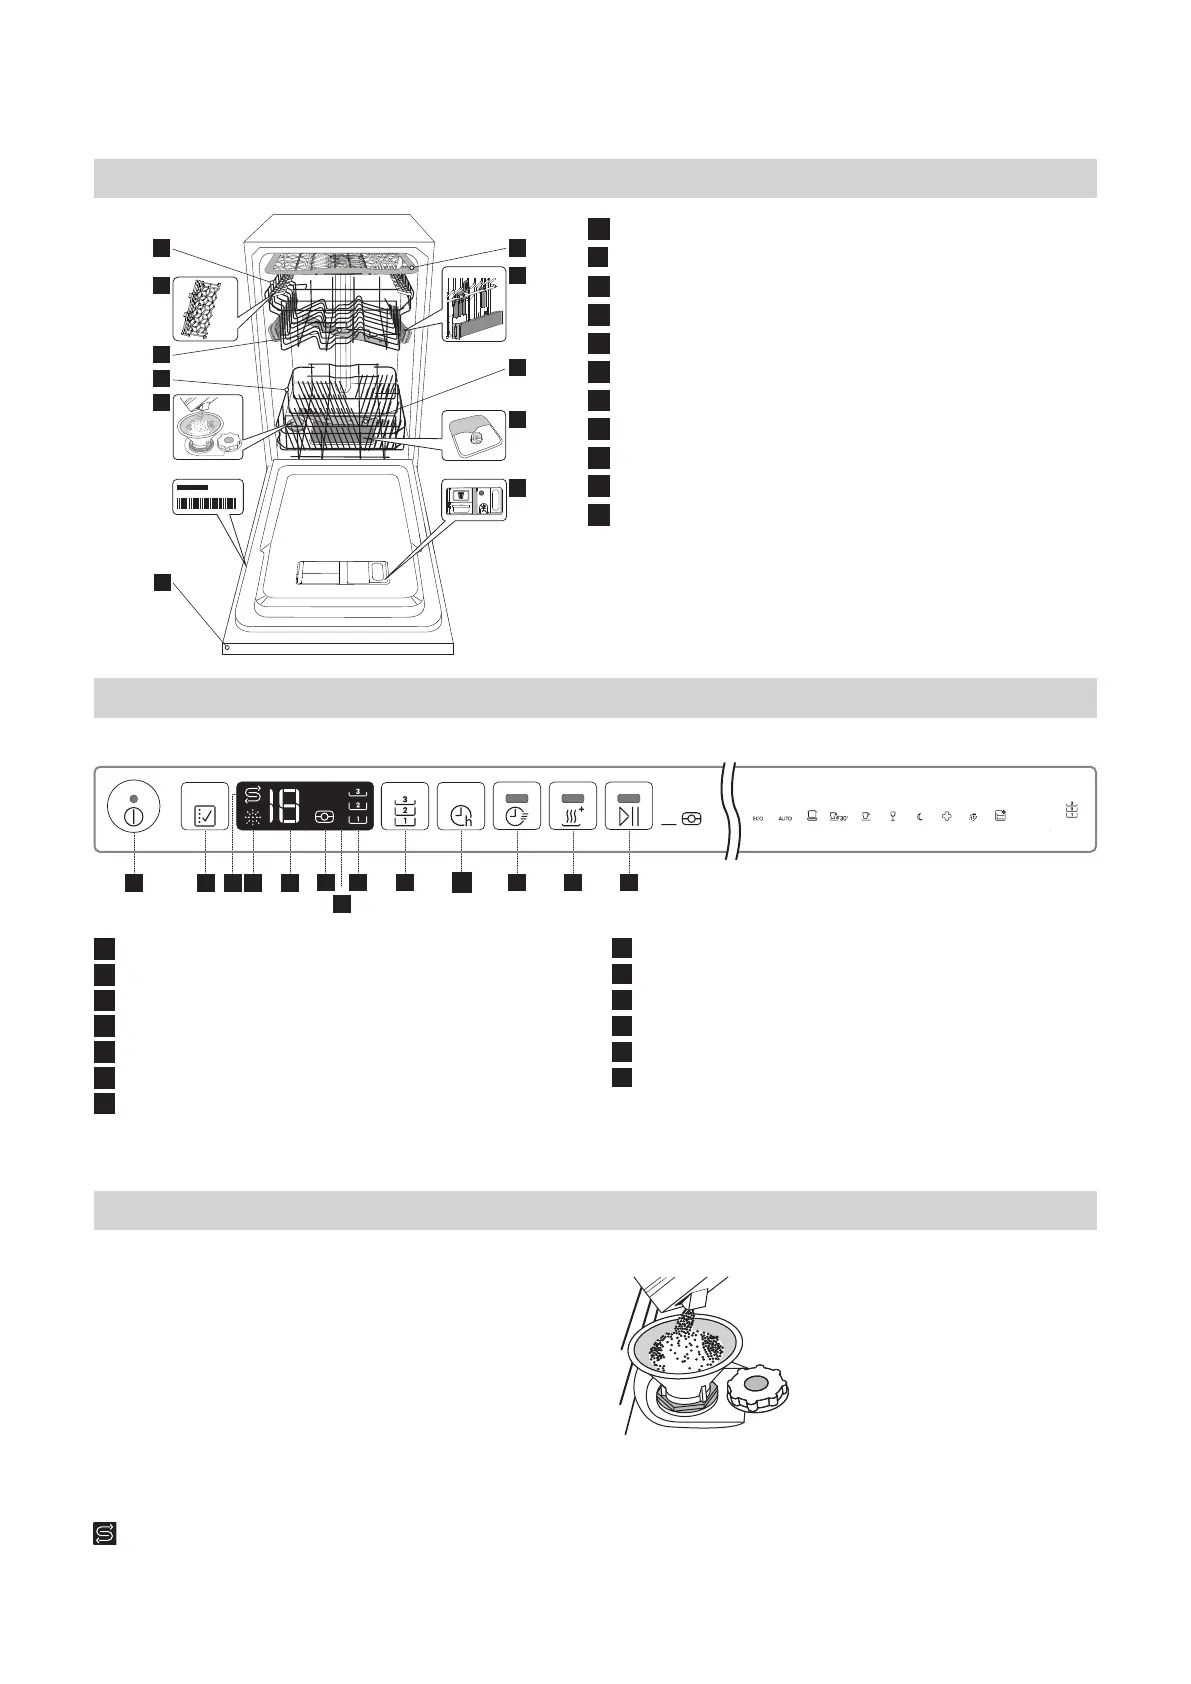
Descrizione del prodotto
1
Cestello superiore
2
Cestello portaposate
3
Regolatore altezza cestello superiore
4
Aspersore superiore
5
Cestello inferiore
6
Cestello portaposate
7
Aspersore inferiore
8
Gruppo ltro
9
Distributore del sale
10
Distributori per detersivo e brillantante
11
Pannello comandi
Pannello comandi
Primo utilizzo
Suggerimento per il primo utilizzo
Dopo aver completato l’installazione, togliere i fermi dai cestelli
e gli elementi elastici di ritegno dal cestello superiore
Riempimento del serbatoio del sale
L’uso di sale previene la formazione di CALCARE sulla supercie
dei piatti e sui componenti della macchina.
• È indispensabile che IL SERBATOIO DEL SALE NON SIA MAI
VUOTO.
• È essenziale quindi che il livello di durezza dell’acqua sia stato
impostato.
Il serbatoio del sale è situato nella parte inferiore della
lavastoviglie (vedere DESCRIZIONE DEI PRODOTTO) e deve
essere rifornito ogni volta che l’indicatore di RIEMPIMENTO SALE
ENGLISH
7
Control panel
Product description
1. Upper rack
2. �������
3. Upper rack height adjuster
4. Upper sprayer arm
5. Lower rack
6. Cutlery basket
7. Lower sprayer arm
8. Filter Assembly
9. Salt reservoir
10. Detergent and Rinse Aid dispensers
11. Rating plate
12. Control panel
1
2
3
4
5
6
10
7
11
9
8
First use
ADVICE REGARDING THE FIRST TIME USE
After installation, remove the stoppers from the racks and the
retaining elastic elements from the upper rack.
FILLING THE SALT RESERVOIR
The use of salt prevents the formation of LIMESCALE on the
dishes andon the machine’s functional components.
• It is important that the salt reservoir be never empty.
• It is important to set the water hardness.
The salt reservoir is located in the lower part of the
dishwasher (see PRODUCT DESCRIPTION) and should be
filled when the SALT REFILL indicator light in the
control panel is lit .
1. Remove the lower rack and
unscrew the reservoir cap
(anticlockwise).
2. Only the first time you do this: fill
the salt reservoir with water.
3. Position the funnel (see figure)
and fill the salt reservoir right up
to its edge (approximately 1 kg);
it is not unusual for a little water to
leak out.
4. Remove the funnel and wipe any
salt residue away from the
opening.
1. On-Off/Reset button with indicator light
2. Program selection button
3. Salt refill indicator ligh
4. Rinse Aid refill indicator ligh
5. Program number and delay time indicator
6. Tablet indicator light
7. Display
8. Half Load indicator light
9. Half Load button
10. Delay button
11. START/Pause button with indicator light / Tab
1 2 3 4 5 6 7 8 9 10
11
3sec
h
sul pannello comandi si accende.
1. Togliere il cestello inferiore e svitare
il tappo del serbatoio (ruotare in
senso antiorario).
2. Solo la prima volta: riempire
d’acqua il serbatoio del sale.
3. Sistemare opportunamente
l’imbuto (vedere gura) e riempire il
serbatoio del sale no all’orlo (circa
1 kg); Non è inconsueto che l’acqua
trabocchi leggermente.
4. Togliere l’imbuto ed eliminare
qualsiasi residuo di sale dall’area
circostante l’apertura.
1
Tasto Accensione-Spegnimento/Ripristino e relativa spia
2
Tasto di selezione programmi
3
Spia di riempimento sale
4
Spia di riempimento brillantante
5
programma e indicatore di durata del ritardo
6
Spia pastiglie
7
Display
8
Spia Lavaggio essibile
9
Tasto Lavaggio essibile
10
Tasto Avvio ritardato
11
Tasto Rapido e relativa spia
12
Tasto Extra Dry e relativa spia
13
Tasto AVVIO/Pausa con spia / Pastiglie
ENGLISH
7
Control panel
Product description
1. Upper rack
2. �������
3. Upper rack height adjuster
4. Upper sprayer arm
5. Lower rack
6. Cutlery basket
7. Lower sprayer arm
8. Filter Assembly
9. Salt reservoir
10. Detergent and Rinse Aid dispensers
11. Rating plate
12. Control panel
1
2
3
4
5
6
10
7
11
9
8
First use
ADVICE REGARDING THE FIRST TIME USE
After installation, remove the stoppers from the racks and the
retaining elastic elements from the upper rack.
FILLING THE SALT RESERVOIR
The use of salt prevents the formation of LIMESCALE on the
dishes andon the machine’s functional components.
• It is important that the salt reservoir be never empty.
• It is important to set the water hardness.
The salt reservoir is located in the lower part of the
dishwasher (see PRODUCT DESCRIPTION) and should be
filled when the SALT REFILL indicator light in the
control panel is lit .
1. Remove the lower rack and
unscrew the reservoir cap
(anticlockwise).
2. Only the first time you do this: fill
the salt reservoir with water.
3. Position the funnel (see figure)
and fill the salt reservoir right up
to its edge (approximately 1 kg);
it is not unusual for a little water to
leak out.
4. Remove the funnel and wipe any
salt residue away from the
opening.
1. On-Off/Reset button with indicator light
2. Program selection button
3. Salt refill indicator ligh
4. Rinse Aid refill indicator ligh
5. Program number and delay time indicator
6. Tablet indicator light
7. Display
8. Half Load indicator light
9. Half Load button
10. Delay button
11. START/Pause button with indicator light / Tab
1 2 3 4 5 6 7 8 9 10
11
3sec
h
1 2 3 4 5
6 8 9 10 11 12 13
7
2
65°
1
50°
5
6
10 PROGRAMS
3
50°
4
45°
7
50°
8
65°
10
50°-60° 50°
9
65°
h
3sec
4
2
7
8
10
1
3
5
6
9
11
0000 000 00000
Service:
 Loading...