Copyright 2018, InnovaPrep LLC Patented https://www.innovaprep.com/patents
Step 4 – Advance to the Main Menu by pressing Enter (
⏎
) on the control panel.
Step 5 – Select Maintenance>Prime
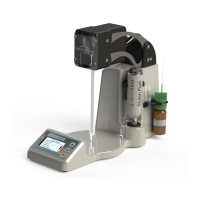
Step 6 – Follow the menu prompts: Place the Maintenance Tip into the Tip Interface Port as
shown in Figure 6.1 using the same procedure described in Section 4.5 for installing a CPT.
Select Continue.
Step 7 – Follow the menu prompt: Place Foam Can (Elution Fluid Canister) Into Position. Use
the installation instructions described in Section 4.4. Make sure the open end of the
permeate line is secured in a waste container. Select Continue. The instrument will purge
elution fluid from the canister through to the permeate. The instrument is now ready for use.
6.2 THE START UP PROCEDURE
Biological contaminants or salts from evaporated elution fluid can be damaging to the instrument if they are allowed to
produce particles large enough to clog the fluid path. The daily Shut Down and Start Up Maintenance Protocol is used to
clean and flush contaminants from the fluid path of the instrument.
The Start Up Procedure is accessed by selecting Main Menu > Maintenance > Start Up. The selection will guide the user
through a series of prompts. The prompts assume the user followed the Shut Down procedure, following the last
instrument use, which instructs the user to leave the Storage Fluid Adapter installed in the Canister Interface Port.
Step 1 – Ensure the required instrument components have been installed: Power Supply (Section 4.1), Permeate
Line (Section 4.2), Storage Fluid and Adapter (Section 4.3).
Step 2 – Power instrument on. Advance to the Main Menu by pressing Enter (
⏎
) on the control panel.
Step 3 – Select Maintenance>Start Up
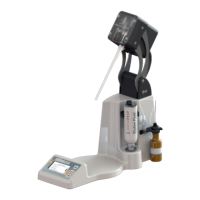
Step 4 – Follow the menu prompt: Place the Maintenance Tip into Tip Interface Port as shown in Figure 6.1 using
the same procedure described in Section 4.5 for installing a CPT. In practice, the Maintenance Tip should already
be in position in most cases, because it should be in place during periods of non - use. Select Continue.
Step 5 – Follow the menu prompt: Remove Storage Fluid Line from Can Interface Port. Cap the adapter fitting
and stow the tube set in the notch on the storage bracket as shown in Figure 4.3. Double check that the open
end of the permeate line is secured in a waste container. Select Continue. The instrument will purge the storage
fluid from the instrument’s fluidics. NOTE: DO NOT INSTALL AN ELUTION FLUID CANISTER UNTIL PROMPTED TO
DO SO IN STEP 6.
Step 6 – Follow the menu prompt: Place Foam Can into Position (see Section 4.4). Select Continue. The
instrument will prime the foam line with elution fluid. The instrument is now ready for use.
6.3 THE SHUT DOWN PROCEDURE
It is important to perform the Shut Down procedure at the end of each day of operation for the maintenance of the
instrument. The Shut Down procedure performs two important functions, instrument decontamination and the
prevention of salt crystals forming in the fluidics due to evaporation of the elution fluid.
Step 1 – From the Main Menu select Maintenance>Shut Down.