8
Section2:Installation
2.0 Pre‐InstallationChecklist
☐Unpackthelightingcontrolpanel.
☐Reportanydamagetothefreightcarrier.
☐Removetheenclosurecoverandsetaside.
☐Determineappropriatemountinglocationforpanel.
☐Mountthepaneltothewall.
☐Punchadditionalknockoutholesforhighandlowvoltageconduitrunsasrequired
☐
Pulltheline,neutral,andgroundwiresfromcircuitbreakerboxtothepanelandterminate.
☐Pullloadwiresfromlightingloadstopanelandterminate.
☐PullCAT5datalinewirestopanelsanddevicesandterminatewithRJ45connectors.
☐Testallcableswiththeappropriatecable
tester.
☐Pullalllowvoltageinputwiresandterminatetotheappropria teconnectors.
☐Cleanthecabinetofanyconstructiondebrisanddust.
☐Doublecheckallhighv oltageconnections.
☐Applypowertothepanel.
2.1MountingtheEnclosure
2.1.1Location
Determinetheproperlocationformountingthelightingcontroller.Typically,thepanelsaremounted
nearthelightingloadstobecontrolled.
2.1.2EnvironmentalConsiderations
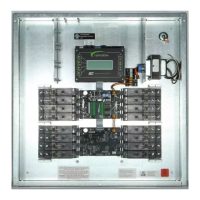
TheEVOIntegratedRelayPanelisinstalledinaNEMA1enclosuredesignedforindoorapplications.The
panelshouldbemountedinanareawithanambienttemperaturebetween 0and50°C(32°‐122°F),
humidityfrom10to90%non‐condensing,non‐explosive/corrosiveatmosphere,andstationary.
2.1.3Mounting
Theenclosureisprovidedwith4holeslocatedateachcorneroftheenclosure.Securetheenclosureto
themountingsurfacewiththeappropriatehardwarefortheapplication.
2.2WiringtheEVO‐INT
2.2.1LineandLoadWires
Pulla16A120VACor277VACcircuittotheLine1(L1)terminalforpoweringthefirstfourrelays(LD1‐4)
andcontrollerboard.Anadditional120VACor277VACcircuitcanbeterminatedatLine2(L2)foran
additional16Acapacityonthesecondset(LD5‐8)ofrelays.Pull
allwiresfromlightingloadstothe
enclosure.Connecteachloadanditsdimmingwirestotheappropriateterminalontherelayoutput
board.Captheunusedleadtopreventelectricalshock.SeeFigure2.1below.