DMX 512 CONTROLLER SERIES
3.6.4 BLACKOUT3.6.4 BLACKOUT
Action :Action :
2)
Select the MIDI control channel (1~16) via the
buttons to set.BANK UP/DOWN
1 MIDI/REC)Press and hold the button for about 3 seconds.
Notes :Notes :
This is the Channel that the controller will receive
MIDI note commands.
Action :Action :
2) Destination unit: Turn unit Off, press and hold
buttons 8, 9 and button 2 then
turn unit back On.
SCANNER SCENE
1 SCANNER
SCENE
) Source unit: Turn unit Off, press and hold
buttons 2, 3 and button 1 then turn unit back On.
Notes :Notes :
3.8 Data Transfer3.8 Data Transfer
3) Both units are now ready to transmit and receive.
Press buttons7&8simultaneously on
Source unit to begin transmission.
SCENE
The display should show TRANSMIT, this indicates it
is ready to transmit data.
The display should show RECEIVE, this indicates it is
ready to receive data transmission.
The button brings all lighting output to 0 or off.Blackout
3.7 Midi Operation3.7 Midi Operation
The controller will only respond to I commands on the channel which it is set to full stop. All
control is performed using Note on commands. All other instructions are ignored. To stop a
chase, send the blackout on note.
MID MIDI
MIDI MIDI
3)
Press and hold the button for 3 seconds
to save settings.
MIDI/REC
4)
To release control, press any other button
except the buttons during step 2.
MIDI
BANK
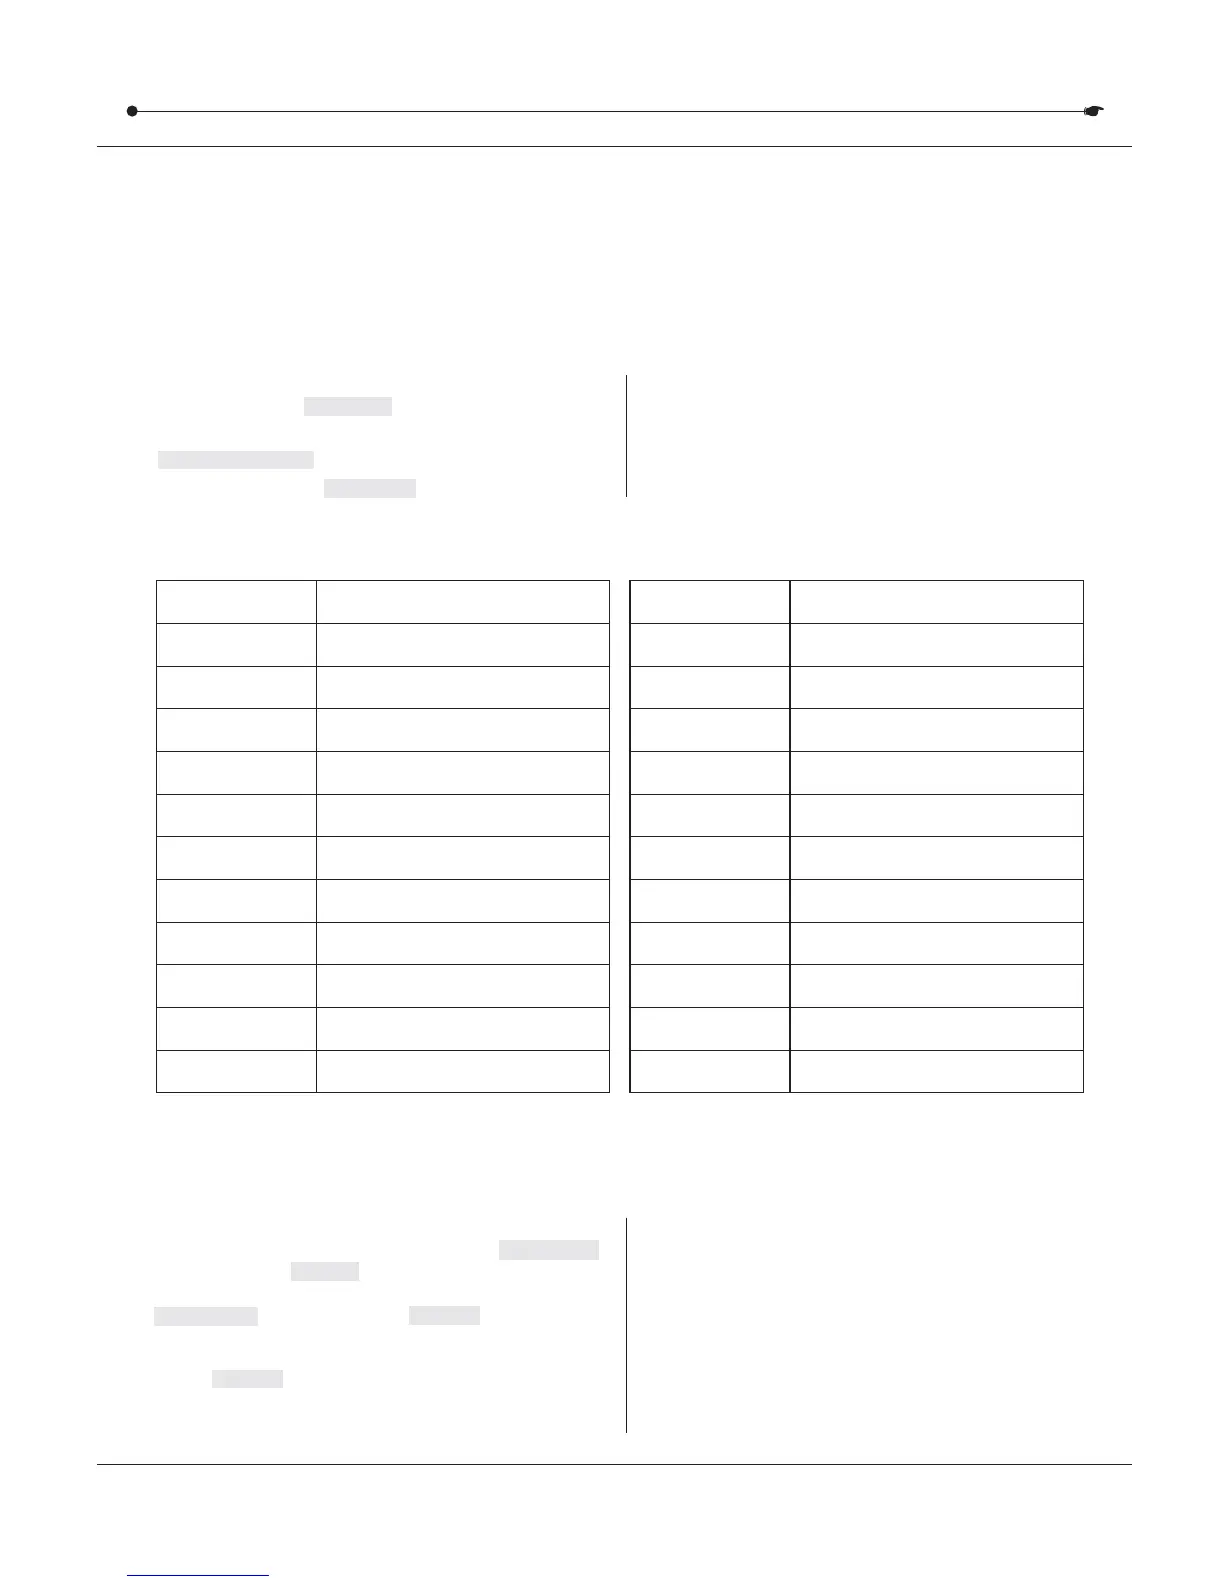
MIDI NOTE
00 to 07
08 to 15
16 to 23
24 to 31
32 to 39
40 to 47
48 to 55
56 to 63
64 to 71
72 to 79
80 to 87
FUNCTION (TURN ON/OFF)
FUNCTION (TURN ON/OFF)
Scenes 1~8 in BANK 1
Scenes 1~8 in BANK 2
Scenes 1~8 in BANK 3
Scenes 1~8 in BANK 4
Scenes 1~8 in BANK 5
Scenes 1~8 in BANK 6
Scenes 1~8 in BANK 7
Scenes 1~8 in BANK 8
Scenes 1~8 in BANK 9
Scenes 1~8 in BANK 10
Scenes 1~8 in BANK 11
MIDI NOTE
88 to 95
96 to 103
104 to 111
112to119
120
121
122
123
124
125
126
FUNCTION (TURN ON/OFF)
FUNCTION (TURN ON/OFF)
Scenes 1~8 in BANK 12
Scenes 1~8 in BANK 13
Scenes 1~8 in BANK 14
Scenes 1~8 in BANK 15
Chase 5
Chase 4
Chase 3
Chase 2
Chase 1
Chase 6
BLACKOUT
It is possible to transfer the programs stored in one DMX-240A controller to another. Connect from the
DMX output of the programmed controller to the DMX input of the other.
DMX-240A USER MANUAL
17/20
 Loading...