Do you have a question about the iRay Technology SCL35W and is the answer not in the manual?
Step-by-step instructions for correctly installing batteries into the device's compartment.
Instructions for turning the device on/off, diopter adjustment, and focal length setting.
Details procedures for shutter and background calibration using the C button.
Instructions for enabling and disabling the reticle using specific button combinations.
Explains how to access and use the shortcut menu for quick adjustments like palette and sharpness.
Details functions accessible via Shortcut Menus 2 (zoom, brightness) and 3 (reticle color/pattern).
Introduces the advanced menu for accessing features like Ultraclear, zeroing, and calibration.
Explains Ultraclear mode benefits and the initial steps for scope zeroing.
Guides on using the zeroing interface to adjust the reticle to the impact point.
Provides critical notes on zeroing accuracy and understanding the reticle movement scale.
Instructions for calibrating dead or stuck pixels using the advanced menu.
Steps to reset the device to its factory default configuration via the advanced menu.
Details the process of personalizing shortcut key functions using the XECM application.
Explains the default functions of shortcut buttons for amplification, shutdown, standby, and rangefinding.
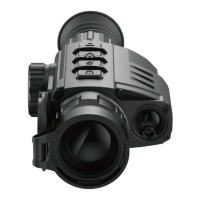
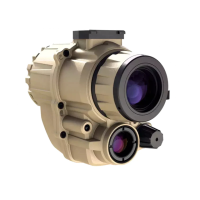
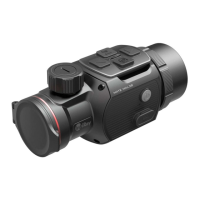
The Saim SCL Series is a line of low-cost thermal rifle scopes designed for night hunting and target observation. These devices are compact and lightweight, making them easy to carry and mount on various firearms. They are notable for their long operation hours, good concealment, and ability to quickly detect, recognize, and identify objects or targets. The Saim SCL Series is effective in various conditions, including total darkness, heavy smoke, haze, fog, and dust, at both close and long ranges.
The Saim SCL Series includes two models: SCL25 and SCL35.
| Feature | SCL25 | SCL35 |
|---|---|---|
| Resolution, pixels | 384×288 | 384×288 |
| Pixel size, µm | 17 | 17 |
| NETD, mk | ≤40 | ≤40 |
| Frame rate, Hz | 50 | 50 |
| Objective lens, mm | 25 | 35 |
| Field of view | 14.9°×11.2° | 10.7°×8.0° |
| Display | 1280×960 LCOS | 1280×960 LCOS |
| Magnification, x | 1.4-5.6 | 2.0-8.0 |
| Battery type | CR123×2 | CR123×2 |
| Max. Operation time, h | 4 | 4 |
| Weight (without batteries), g | <410 | <410 |
| Dimension, mm | 176×61×61 | 195×61×61 |
| Detective range, m (Target size: 1.7m*0.5m, P(n)=99%) | 916 | 1283 |
| USB type | Type C | Type C |
The device uses CR123 batteries. To install them, open the battery compartment cover anticlockwise. Ensure batteries are installed correctly with the positive pole upward. After installation, close the cover and push until a "click" sound confirms it's correctly secured. Note: Only disposable batteries should be used. Rechargeable batteries are not recommended due to potential nonstandard quality. Avoid mixing different battery models or capacities. The Saim series also supports external power supply via a Type-C cable, indicated by a USB icon on the screen.
To power on, long-press the P button for 3 seconds and wait 6 seconds for the thermal image to appear. To power off, long-press the P button for 5 seconds until the shutdown option menu appears. Select "√" to shut down or "×" to cancel, then short-press the M button to confirm.
Rotate the focus ring and eyepiece adjustment to achieve the clearest image after powering on.
Focus is adjusted by rotating the objective lens adjusting ring.
Short-press the C button for shutter correction and long-press C for background correction. For background correction, the lens cap should be covered.
To enable the reticle for the first time, press and hold the P+C buttons simultaneously for 3 seconds, then click the M button four times. To toggle the reticle on/off, press and hold the P+M+C buttons simultaneously for 3 seconds. This shortcut needs to be activated after the reticle is first enabled. When the reticle is off, all related menu operations (color, pattern, zeroing, blind pixel correction) are hidden.
In normal mode, a short press of the M button brings up the shortcut menu, offering options for:
In normal mode, press and hold the M button to enter the advanced menu. This menu includes settings for Ultraclear mode, Auto shutter correction, video output, PIP (Picture-in-Picture), battery mode, zeroing type, zeroing, blind pixel correction, and default resetting.
This mode enhances image details in heavy fog, rain, or snow.
Before zeroing, ensure the reticle is on and the zeroing type is selected in the advanced menu.
In the advanced menu, select "Blind Pixel Calibration" using Power/C and press M to enter the calibration interface.
In the advanced menu, select "Default Resetting" using Power/C and press M to enter the resetting interface. Use P and C to switch between "√" (reset) and "×" (cancel). Short-press M to confirm and exit to the normal interface.
The Saim series supports customization of shortcut keys.
For frequently used functions, the Saim has default shortcuts in the observation interface:
| Brand | iRay Technology |
|---|---|
| Model | SCL35W |
| Category | Thermal cameras |
| Language | English |