Do you have a question about the iRay Technology MATE MAL25 and is the answer not in the manual?
Precautions regarding heat sources and lens damage.
Warning against letting small children handle the device due to small parts.
Guidelines on operating temperature, storage, and connection.
Configuring alerts for target distance based on prey type.
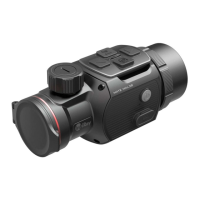
The InfiRay MATE Series is a new generation of front attachment designed as an infrared expansion device for daylight optics. Unlike traditional night vision devices that rely on image enhancement, the MATE Series does not require an external light source and is unaffected by strong light exposure. This makes it suitable for use at night or in adverse weather conditions such as fog, rain, or smog. It can detect objects through obstacles like branches, tall grass, and dense bushes. The MATE Series has a wide range of applications, including night hunting, observation, terrain orientation, and search and rescue operations.
Using the MATE Series Front Attachment offers several advantages over night hunting with traditional optics or even other night vision devices. By attaching the MATE Series to a traditional scope, users can maintain the familiar comfort of shooting with their day optics, including their existing reticle and eye relief. The MATE Series Front Attachment also allows users to continue utilizing their riflescope's variable magnification.
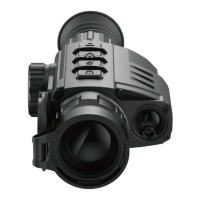
The MATE Series offers quick "monocular-attachment" conversion, allowing for rapid mounting and removal of the attachment. It features a 12µm thermal imaging detector and a 1024×768 high-resolution AMOLED display. No re-zeroing is required after attachment, ensuring quick setup. The device is housed in a magnesium alloy casing, providing durability. It offers familiar precision and supports capture/video recording. Connectivity is enhanced with APP support via Wi-Fi and a wireless remote control. Users can choose from four image modes: White hot, Black hot, Red hot, and Color, as well as three scene modes: Forest, Flatland, and City. In monocular mode, it offers digital zoom options of x1, x2, and x4. The device boasts a degree of protection of IP67.
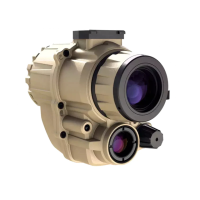
The MATE series can be used as a monocular or a front attachment for a day scope. Its original design allows for quick conversion between monocular and attachment modes. This conversion can be rapidly performed by a long press of the Down (3) + Menu (4) buttons for 3 seconds.
When used as a front attachment, the MATE is designed to complement a day scope for use in both nighttime and daytime inclement weather (fog, smog, rain, etc.). It is crucial to ensure the MATE is in attachment mode, indicated by "G1/G2/G3/G4" in the status bar. To mount the device, first ensure the day device is zeroed. Measure the outer diameter of the day scope's lens (17). Select an appropriate adapter with an internal M52*0.75 thread and an insert matching the objective lens's outer diameter. The package includes a universal adapter (14) with four inserts suitable for outer diameters from 56mm to 65mm; other sizes must be purchased separately. Install the insert (16) fully into the adapter (14), then firmly install the adapter with the insert onto the day scope's objective lens (17). Snap the lever (20) from the OPEN to the CLOSE position to secure the adapter. If there is a clearance, loosen the locking screw (19) with a 2mm hex-nut wrench, tighten screw (18) with a 4mm hex-nut wrench to ensure a tight fit, then retighten the locking screw (19). Mount the MATE onto the adapter (14) and tighten the eyepiece bayonet-type ring (2) counterclockwise to lock it. If the MATE's display is not aligned with the day scope's center after installation, loosen locking screw (21) with a 4mm hex-nut wrench, adjust the MATE's angle, and then retighten locking screw (21).
To use the MATE as a monocular, remove the Clip-on universal adapter (14). In monocular mode, the status bar will display "x1/x2/x4". For an enhanced observation experience, the InfiRay Monocular (15) (sold separately) is recommended. Install the InfiRay Monocular (15) onto the MATE's eyepiece by thread locking. In monocular mode, the MATE supports up to 4x electronic zoom, and with the 4x24 InfiRay Monocular (15), up to 16x amplification can be achieved.
To operate, open the lens cover (8). Press and hold the Power (10) button for 3 seconds to power on the device, then wait 5 seconds for the thermal image to appear. Adjust the lens focus by rotating the lens focus ring (7). Calibration can be performed via shutter correction (short press Down (3) button) or background correction (long press Down (3) button, then cover the lens). Image mode settings (White hot, Black hot, Red hot, Color) are changed with a short press of the Up (6) button. Other image settings, such as electronic zoom (monocular only), brightness, scene mode, and sharpness level, are accessed via a short press of the Menu (4) button to enter the Shortcut Menu interface. To power off, long press the Power (10) button for 3 seconds. For standby mode, briefly press the Power (10) button, and press it again to wake up the device.
When the MATE is installed as an infrared extension, the image zeroing function aligns the infrared image with the day scope's reticle. Before mounting the MATE, ensure the day scope is calibrated. After mounting, aim at a target 100 meters away and shoot. Measure the horizontal and vertical distances between the bullet's impact point and the aiming point. To enter the Zeroing Profile, press and hold the Menu (4) button from the home screen. Use the Up (6) / Down (3) buttons to select "Zeroing Profile" and then "Zeroing" with a short press of the Menu (4) button. In the zeroing interface, use short or long presses of the Up / Down / Camera / Menu buttons to move the infrared image until the target aligns with the day scope's reticle. To save and exit, long press Menu (4) + Camera (5) buttons, or hold Down (3) + Up (6) buttons for 3 seconds to set the zeroing position as (0,0) and exit.
From the home screen, a brief press of the Menu (4) button opens the Shortcut Menu. Functions include Electronic zoom (x1 to x4, monocular only), Screen brightness (levels 1-4), Scene mode (Forest, Flatland, City), and Image sharpness (levels 1-4). Use Up (6) / Down (3) buttons to switch options. Long press Menu (4) or wait 5 seconds to exit.
A 3-second press of the Menu (4) button from the home screen enters the Main Menu. Use Up (6) / Down (3) buttons to navigate options. A brief press of Menu (4) adjusts parameters or enters submenus. A 3-second press of Menu (4) exits to the home screen. A brief press of Power (10) saves and exits to the upper interface.
The MATE has 32GB of built-in storage. Files are named by time, so setting the time in the Main Menu or synchronizing it with the InfiRay Outdoor APP is recommended.
When the device is on and connected to a computer via Type-C cable, it is recognized as a flash memory card. Double-click "my computer," then "InfiRay," then "Internal Storage" to access folders named by time, containing recorded photos and videos. Select files or folders to copy or delete.
The MATE series includes an IBP-4 InfiRay battery pack (22), which is impact-resistant, waterproof, and lightweight. Secure the battery pack (22) to the smaller ring of the adapter fixture (27) and tighten screws (26) with a 2mm hex-nut wrench. Install the adapter fixture (27) with the battery pack (22) onto the day scope (17). Close the lever (25) to lock the fixture. The fixture is compatible with most day scopes with a 30mm barrel diameter. After installation, insert the data cable (24) into the Type-C port (12) of the MATE and the battery pack. The battery pack will automatically charge the MATE. Press the Power button (23) on the battery pack to check its remaining power.
The MATE button module can be detached and used as a remote control. Remove the button module (28) from the MATE unit. Install it on the base (29) provided in the package. Thread two magic straps (30) into the base (29) and attach the module to a suitable position on your gun. The remote control has a built-in battery that lasts over 30 days. If the battery runs out, reattach the button module (28) to the MATE for automatic charging via the pogo pin.
The MATE series supports software updates via the InfiRay Outdoor application or the official website. Download the InfiRay Outdoor APP from the official website, App Store, or by scanning the QR code. After installation, open the app. If the device is already connected, switch on mobile data. The app will automatically detect updates; click 'Now' to download or 'Later' to update later. The app stores the last connected device, so if the device is not connected but was previously linked, an update prompt will appear when turning on InfiRay Outdoor. Download updates via mobile Wi-Fi, then connect to the MATE. After updating, the device will reboot. Instructions for using InfiRay Outdoor are available on the official website.
Maintenance should be performed at least twice a year.
| Pixel Size | 12 μm |
|---|---|
| Frame Rate | 50 Hz |
| Objective Lens | 25 mm |
| Magnification | 1x |
| Display Resolution | 1024x768 |
| Display Type | OLED |
| Battery Life | 7 hours |
| Weight | < 530 g |
| Dimensions | 186x65x64 mm |
| Storage Temperature | -40°C to +70°C |
| Protection Level | IP67 |
| Sensor Type | Uncooled VOx Microbolometer |
| Focus | Manual |
| IP Rating | IP67 |
| Detector Resolution | 256x192 |
| Battery Type | Li-ion |
| Operating Temperature | -20°C to 50°C |
| Resolution | 256 × 192 |
| Spectral Range | 8 - 14 μm |
| Display | 1024x768 OLED |
| NETD | < 50 mK |
| Digital Zoom | 1x - 8x |
| Thermal Sensitivity (NETD) | < 50 mK |