Adjustment
of
the amount
of
oil in the hook is performed with oil amount adjustment screwQ).
1) Adjustment procedure
Tighten (turn clockwise) o
il
amount adjustment scr
ewQ)
to
in
crease the amount
of
oil in the hook,
or
loosen
(tum counterclockwise) to decrease i
t.
(Caution)
1.
When
using
RP
hook
(hook
for
dr
y
head)
for
the
SS type,
be
sure
to
loosen
the
oil a
mount
adjustment
sc
rew
up
to th
e
minimum
so
as
to
reduce
the
oil
amount
in
th
e
hook
.
2. Never
drain
the
oil in
the
oil
tank
even when
RP
hook
(hook
for
dry
head
) is used.
7.
PJE~ftb
_,;_
(ftb:i[E)
l'f.JiffiJ~:1J1!(8990SS,
8991SS) /ADJUSTING
THE
AMOUNT
OF
OIL
(OIL
SPLASHES)
IN
THE
HOOK(8990SS, 8991SS)
&
a:
J!r..
-
l&J-.
mE
•~
Id.
!Wi
:ia!:i§
ttl
o
79
T
IW
ll::A
5f
$i'&,
iJij
~
Afl
:m:
n
ot
,
iw
1Jn
ld.1E
7}
1¥1
tt
~
o
WARNING:
A Be extremely careful a
bout
the
o
peration
of
th
e machine snice
the
amout
of
oil
ha
s to
be
checked
by
t
urn
ing
the
hook
at
a high speed.
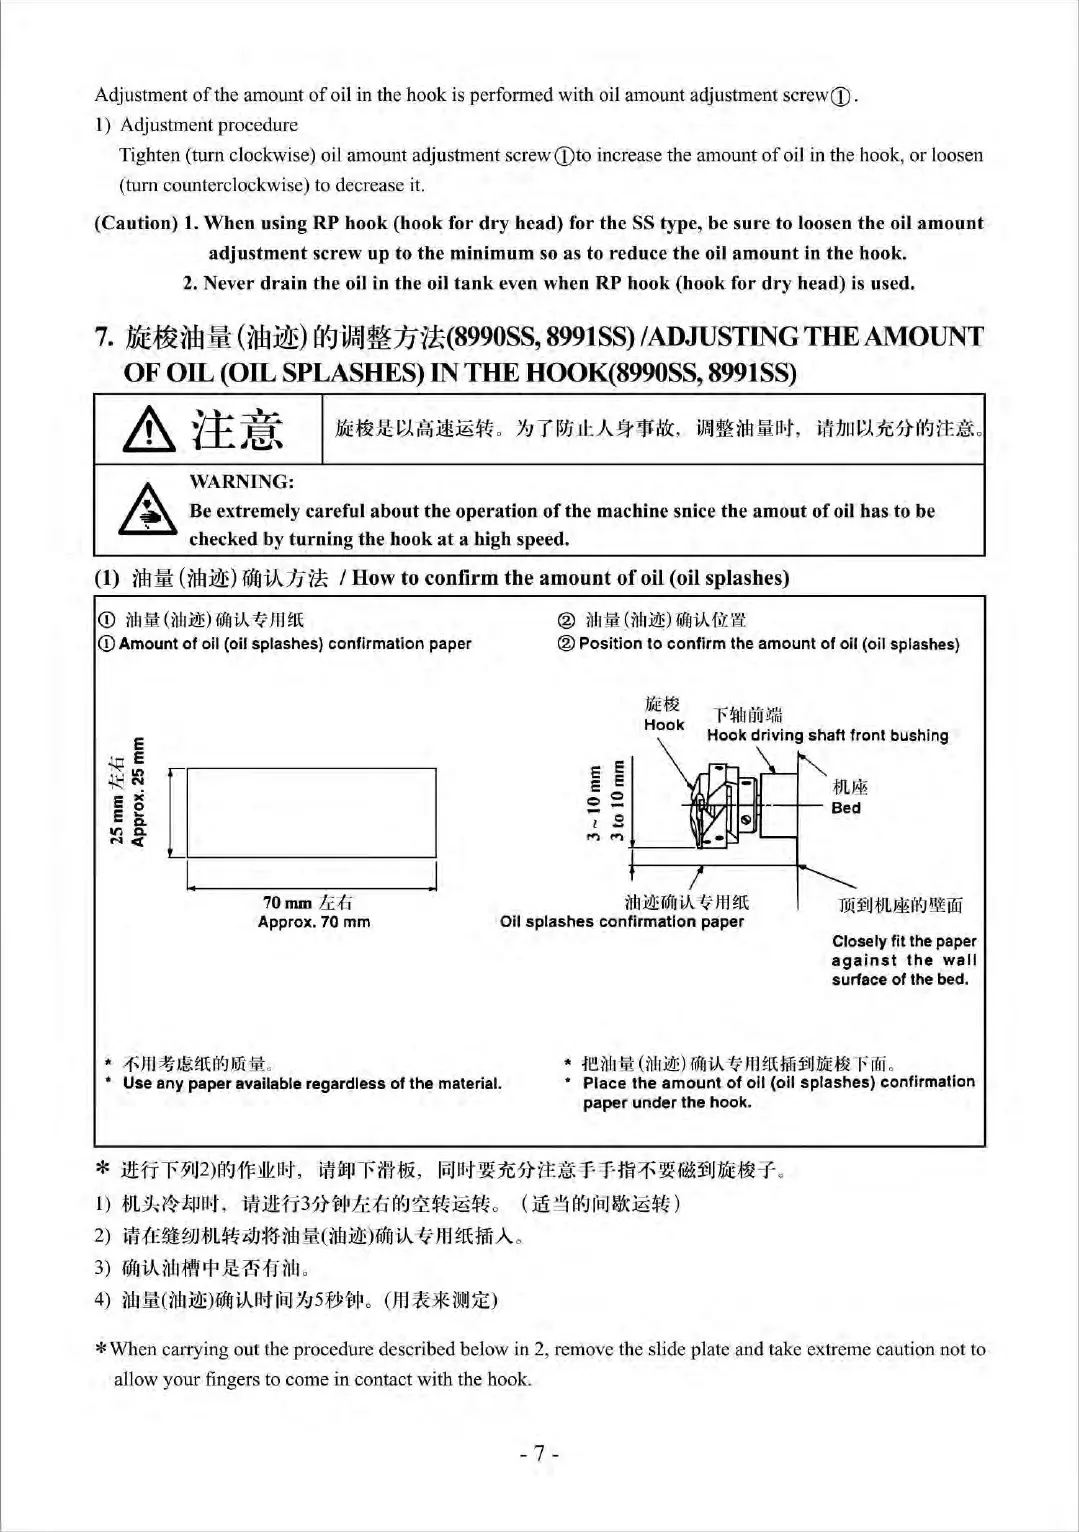
(1)
ilil:ID:
(na~)
TrfffiA1J~
I How to confirm the
amount
of
oil
(o
il
splashes)
CD
ilh!ll
(il
tr
Y!t)
rifrriA.
v
nm~
CD
Amount
of
oil (oil splashes)
confi
r
mation
paper
70 mm
ti.ti
Approx. 70
mm
•
/f~
!fl ~
t~
nt
ft'~
!Vl
illo
®
ilh
!11
(
ilb
:Yl.l!)
Tifo
·
iA.
fi'L
'
11.
1
'.
®
Position
to
confirm
the
amoun
t
of
oil
(o
il splashes)
~~
r!fl
h1~iJ
!t
;
M
Hook
Hook
driving
shaft front bushing
ilh
Ylt
TiffriA.
v
ffl
nt
Oil
sp
l
ashes
con
fi
rmation
paper
Closely
fit
the paper
against
the
wall
surface
of
the bed.
*
tr!.
il
h
!ll:
(
nh
:Yl.l!)
riff!
iA.
v m
ftHifi
l!
IJ
M£
~
r·
rm
o
• Use
any
paper available regardless
of
the
material.
•
Place
the
amount
of
oil
(oil
splashes) confirmation
paper
under
the
hook
.
*fil
fi~~~A"J~
~~.
m
•~m•
.
~~W1E*tta•
•
m~w•~••
~
o
1)
:fJL:Yd~trrnot
,
tilffilfi3*~
1
1
ti:;(:j1¥-J'S!!tl:i§!tl
0 (
~
§
1¥-J1aJ
~:i§!tl)
2)
·
ri'f
:(£f
iUJJ
;fJ
L
~i;/J
:m
Afl
:lil:
(
Afl
~)reffriA
=If-
Jn
~till
A 0
3)
Teff1
iJ-
ill1
l\19
~
J:i
~ N
:fi"
illr
o
4)
Afl
:!M:(
Afl~
)1ef
fJ
iA
~lal-'/95
tyflft
o
(Jn
~V
~~IJ~)
*Wh
en carrying out the procedure described below in 2, remove the slide plate and take extreme caution not to
allow your fingers to come in contact with the hook.
- 7 -
 Loading...