12.2 Draining and Relling
About every 3 months, you will want to replace the spa’s water. The
frequency depends on a number of variables including the amount of
use, attention paid to water quality maintenance, etc. You will know it is
time for a change when you cannot control sudsing and/or you can no
longer get the normal feel or sparkle to the water even though the key
water balance measurements are all within the proper parameters.
CAUTION! READ THIS BEFORE DRAINING: To prevent damage
to the spa’s components, turn off power to the spa at the circuit
breaker before draining it. Do not turn the power back on until
your spa has been relled.
CAUTION: There are certain precautions to keep in mind when
draining your spa. If it is extremely cold, and the spa is outdoors,
freezing could occur in the lines or the equipment, see “WINTER-
IZING” (page 38). On the other hand, if it is hot outdoors, do not
leave the spa’s surface exposed to direct sunlight.
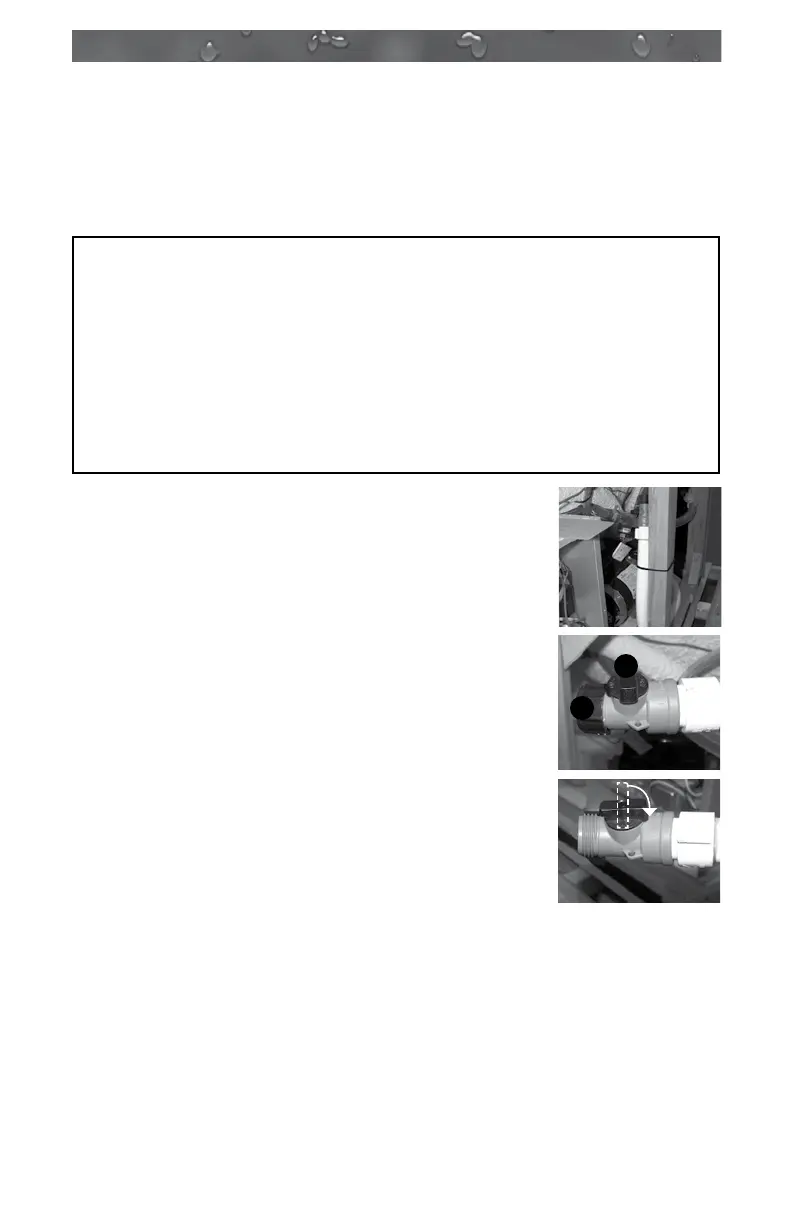
To drain your spa, perform the following steps (actual
drain may vary from one shown). Turn off power to
spa at breaker.
1. Locate and remove the synthetic cabinet door
screws and door. The door is located directly
below the control panel.
2. Cut zip tie(s) and pull drain hose from
equipment area (Figure A).
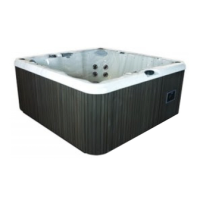
3. Hold drain hose above water line, then
unthread drain cap (1) from hose using a
counterclockwise rotation (Figure B). Place
drain hose on ground to start drain, making sure
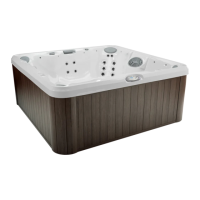
to direct water away from spa. If equipped, turn
valve (2) counterclockwise to open the valve
(Figure C).
4. After spa is drained, reinstall drain cap on drain
hose tting until nger tight! If equipped, turn
valve (2) clockwise to close the valve. DO NOT
OVERTIGHTEN!
5. Coil drain hose up and place back inside the
spa equipment bay (Fig. A).
6. Reinstall synthetic cabinet door and screws, then
refer to the “Spa Fill Up Procedure” (page 17).
12.3 Pillow Care
Remove and clean each headrest by gently grasping both ends in each
hand and pulling upward to release each pillow “snap.” To reinstall,
simply “snap” each pillow back into place. Clean as needed with soapy
water using a cloth or soft-bristle brush. Always remove the pillows when
adding chemical shock treatment to the spa water. The pillows can be
Figure A
Figure C
Figure B
Drain location
and appearance
may vary.
2
1
36