Page 21
ePump
™
Series Pumps, Installation and Operation Manual
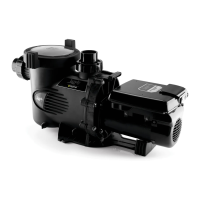
Figure 13. Backplate, Impeller, Diffuser, Mechanical
Seal Exploded View
Backplate
Mechanical
Seal
Impeller
Diffuser
Washers (2)
Screws (2)
Diffuser
O-ring
Backplate
O-ring
Self Sealing
Left Handed
Screw
5. Turn the backplate o-ring side up and insert the
new ceramic seal side into the backplate. Use
great care to press the seal in squarely with your
fingers. The ceramic is easily damaged and must
be pressed in using only your fingers or soft tools.
Do not use any lubricant other than water or soapy
water.
6. Install the backplate by following the relevant
steps in Section 6.2.2.1, Impeller Reassembly.
7. Install the motor by following the steps in
Section 6.2.5, Motor Replacement.
6.2.3 Mechanical Seal Replacement
NOTE This is a two-part replacement process. The
mechanical seal must be replaced as a set.
NOTE Refer to Figure 13 for an illustration of the
location of the mechanical seal and impeller.
CAUTION
Do not damage the ceramic or carbon surfaces of the
seals. If the surfaces are damaged, leaks will occur.
1. To access the mechanical seal, follow Steps 1
through 9 of Section 6.2.2, Impeller Removal and
Replacement.
2. Remove the carbon face seal half from the motor
shaft (See Figure 11). This is a spring-loaded seal.
Grasp the portion of the seal closest to the impeller
body and pull the seal off, using a twisting motion.
3. Remove the motor from the backplate, following
the steps in Section 6.2.5, Motor Replacement.
4. Place the backplate o-ring side down and force the
ceramic seal out using a screwdriver or drift.
 Loading...