10
JB INDUSTRIES • ELIMINATOR OPERATING MANUAL • 800.323.0811 • SALES@JBIND.COM • JBIND.COM
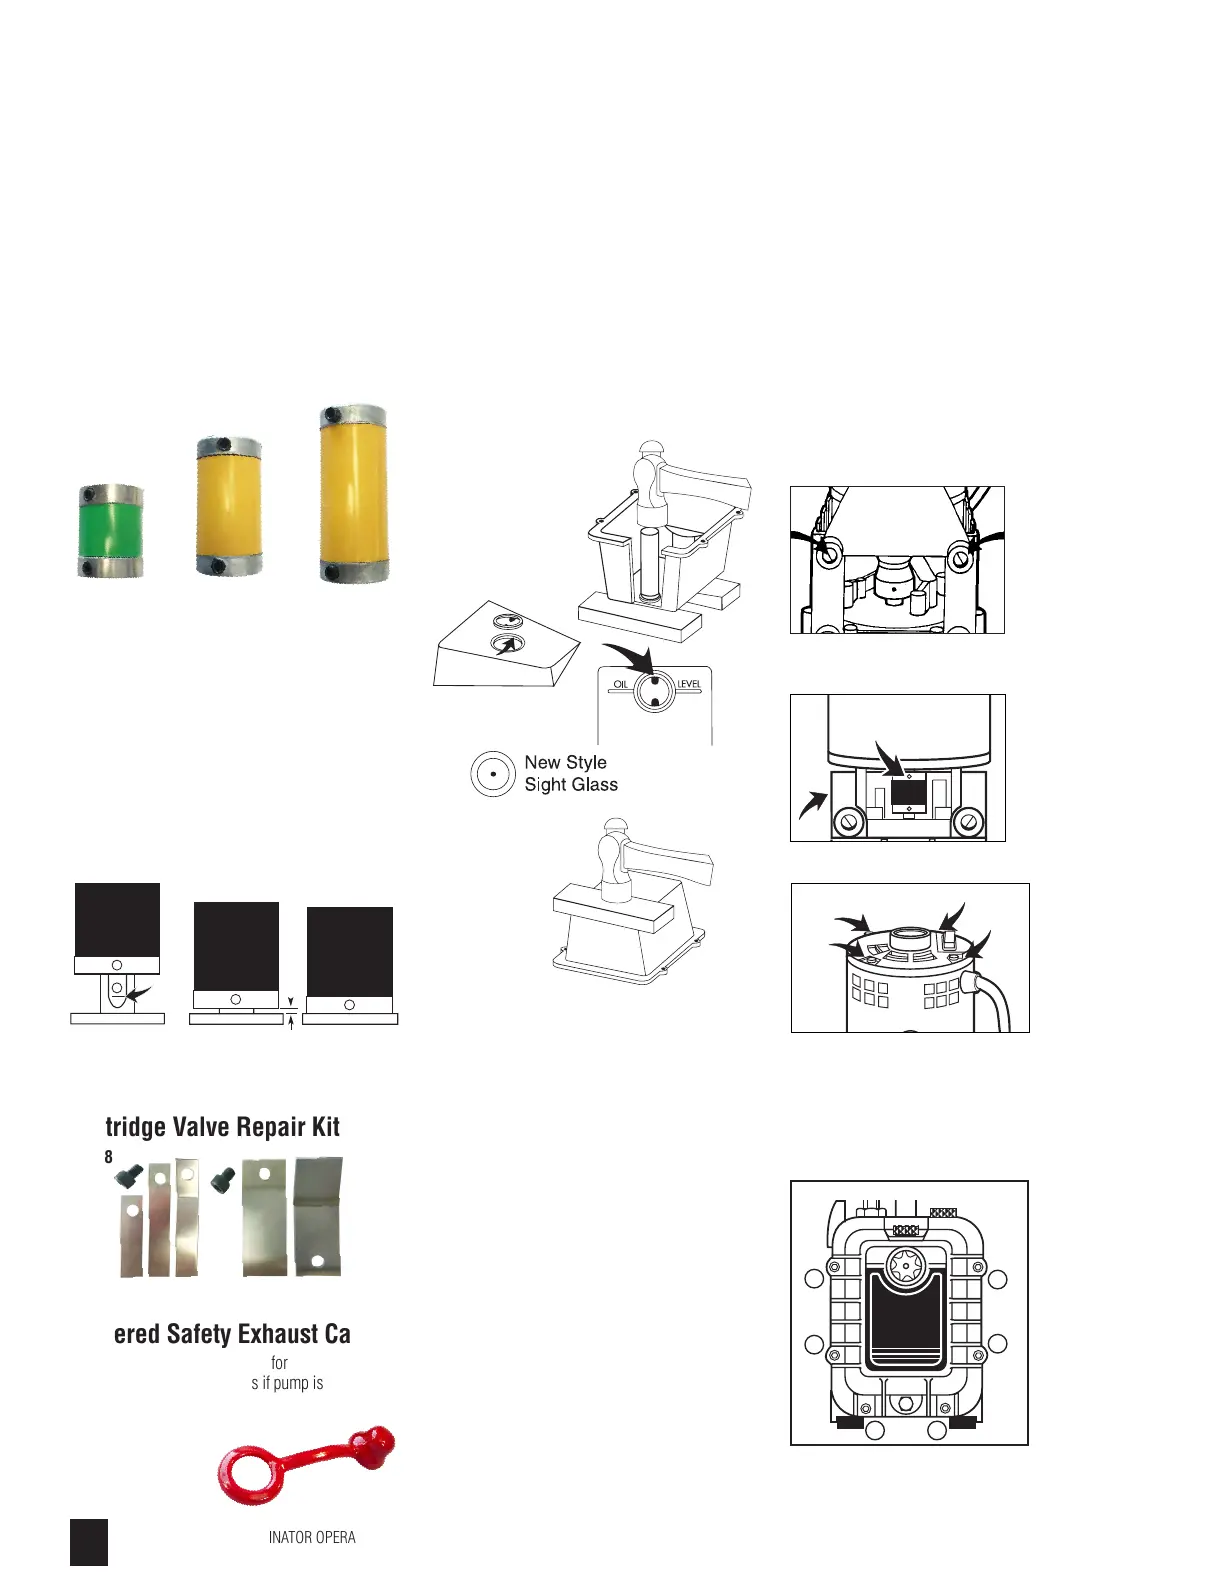
Flexible Couplers
Flexible couplers are a three part assembly
(Figure 19)
. Two metal hubs that look like gears
and a flexible middle section. The one hub is
attached to the shaft of the motor and the other is
attached to the shaft of the cartridge. NOTE: The
color of the flexible middle section can be black,
yellow or green. The middle sections of the PR-208
and the PR-6 can be ordered separately. The PR-208
has a “D” bore in the metal hubs to prevent hubs
from spinning on shafts.
1994 and older = PR-6
1995 and newer = PR-208
Prior to 2001 -250 models after serial#0198 and
dual pumps prior to 1988 = PR-53
Replacing Coupler
(Motor Removed)
Coat setscrew threads with removable thread sealant.
Align coupler setscrew with flat surface of cartridge
shaft. Tighten screw so coupler slides on to shaft but
stops at the bottom of the flat. (Figure 20) Tighten
until screw head is flush with coupler surface
(approx. 40 in-lbs).
Cartridge Valve Repair Kit
PR-18
Tethered Safety Exhaust Caps
Red tethered safety exhaust caps for handles help
prevent oil leakage out handles if pump is overturned
during transportation.
DV-EP-6 3/8" NPT
DV-EP-8 1/2" NPT
Sight Glass Repair
Step 1: With cover off of the pump, lay on two
blocks of wood. Pop out the sight glass
using a broom handle or other object
as a punch. For DV-85 series, DV-142
series, or DV-200 series use a 1" diameter
punch (Figure 21)
.
Step 2: Clean the surface with acetone or nail
polish remover. Put loctite on the inside
surface of the hole.
Step 3: Install the new sight glass from the outside.
The hole position does not matter with the
new style sight glass.
Step 4: With the wood block covering the sight
glass, tap the sight glass into place.
Replace the cover on the pump.
CARTRIDGE REPAIR AND
REPLACEMENT
The cartridge kit contains two new o-rings, one
cover gasket and shaft seal. Before replacing
cartridge, be thoroughly familiar with replacing
pump cartridge procedures.
Tools required:
• Hammer
• Medium screwdriver
• 5/32" and/or 1/8" and 3/16" allen wrench
• 11/16" socket head
• 3/8" or 7/16" wrench or socket
• Thread sealant
• Petroleum jelly or grease
NOTE: Instructions pertain to all pump series.
Pump styles may vary from illustrations.
Draining Oil And
Removing Motor
Step 1: Stand pump on oil cover. If pump has
foot mounting bracket, remove unit by
loosening foot screws (Figure 22)
.
Step 2: Turn coupling until set screws are facing
you. With 5/32” or 1/8” allen wrench
(depending on model) loosen set screw
on motor shaft (Figure 23)
. Loosen four
motor bolts (Figure 24). Remove motor.
DO NOT REMOVE BOLTS FROM MOTOR
AT ANY TIME. If old cartridge is frozen,
i.e. coupler will not turn, remove oil cover
(Figure 25) and four cartridge bolts
(Figure 26)
. By turning cartridge, coupler
will rotate into position.
Step 3: Loosen set screws on coupler and remove
coupling (Figure 23).
Removing Oil Cover
Using 3/16" allen wrench remove six socket head
cap screws from oil cover (Figure 25)
.
PR-53
2-3/4"
PR-6
2-1/4"
PR-208
1-1/2"
Figure 20
Figure 19
Figure 21
Trap
Loosen Coupler
Set Screw
on Motor Shaft
Figure 22
(Models with foot mounting bracket only)
Figure 23
Loosen 4 Motor Bolts. Lift Motor Off.
(Do Not Remove Bolts)
Trap
Loosen Coupler
Setscrew
On Motor Shaft
Figure 24
Figure 25
Bottom of Flat Correct Incorrect
 Loading...