EasyManua.ls Logo

Jet JPS-10TS - User Manual

Jet JPS-10TS
40 pages
Print Icon
To Next Page IconTo Next Page
Loading...
Operating Instructions and Parts Manual
10-inch ProShop
Table Saw
with Riving Knife
Model JPS-10TS
(shown with steel wings and 30” rail set)
for serial no. 11120136 and higher
WALTER MEIER (Manufacturing) Inc.
427 New Sanford Road
LaVergne, Tennessee 37086 Part No. M-708490
Ph.: 800-274-6848 Revision B1 04/2012
www.waltermeier.com Copyright © 2012 Walter Meier (Manufacturing) Inc.

Other manuals for Jet JPS-10TS

Questions and Answers

  • A
    adamobrienAug 12, 2025
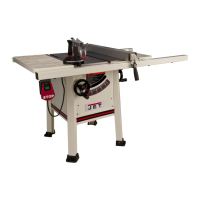
    Why won't my Jet JPS-10TS Saw motor start?
    • S
      smithmaryAug 12, 2025
      If your Jet Saw motor won't start, it could be due to a few reasons. Check the power line for proper voltage, as low voltage can prevent the motor from starting. Also, inspect all lead connections on the motor for loose or open connections.
  • B
    Brandi HunterAug 16, 2025
    What to do if my Jet Saw motor stalls and blows fuses?
    • S
      Sophia MitchellAug 16, 2025
      If your Jet Saw motor stalls, resulting in blown fuses or a tripped circuit, several factors could be at play. First, inspect the motor connections for loose or shorted terminals, or worn insulation. Low voltage could be the culprit, so correct any low voltage conditions. Also, ensure that the correct fuses or circuit breakers are installed in the power line. Finally, the motor may be overloaded, so reduce the load accordingly.
  • B
    brian23Aug 19, 2025
    What to do if my Jet JPS-10TS motor overheats?
    • E
      emily27Aug 19, 2025
      If your Jet Saw motor overheats, it could be due to a couple of reasons. One possibility is that the motor is overloaded, in which case you should reduce the load on the motor. Another reason could be restricted air circulation through the motor. To fix this, clean the motor fan with compressed air to restore normal air circulation.
  • N
    Natalie CummingsAug 23, 2025
    What to do if my Jet Saw motor won't start and the fuses blow?
    • A
      Alicia SmithAug 23, 2025
      If your Jet Saw motor won't start and the fuses or circuit breakers blow, check the following: Inspect the cord or plug for damaged insulation and shorted wires. Also, inspect all connections on the motor for loose or shorted terminals or worn insulation. Finally, make sure that the correct fuses or circuit breakers are installed.
  • A
    amynormanAug 27, 2025
    Why is my Jet Saw blade not square?
    • B
      bakerbrianAug 27, 2025
      If the blade is not square with the miter slot, or the fence is not square to the blade on your Jet Saw, consider these potential causes: The blade itself might be warped, requiring replacement. Alternatively, the table top might not be parallel to the blade, necessitating adjustment. Finally, the fence may not be parallel to the blade, which also requires adjustment.
  • A
    Andrew HigginsAug 30, 2025
    Why does my Jet JPS-10TS Saw slow down when operating?
    • S
      Sherry CunninghamAug 30, 2025
      If your Jet Saw slows down during operation, it could be because you are applying too much pressure to the workpiece; try feeding the workpiece more slowly. Another possible reason is that the belts are loose, so you may need to tighten them.
  • T
    tclaySep 3, 2025
    How to fix a loud noise from my Jet JPS-10TS?
    • A
      Andrea CollierSep 3, 2025
      If you hear a loud, repetitious noise coming from your Jet Saw, here's what to check: 1. Inspect the keys and setscrews on the pulley; replace or tighten them if necessary. 2. See if the motor fan is hitting the cover; tighten the fan or shim the cover. 3. Check if the V-belt is defective and replace it if needed.
  • J
    Joseph HesterSep 7, 2025
    What to do if my Jet Saw blade does not reach 90 degrees?
    • N
      Nicole MarshallSep 7, 2025
      If the blade on your Jet Saw does not reach 90 degrees, it could be because the 90-degree stop bolt is out of adjustment; adjust the 90-degree stop bolt. Another possibility is that the pointer bracket is hitting before the blade reaches 90 degrees; file down the right side of the pointer bracket until the blade can reach 90 degrees.

Summary

1.0 Warranty and service

More Information

Provides details on obtaining up-to-date product information and visiting the company website.

Product Warranty Details

Outlines the duration and types of limited warranties offered for JET products based on application.

Warranty Coverage and Exclusions

Details what is covered, who is covered, period, exclusions, and how to get service.

Warranty Limitations and State Law

Details limitations on implied warranties, liability, and state law rights.

3.0 Safety warnings

Safety Notices and Warnings

Explains CAUTION and WARNING symbols and general safety advice for manual usage.

Kickback Hazards and Prevention

Details kickback causes, prevention methods, and protection tips.

4.0 About this manual

Manual Scope and Purpose

Explains the manual's coverage of operation, maintenance, and safety procedures for the table saw.

5.0 Glossary

Cutting Operation Terms

Defines terms related to different types of cuts and blade usage.

Safety Features and Devices

Defines safety components like guards, kickback prevention, and push devices.

Alignment and Measurement Terms

Defines terms related to alignment, parallelism, and measurement.

Other Glossary Terms

Defines miscellaneous terms including cutting techniques and components.

6.0 Features

7.0 Specifications

8.0 Setup and assembly

8.1 Shipping contents

Lists all components included in the shipping carton and hardware package.

8.2 Unpacking and cleanup

Provides instructions for safely unpacking the saw and preparing it for assembly.

8.3 Installing legs

Guides the user through the process of attaching the legs to the saw cabinet.

8.4 Handwheels

Explains how to install the two handwheels onto their respective shafts.

8.5 Extension wings

Details the steps for attaching the left and right extension wings to the saw table.

8.6 Extension wing adjustment

Explains how to level and securely tighten the extension wings to the saw table.

8.7 Rails and fence

Refers to a separate manual for installing the rails and fence assembly.

8.8 Wood extension table

Refers to a separate manual for installing the optional wood extension table.

8.9 Switch bracket

Provides instructions for securing the switch bracket to the front rail.

8.10 Dust Hood

Explains how to install the dust hood and connect a dust collection system.

8.11 Riving knife

Details the procedure for installing the riving knife onto the saw.

8.12 Anti-kickback pawls

Guides the user on how to mount and secure the anti-kickback pawl assembly.

8.13 Blade guard

Explains how to install and secure the blade guard assembly onto the riving knife.

8.14 Blade installation;replacement

Provides instructions for safely installing or replacing the saw blade.

8.15 Aligning blade guard and riving knife

Details the process for aligning the blade guard and riving knife for proper function.

8.16 Low profile riving knife

Describes the low profile riving knife and its use for non-through cuts.

8.17 Table insert

Guides the user on removing the riving knife and installing the table insert.

8.18 Miter gauge

Describes the operation and adjustment features of the miter gauge.

9.0 Electrical connections

Calibration and Grounding

Covers miter gauge calibration and critical grounding instructions.

Voltage Conversion

Outlines the process for switching the saw between 115V and 230V operation.

Overload Reset and Extension Cords

Explains overload reset function and guidance for using extension cords.

Padlock Feature

Describes the feature allowing a padlock to secure the on-off switch.

10.0 Adjustments

Blade Raising;Tilt Mechanism

Details how to adjust the blade height and tilt angle using the handwheels.

Positive Stops Adjustment

Provides instructions for accurately setting the 90° and 45° blade tilt positive stops.

Table to Blade Alignment

Explains how to check and correct the alignment of the table relative to the saw blade.

11.0 Operations

Kickback Hazards and Prevention

Describes kickback events and lists conditions that can cause them.

Rip Sawing Techniques

Details the process of rip sawing using the fence as a guide.

Resawing and Crosscutting

Explains resawing for cutting thick boards and crosscutting using a miter gauge.

Bevel, Miter, and Dado Operations

Covers bevel, miter, and dado cutting techniques and precautions.

12.0 Safety devices

Feather Board Usage

Describes how to make and use a feather board for workpiece support.

Filler Piece and Push Stick;Block

Explains the purpose of a filler piece and the safety benefits of push sticks/blocks.

13.0 Maintenance

Cleaning Procedures

Outlines a daily and weekly cleaning schedule for the table saw.

Lubrication Schedule

Details the lubrication points and frequency for maintaining the saw.

Miscellaneous Checks

Advises regular checks of mounting bolts, power switch, blade, and guard.

14.0 Optional accessories

15.0 Troubleshooting the JPS-10 TS

16.0 Replacement Parts

16.1.2 Motor and Trunnion - Parts List

16.2.2 Table and Cabinet - Parts List

16.3.2 Stand Assembly - Parts List

16.4.2 Cast Iron Wings - Parts List

17.1 Electrical Connections - 115 V

17.2 Electrical Connections - 230 V

Jet JPS-10TS Specifications

General IconGeneral
BrandJet
ModelJPS-10TS
CategorySaw
LanguageEnglish

Related product manuals