EasyManua.ls Logo

JUKI MS-1261M User Manual

JUKI MS-1261M
96 pages
To Next Page IconTo Next Page
Page #1 background imageLoading...
Page #1 background image
No.01
40095707
NOTE : Read safety instructions carefully and understand them before using.
Retain this Instruction Manual for future reference.
HINWEIS :
Lesen Sie die Sicherheitsanweisungen aufmerksam durch, um sich mit ihnen vertraut zu
machen, bevor Sie diese Maschine in Betrieb nehmen. Bewahren Sie diese Bedienungsanleitung
für spätere Bezugnahme auf.
NOTE : Avant d’utiliser la machine, lire attentivement toutes les consignes de sécurité.
Conserver ce manuel pour pouvior le consulter en cas de besoin.
NOTA : Antes de comenzar a usar esta máquina lea con detención hasta comprender todas las
instrucciones de sequridad. Conserve este Manual de instrucciones a mano para futuras
consultas.
NOTA : Leggere attentamente e compredere tutte le istruzioni per la sicurezza prima di inziare l’ uso
di questa macchina. Conservare questo Manuale d’Instruzioni per pronto riferimento.
INSTRUCTION MANUAL
BETRIEBSANLEITUNG MANUEL D’UTILISATION
MANUAL DE INSTRUCCIONES
MANUALE D’ISTRUZIONI
MS-1261
MS-1261M

Table of Contents

Other manuals for JUKI MS-1261M

Question and Answer IconNeed help?

Do you have a question about the JUKI MS-1261M and is the answer not in the manual?

JUKI MS-1261M Specifications

General IconGeneral
BrandJUKI
ModelMS-1261M
CategorySewing Machine
LanguageEnglish

Summary

TO ENSURE SAFE USE OF YOUR SEWING MACHINE

Explanation of Risk Levels

Summarizes danger, warning, and caution levels for safety.

Explanation of Pictorial Warnings and Labels

Details warning symbols and their meanings on the machine.

SAFETY PRECAUTIONS

Risk Levels: DANGER and CAUTION

Defines critical danger and caution scenarios for user safety.

General Safety Guidelines

Covers basic precautions, safety devices, application, education, and power off rules.

Precautions During Operation Stages

Highlights key safety considerations for different phases of operation.

PRECAUTIONS TO BE TAKEN IN VARIOUS OPERATION STAGES

Transportation and Unpacking Safety

Safety measures for moving and unpacking the sewing machine.

Installation Procedures

Covers safe installation of table, wiring, grounding, and motor.

Before and During Operation Safety

Safety checks before and during machine operation.

SPECIFICATIONS

Machine Model Specifications

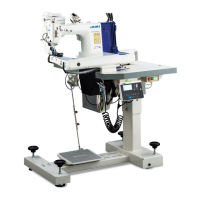
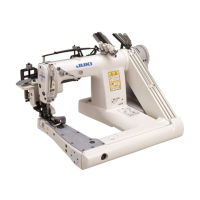
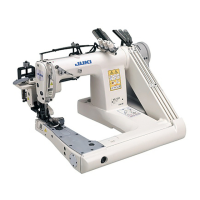
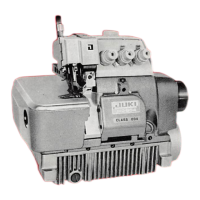
Provides technical details for MS-1261 and MS-1261M models.

1. SETTING UP THE SEWING MACHINE

Machine Placement and Cover Installation

Instructions for setting up the sewing machine and installing covers.

2. ADJUSTING THE BELT TENSION

Belt Tension Adjustment

Procedure for adjusting the drive belt tension for optimal performance.

3. INSTALLING THE THREAD STAND

Thread Stand Assembly and Mounting

Steps to assemble and securely mount the thread stand.

4. INSTALLING THE KNEE LIFTER

Knee Lifter Installation Procedure

Guide for installing the knee lifter mechanism for hands-free operation.

5. LUBRICATION

Initial Lubrication Procedure

Steps for lubricating the machine before first use.

Draining Oil

Instructions on how to drain accumulated oil from the machine.

6. ATTACHING A NEEDLE

Needle Selection and Attachment

Guidance on choosing and properly attaching the sewing machine needle.

7. THREADING THE MACHINE HEAD

Machine Head Threading Process

Step-by-step instructions for threading the sewing machine head.

8. THREAD TENSION

Needle Thread Tension Adjustment

How to adjust the tension for the needle thread.

Looper Thread Tension Adjustment

How to adjust the tension for the looper thread.

9. ADJUSTING THE PRESSURE OF THE PRESSER FOOT

Presser Foot Pressure Adjustment

Procedure to adjust the pressure applied by the presser foot.

10. ADJUSTING THE STITCH LENGTH

Stitch Length Adjustment Procedure

Steps to set the desired stitch length for sewing.

11. ADJUSTING THE NEEDLE GUARD

Needle Guard Clearance Adjustment

Adjusting the gap between the needle and needle guard.

Vertical Position of Needle Guard

Setting the correct vertical position of the needle guard.

Needle and Looper Clearance Adjustment

Ensuring proper clearance between needles and loopers.

12. ADJUSTING THE LOOPER LHREAD CAM

Looper Thread Cam Adjustment

Adjusting the timing of the looper thread cam.

Looper Thread Guide Adjustment

Adjusting the position of the looper thread guide.

13. HEIGHT OF THE FEED DOG

Feed Dog Height Adjustment

Setting the correct height of the feed dog for material feeding.

14. TIMING TO RELEASE THE NEEDLE THREAD TENSION

Needle Thread Tension Release Timing

Adjusting when needle thread tension is released during the stitch cycle.

15. ADJUSTING THE TAKE-UP THREAD TENSION CONTROL LEVER

Take-up Thread Tension Control Lever Adjustment

Adjusting the take-up lever for proper thread tension.

16. POSITION OF THE INTERMEDIATE THREAD TENSION RELEASING LEVER AND THREAD GUIDE OF THE NEEDLE THREAD TENSION CONTROLLER

Intermediate Tension Lever and Thread Guide Positioning

Setting the position of intermediate thread tension components.

17. MOTOR PULLEY AND SEWING SPEED

Motor Pulley and Sewing Speed Specifications

Details on motor pulley specifications and sewing speed.

18. TABLE OF REPLACEABLE GAUGES

MS-1261 Replaceable Gauges

Part numbers for various gauges used with the MS-1261 model.

MS-1261 Feed Dog Spacer Table

Table for feed dog spacer part numbers for MS-1261.

MS-1261M Replaceable Gauges

Part numbers for various gauges used with the MS-1261M model.

Folder Types and Needle Gauge Compatibility

Information on folders and their compatibility with needle gauges.

Related product manuals