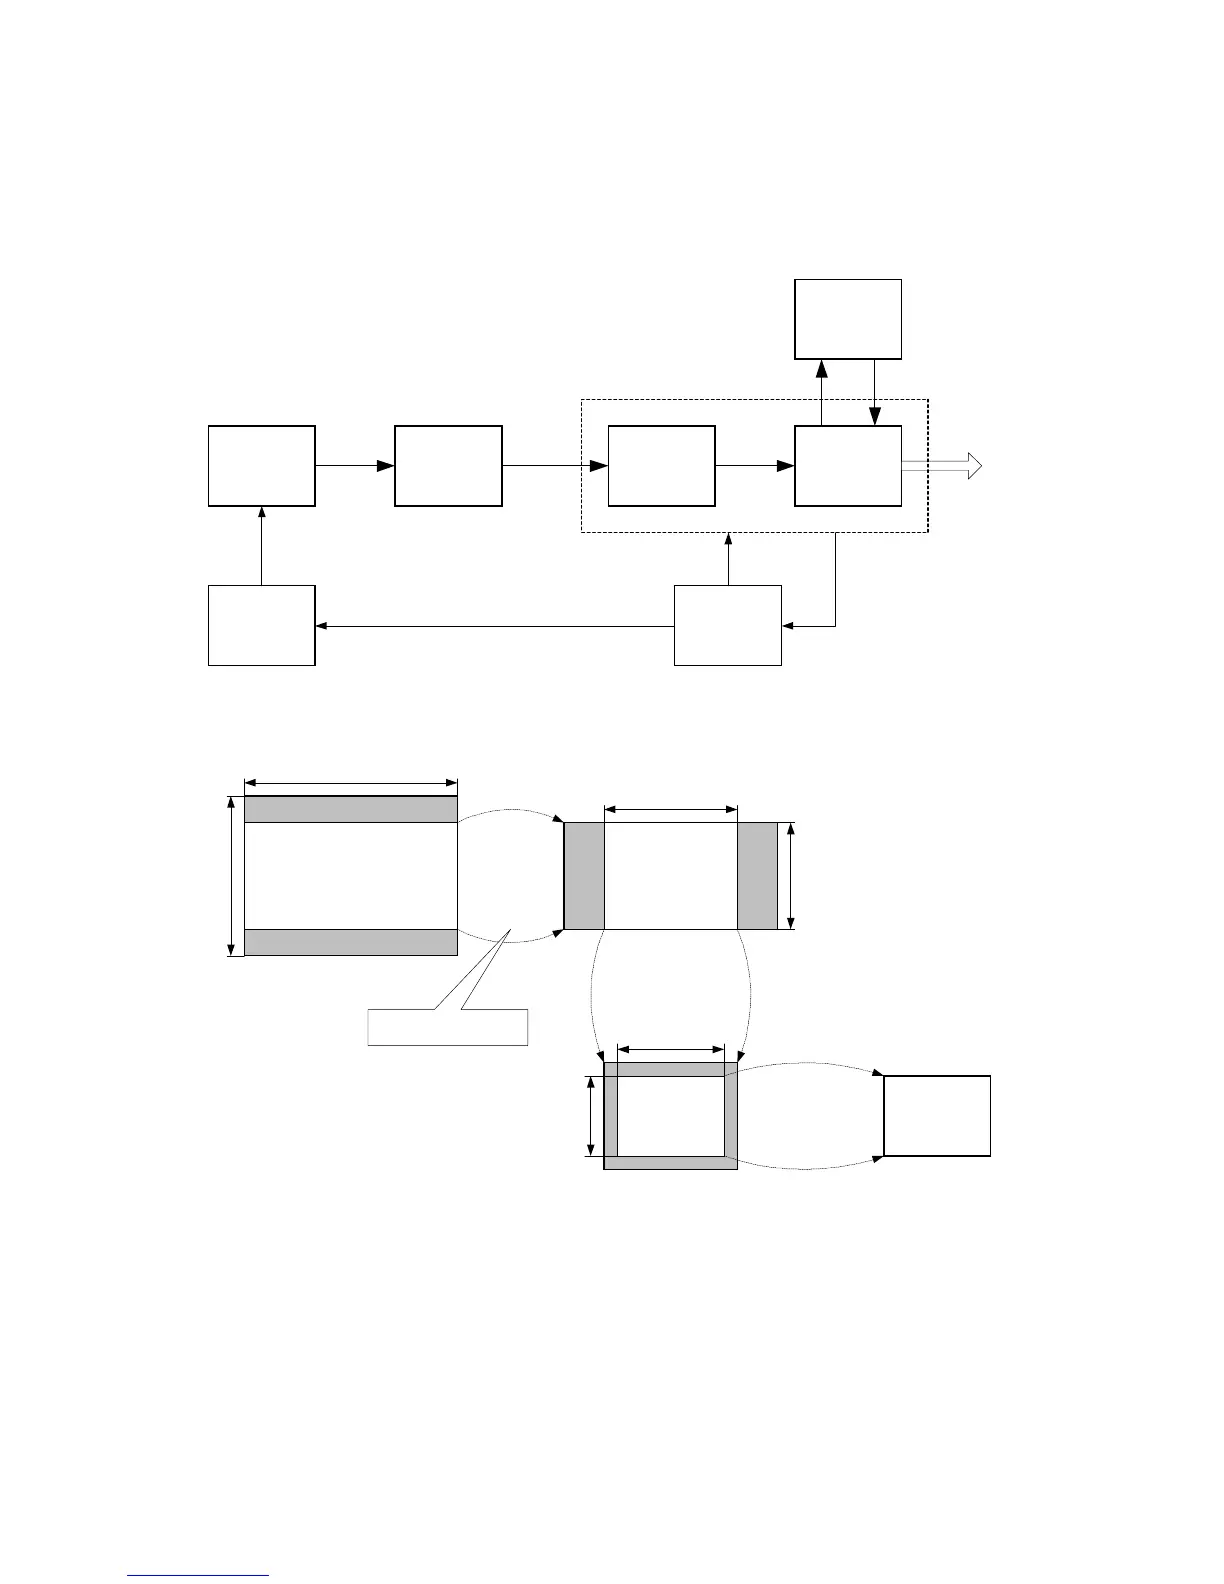
EasyManuals Logo
Home>JVC>Camcorder>GR-DVA10

JVC GR-DVA10 User Manual

JVC GR-DVA10
35 pages
To Next Page IconTo Next Page
To Previous Page IconTo Previous Page
Page #20 background imageLoading...
Page #20 background image
Audio/Video
Tos
‘able
(provided)
S-Video
cable
(optional)
White
to
AUDIO
LIN
To
Yellow
to
Red
to
S-VIDEO
IN
VIDEO
IN
Be
AUDIO
R
if
Connect
when
an
S-Video
cable
is
not
used.
"*
When
connecting
the
cables,
open
this
cover.
(OTT
ING:
Dubbing
To
A
VCR
Following
the
illustration,
connect
the
camcorder
and
the
VCR.
Also
refer
to
pg.
34
and
35.
Set
the
camcorder's
Power
Switch
to
EQ”
while
pressing
down
the
Lock
Button
located
on
the
switch,
‘turn
on
the
VCR’s
power,
and
insert
the
appropriate
cassettes
in
the
camcorder
and
the
VCR.
3
Engage
the
VCR's
AUX
and
Record-Pause
modes.
Pa
§
Engage
the
camcorder's
Play
mode
to
find
a
spot
just
before
the
edit-in
point.
Once
it
is
reached,
press
®/U
on
the
camcorder,
fox)
Press
P/II
on
the
camcorder
and
engage
the
VCR's
F894
Record
mode.
Engage
the
VCR's
Record-Pause
mode
and
press
»/I8
on
the
camcorder.
Repeat
steps
4
through
6
for
additional
editing,
then
stop
the
VCR
and
camcorder
when
finished.
NOTES:
©
Use
the
provided
Audio/Video
cable,
making
sure
to
connect
the end
with
a
core
filter
to
the
camcorder.
The
core
filter
reduces
interference.
©
You
can
use
Playback
Zoom
(=
pg.
42)
or
Playback
Special
Effects
(CF
pg.
43)
in
step
5.
©
Before
you
start
dubbing,
make
sure
that
the
indications
do
not
appear
on
the
connected
TV.
If
they
do,
they
are
being
recorded
onto
the
new
tape.
To
choose
whether
or
not
the
following
displays
appear
‘on
the
connected
TV...
*
Date/Time
vn
Set
“DATETIME”
to
“ON"
or
“OFF
in
the
Menu
Screen
(7
pg.
32).
ime
Code
set
“TIME
CODE’
to
“ON”
or
“OFF”
in
the
Menu
Screen
(CF
pg,
32).
‘Playback
Sound
Mode,
Tape
Speed
And
Tape
Running
Displays
vn
Set
“ON
SCREEN’
to
“LCD”
or
“SIMPLE”
in
the
Menu
Screen
(CF
pg.
32).
Or,
press
DISPLAY
on
the
remote
control.
To
DV
IN/OUT
Core
filter
DV
cable
(optional)
a
filter
it
equipped
To
Use
This
Camcorder
As
A
Recorder
..
.
1.
Turn
the
Power
Switch
to
“El
a
EN
Dubbing
To
Or
From
A
Video
Unit
Eq
With
A
DV
Connector
(Digital
Dubbing)
Itis
also
possible
to
copy
recorded
scenes
from
the
camcorder
onto
another
video
unit
equipped
with
a
DV
connector.
Since
a
digital
signal
is
sent,
there
is
little
if
any
image
or
sound
deterioration.
[To
use
this
camcorder
as
a
player]
fp
Make
sure
the
camcorde’s
power
i
of
Connect
the
camcorder
to
your
video
unit
equipped
with
a
DV
connector
using
a
DV
cable
as
shown
in
the
illustration.
i
Fess
>to
lay
back
the
source
tape
While
watching
the
playback
on
the
monitor,
engage
the
DV
connecior-equipped
video
unit’s
record
mode
from
the
spot
on
the
source
tape
you
want
to
begin
recording,
NOTES:
©
itis
recommended
to
use
the
AC
Power
Adapter/Charger
as
the
power
supply
instead
of
the
battery
pack
(7
pg.
9).
©
If
the
remote
control
is
used
when
both
the
player
and
recorder
are
JVC
video
units,
both
units
will
perform
the
same
operation.
To
prevent
this
from
happening,
press
the
buttons
on
both
units.
©
For
Digital
Dubbing,
this
camcorder
can
be
connected
only
to
one
device
at
a
time.
This
camcorder
can
also
be
used
as
a
recorder.
Ifa
blank
portion
or
disturbed
image
is
played
back
on
the
player
during
dubbing,
the
dubbing
may
stop
so
that
an
unusual
image
is
not
dubbed.
@
Even
though
the
DV
cable
is
connected
correctly,
some-
times
the
image
may
not
appear
in
step
3.
f
this
occurs,
turn
off
the
power
and
make
connections
again.
©
If
“Playback
Zoom”
(1
pg.
42),
"Playback
Special
Effects”
(EF
pg,
43)
or
“Snapshot”
is
attempted
during
playback,
only
the
original
playback
image
recorded
on
the
tape
is
output
from
the
DV
IN/OUT
connector.
‘©
When
using
a
DV
cable,
be
sure
it
has
a
core
filter
attached.
The
core
filter
eeduces
interference.
while
pressing
down
the
Lock
Button
located
on
the
switch.
2,
Set
“REC
MODE"
to
“SP”
or
“LP”
in
the
Menu
Screen
(C#
pg.
32)
3.
Connect
the
DV
cable
as
shown
in
the
illustration
and
load
a
cassette
to
record
on.
4,
Press
the
Recording
Start/Stop
button
to
engage
the
Record-Pause
made.
“DV.
IN”
appears
on
the
screen.
5,
Press
the
Recording
Stary/Stop
button
to
start
recording.
“DV.
IN”
changes
to
6,
Press
the
Recording
Starv/Stop
button
again
to
engage
the
Record-Pause
mode.
EXAIN”
returns
to
“DV,
IN".
NOTES:
©
Digital
Dubbing
is
performed
in
the
sound
mode
recorded
on
the
original
tape,
regardless
of
the
current
“SOUND
MODE”
setting
(CF
pg.
23).
‘©
During
Digital
Dubbing,
no
signals
are
output
from
the
video
or
audio
connectors.

Other manuals for JVC GR-DVA10

Questions and Answers:

Question and Answer IconNeed help?

Do you have a question about the JVC GR-DVA10 and is the answer not in the manual?

JVC GR-DVA10 Specifications

General IconGeneral
BrandJVC
ModelGR-DVA10
CategoryCamcorder
LanguageEnglish

Related product manuals