1-3
1.1.2 Specification of the DVC models
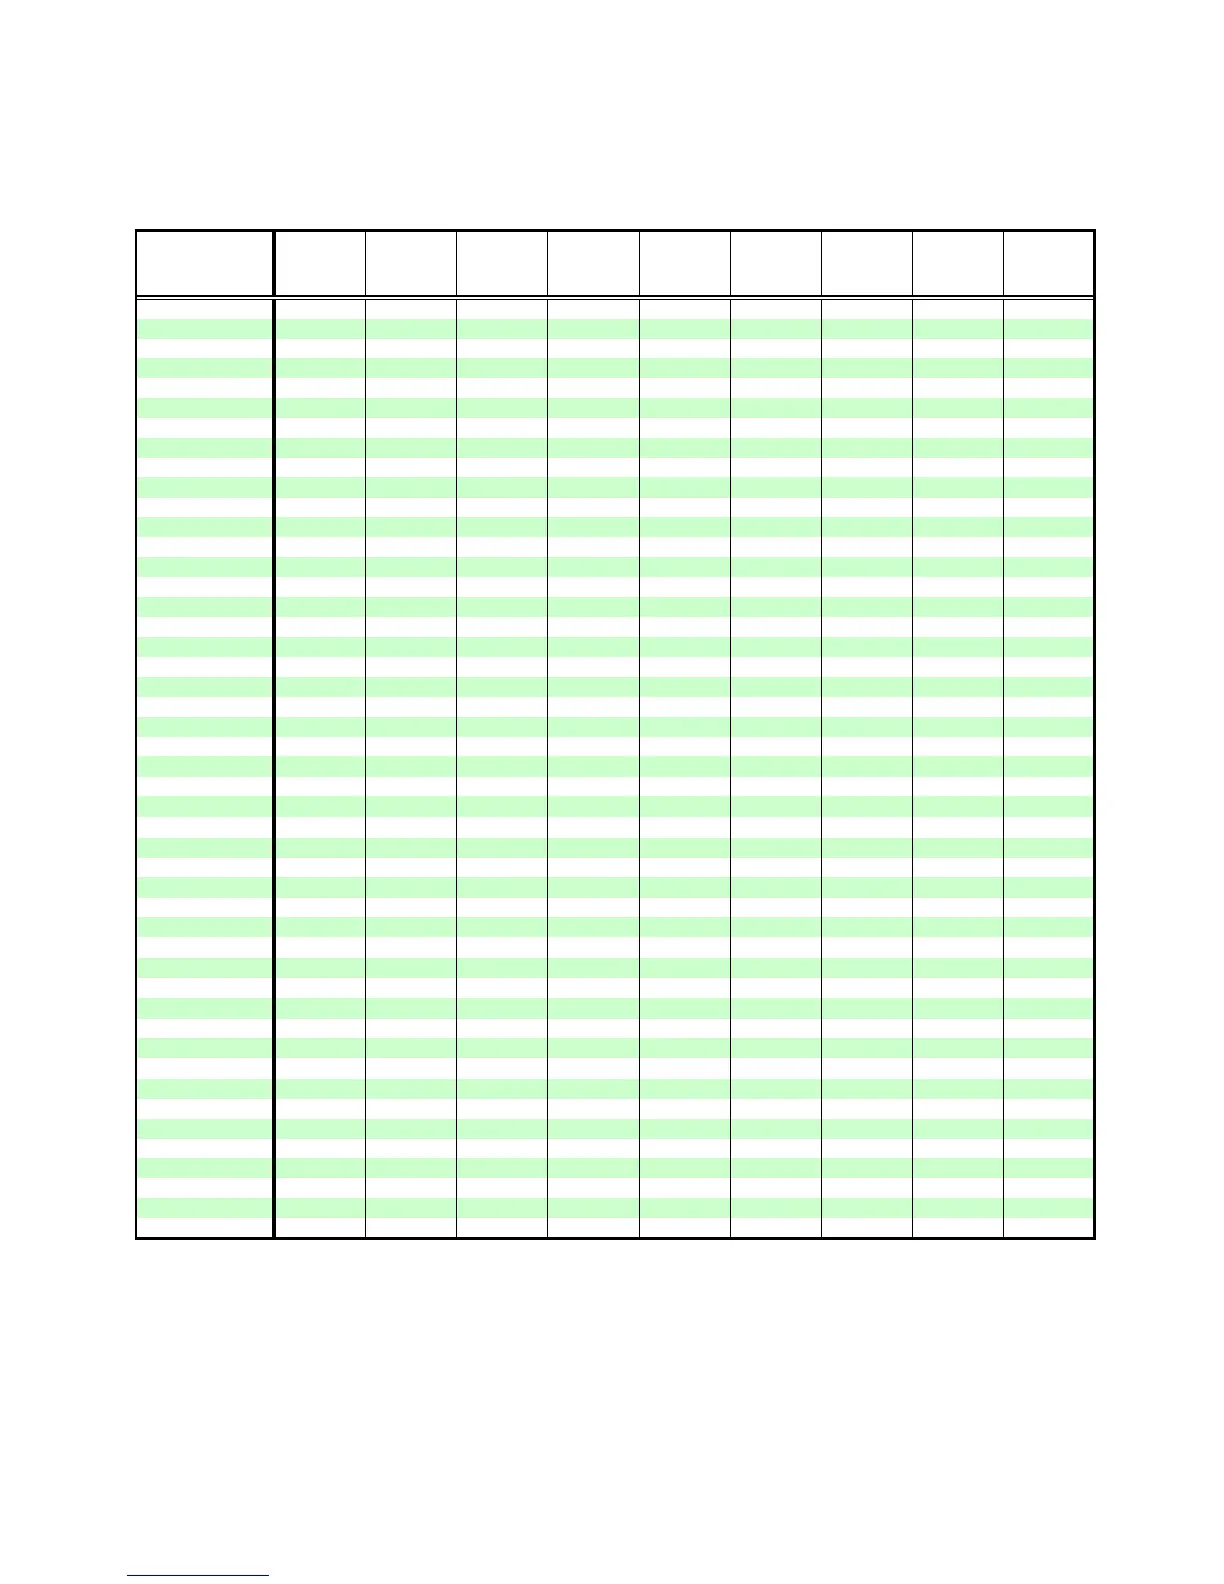
MODEL
SIGNAL
FORMAT
CCD VF
LDC
MONI
DV
TERMINAL
DIGITAL
STILL
OUTPUT
DSC MMC
DIGITAL
ZOOM
GR-DVF10 NTSC 1/4" 680K B/W 3.0 INCH IN/OUT - - - 250 X
GR-DVA10 NTSC 1/4" 680K COLOR 3.0 INCH IN/OUT YES - - 100 X
GR-DVA11/K NTSC 1/4" 680K COLOR 3.0 INCH IN/OUT YES DSC
MMC
100 X
GR-DVL100U NTSC 1/4" 680K B/W 2.5 INCH IN/OUT - - - 250 X
GR-DVL300U NTSC 1/4" 680K B/W 2.5 INCH IN/OUT YES - - 250 X
GR-DVL305U NTSC 1/4" 680K COLOR 2.5 INCH IN/OUT - - - 250 X
GR-DVL307U NTSC 1/4" 680K B/W 3.0 INCH IN/OUT - - - 250 X
GR-DVL500U NTSC 1/4" 680K COLOR 3.0 INCH IN/OUT YES - - 250 X
GR-DVL505U NTSC 1/4" 680K B/W 3.0 INCH IN/OUT YES DSC - 250 X
GR-DVL507U NTSC 1/4" 680K B/W 3.5 INCH IN/OUT YES - - 250 X
GR-DVL805U NTSC 1/4" 680K COLOR 3.5 INCH IN/OUT YES DSC - 250 X
GR-DVL300UM NTSC 1/4" 680K B/W 2.5 INCH IN/OUT YES - - 250 X
GR-DVL505UM NTSC 1/4" 680K B/W 3.0 INCH IN/OUT YES DSC - 250 X
GR-DVL805UM NTSC 1/4" 680K COLOR 3.5 INCH IN/OUT YES DSC - 250 X
GR-DVL300KR NTSC 1/4" 680K B/W 2.5 INCH IN/OUT YES - - 250 X
GR-DVL805KR NTSC 1/4" 680K COLOR 3.5 INCH IN/OUT YES DSC - 250 X
GR-DVL100EG PAL 1/4" 800K B/W 2.5 INCH OUT
∗
OPTION
- - 100 X
GR-DVL107EG PAL 1/4" 800K B/W 2.5 INCH IN/OUT YES - - 100 X
GR-DVL108EG PAL 1/4" 800K B/W 2.5 INCH OUT YES DSC
MMC
100 X
GR-DVL109EG PAL 1/4" 800K B/W 2.5 INCH IN/OUT YES DSC
MMC
100 X
GR-DVL200EG PAL 1/4" 800K B/W 3.0 INCH OUT YES DSC - 100 X
GR-DVL300EG PAL 1/4" 800K COLOR 3.5 INCH OUT YES - - 100 X
GR-DVL307EG PAL 1/4" 800K COLOR 3.5 INCH IN/OUT YES - - 100 X
GR-DVL308EG PAL 1/4" 800K COLOR 3.5 INCH OUT YES DSC
MMC
100 X
GR-DVL309EG PAL 1/4" 800K COLOR 3.5 INCH IN/OUT YES DSC
MMC
100 X
GR-DVL100EK PAL 1/4" 800K B/W 2.5 INCH OUT
∗
OPTION
- - 100 X
GR-DVL107EK PAL 1/4" 800K B/W 2.5 INCH IN/OUT
∗
OPTION
- - 100 X
GR-DVL108EK PAL 1/4" 800K B/W 2.5 INCH OUT YES DSC
MMC
100 X
GR-DVL109EK PAL 1/4" 800K B/W 2.5 INCH IN/OUT YES DSC
MMC
100 X
GR-DVL200EK PAL 1/4" 800K B/W 2.5 INCH OUT YES DSC - 100 X
GR-DVL300EK PAL 1/4" 800K COLOR 3.5 INCH OUT YES - - 100 X
GR-DVL308EK PAL 1/4" 800K COLOR 3.5 INCH OUT YES DSC
MMC
100 X
GR-DVL105A PAL 1/4" 800K B/W 2.5 INCH IN/OUT
∗
OPTION
- - 450 X
GR-DVL300A PAL 1/4" 800K B/W 2.5 INCH IN/OUT YES - - 450 X
GR-DVL800A PAL 1/4" 800K COLOR 3.5 INCH IN/OUT YES DSC - 450 X
GR-DVL105A-S PAL 1/4" 800K B/W 2.5 INCH IN/OUT
∗
OPTION
- - 450 X
GR-DVL300A-S PAL 1/4" 800K B/W 2.5 INCH IN/OUT YES - - 450 X
GR-DVL800A-S PAL 1/4" 800K COLOR 3.5 INCH IN/OUT YES DSC - 450 X
GR-DVL100EA PAL 1/4" 800K B/W 2.5 INCH IN/OUT
∗
OPTION
- - 450 X
GR-DVL300EA PAL 1/4" 800K COLOR 3.5 INCH IN/OUT YES - - 450 X
GR-DVL300ED PAL 1/4" 800K B/W 2.5 INCH IN/OUT YES - - 450 X
GR-DVL400ED PAL 1/4" 800K B/W 3.0 INCH IN/OUT YES - - 450 X
GR-DVL500ED PAL 1/4" 800K COLOR 3.0 INCH IN/OUT YES - - 450 X
GR-DVL600ED PAL 1/4" 800K B/W 3.5 INCH IN/OUT YES - - 450 X
GR-DVL707ED PAL 1/4" 800K B/W 3.5 INCH IN/OUT YES DSC - 450 X
GR-DVL800ED PAL 1/4" 800K COLOR 3.5 INCH IN/OUT YES DSC - 450 X
CC9370 NTSC 1/4" 680K B/W 3.0 INCH IN/OUT - - - 250 X
∗
OPTION: HS-V14KITE (CD-ROM and Cables)
Table 1-1-2 Specification of the DVC models