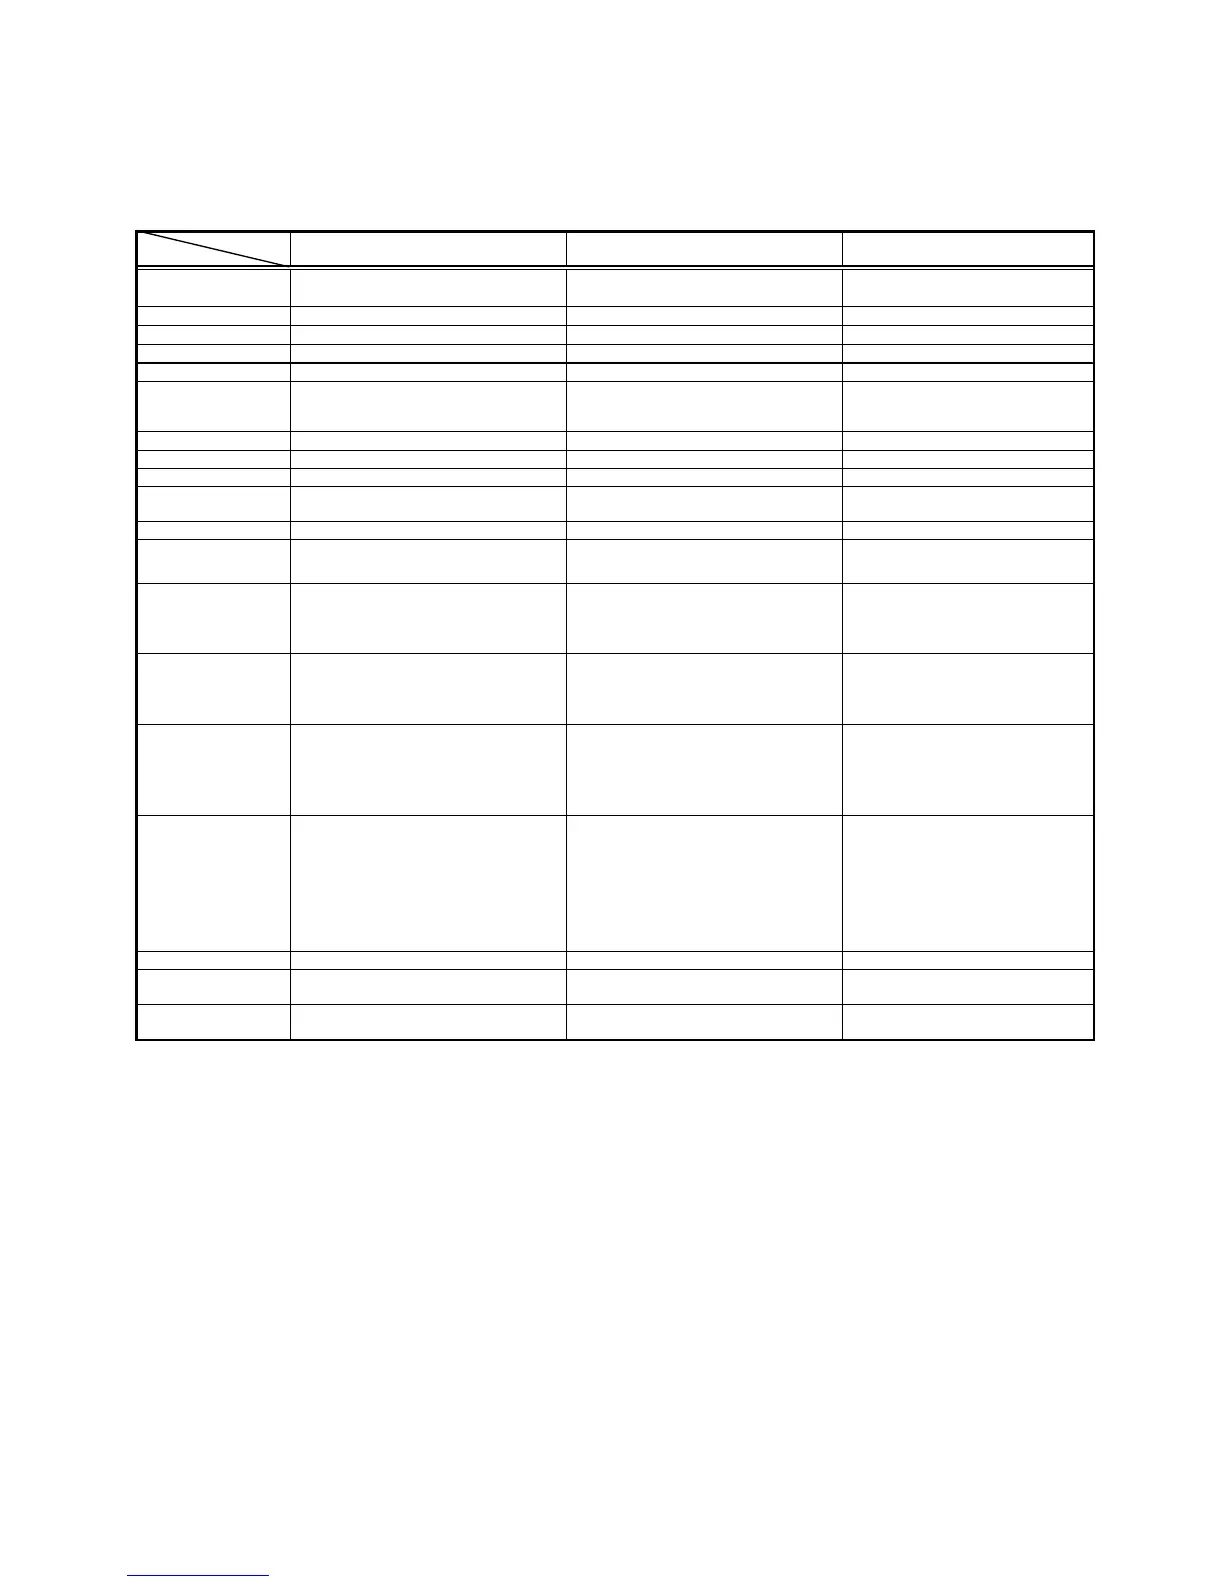
EasyManuals Logo
Home>JVC>Camcorder>GR-DVA10

JVC GR-DVA10 User Manual

JVC GR-DVA10
35 pages
To Next Page IconTo Next Page
To Previous Page IconTo Previous Page
Page #5 background imageLoading...
Page #5 background image
GETTING
STARTED
8en
Battery
pack
BN-V408U,
BN-V416U
or
BN-V428U
Power
This
camcorder's
2-way
power
supply
system
lets
you
choose
the
most
appropriate
source
of
power.
Do
not
use
provided
power
supply
units
with
other
equipment.
CHARGING
THE
BATTERY
PACK
‘Make
sure
you
unplug
the
camcorder's
DC
cord
from
the
AC
Power
Adapter/Charger.
Plug
the
AC
Adapter/
Y
AC
Power
‘Charger’s
power
cord
into
an
AC
outlet.
The
POWER
‘Adapter/Charger
indicator
lights.
POWER
Attach
the
battery
pack
with
the
®
©
mark
aligned
indlicatoe:
2
with
the
corresponding
marks
on
the
AC
Power
Adapter/Charger.
The
CHARGE
Indicator
begins
blinking
to
indicate
charging
has
started.
Battery
pack
Fally
charging
time
When
the
CHARGE
indicator
stops
blinking
but
stays
5
SoaSoae
lit,
charging
is
finished,
Slide
the
battery
and
lift
off
Bhy
VAQRU
pin.
90
in
Remember
to
unplug
the
AC
Adapter/Charger's
BN-VAT6U
(optional)
|
approx.
2
hrs
power
cord from
the
AC
outlet.
BN-V428U
(optional)
|
approx.
3
hrs.
20
min.
NOTES:
©
Ifthe
protective
cap
is
attached
to
the
battery
pack,
remove
it
first
©
Perform
charging
where
the
temperature
is
between
10°C
and
35°C
(50°F
and
95°F).
20°C
to
25°C
(68°F
to
77°F)
is
the
ideal
temperature
range
for
charging.
if
the
environment
is
too
cold,
charging
may
be
incom-
plete.
©
Charging
times
noted
above
are
for
a
fully
discharged
battery
pack.
Charging
time
varies
according
to
the
ambient
temperature
and
the
status
of
the
battery
pack.
©
To
avoid
interference
with
reception,
do
not
use
the
AC
Power
Adapter/Charger
near
a
radio.
©
if
you
connect
the
camcorder's
DC
cord
to
the
adapter
during
battery
charging,
power
is
supplied
to
the
camcorder
and
charging
stops.
©
Since
the
AC
Power
Adapter/Charger
processes
electricity
internally,
it
becomes
warm
during
use.
Be
sure
to
use
it
only
in
well-ventilated
areas
‘©
When
charging
the
battery
pack
for
the
first
time
or
after
a
long
storage
period,
the
CHARGE
indicator
may
not
light.
In
this
case,
remove
the
battery
pack
from
the
AC
Power
Adapter/Charger,
then
try
charging
again.
©
if
the
battery
operation
time
remains
extremely
short
even
after
having
been
fully
charged,
the
battery
is
worn
out
and
needs
to
be
replaced, Please
purchase
a
new
one.
About
Batteries
DANGER!
Do
not
attempt
to
take
the
batteries
apart,
or
‘expose
them
to
flame
or
excessive
heat,
as
it
may
cause
a
fire
‘or
explosion.
WARNING!
Do
not
allow
the
battery
or
its
terminals
to
come
in
contact
with
metals,
as
this
can
result
in
a
short
circuit
and
possibly
start
a
fire.
The
Benefits
Of
Lithium-Ion
Batteries
Temperatures:
Lithium-ion
battery
packs
are
small
but
have
a
large
power
Capacity.
However,
when
one
is
exposed
to
cold
temperatures
{below
10°C/S0°F},
its
usage
time
becomes
shorter
and
it
may
cease
to
function.
If
this
happens,
place
the
battery
pack
in
your
pocket
or
other
warm,
protected
place
for
a
short
time,
then
re-attach
it
to
the
camcorder.
As
long
as
the
battery
pack
itself
is
not
cold,
it
should
not
affect
performance.
(if
you're
using
a
heating
pad,
make
sure
the
battery
pack
does
not
come
in
direct
contact
with
it.)
BATTERY
RELEASE
1
Tilt
the
viewfinder
upward
©.
JA
With
the
arrow
on
the
battery
pack
pointing
downward,
push
the
battery
pack
slightly
against
the
i
battery
pack
mount
©,
then
slide
down
the
battery
pack
to
attach
it@.
‘if
the
battery
pack
is
attached
with
its
®
©
mark
set
q
in
the
wrong
direction,
a
malfunction
may
occur.
ey
td
®
To
Detach
The
Battery
Pack.
.
tilt
the
viewfinder
upward
@
and
slide
the
battery
pack
up
slightly
while
pressing
BATTERY
RELEASE
to
detach
it.
ATTENTION:
Keveutaiad
cording
Before
detaching
the
power
source,
Dpronante
secoreine
fine
make
sure
that
the
camcorder’s
power
Battery
pack
|
LCD
monitor
on/
|
LCD
monitor
off/
is
turned
off.
Failure
to
do
so
can
result
Viewfinder
off
Viewfinder
on
in
a
camcorder
malfunction.
BN-V408U
Thr.
Thr.
15
min,
(35
min.)
(40
min.)
INFORMATION:
BN-V416U
|
2his._
2
hes.
30
min
WLVASGRITING
a
pre
(optional)
|
(ihr.
10
min.)
(hr.
20
min.)
BN-V856U
battery
pack
and
AA-V80U
AC
BN-V428U
|
3
hrs.
30
min.
hrs.
20
min.
Power
Adapter/Charger.
Read
the
VU-V856KIT's
(optional)
(2
brs.)
2
brs.
20
min)
instruction
manuals
before
using.
BN-V856U
7
brs.
B
hrs.
40
min
{tis
impossible
to
charge
the
BN-V856U
battery
(optional)
hrs)
(4
hrs.
40
min.)
pack
using
the
provided
AC
Power
Adapter/
=
Charger.
Use
the
optional
AA-V80U
AC
Power
{_):
when
the
video
light
is
on.
Adapter/Charger.
NOTES:
©
Recording
time
is
reduced
significantly
under
the
following
conditions:
*
Zoom
or
Record-Standby
mode
is
engaged
repeatedly.
*
The
LCD
monitor
is
used
repeatedly.
©
Before
extended
use,
it
is
recommended
that
you
prepare
enough
battery
packs
to
cover
3
times
the
planned
shooting
time.
USING
AC
POWER
Use
the
AC
Power
Adapter/Charger
(connect
as
shown
in
the
illustration).
NOTES:
©
The
provided
AC
Power
Adapter/Charger
features
automatic
voltage
selection
in
the
AC
range
from
110
V
to
240V.
©
For
other
notes,
&
pg.
8.
(AT
To
AC
outlet
AC
Power
‘Adapter/Charger
To
DC
Input
connector
DC
cord

Other manuals for JVC GR-DVA10

Questions and Answers:

Question and Answer IconNeed help?

Do you have a question about the JVC GR-DVA10 and is the answer not in the manual?

JVC GR-DVA10 Specifications

General IconGeneral
BrandJVC
ModelGR-DVA10
CategoryCamcorder
LanguageEnglish

Related product manuals