INSTALLATION
(IN-DASH
MOUNTING)
INSTALACION
(MONTAJE
EN
EL
TABLERO
DE
INSTRUMENTOS)
INSTALLATION
(MONTAGE
DANS
LE
TABLEAU
DE
BORD)
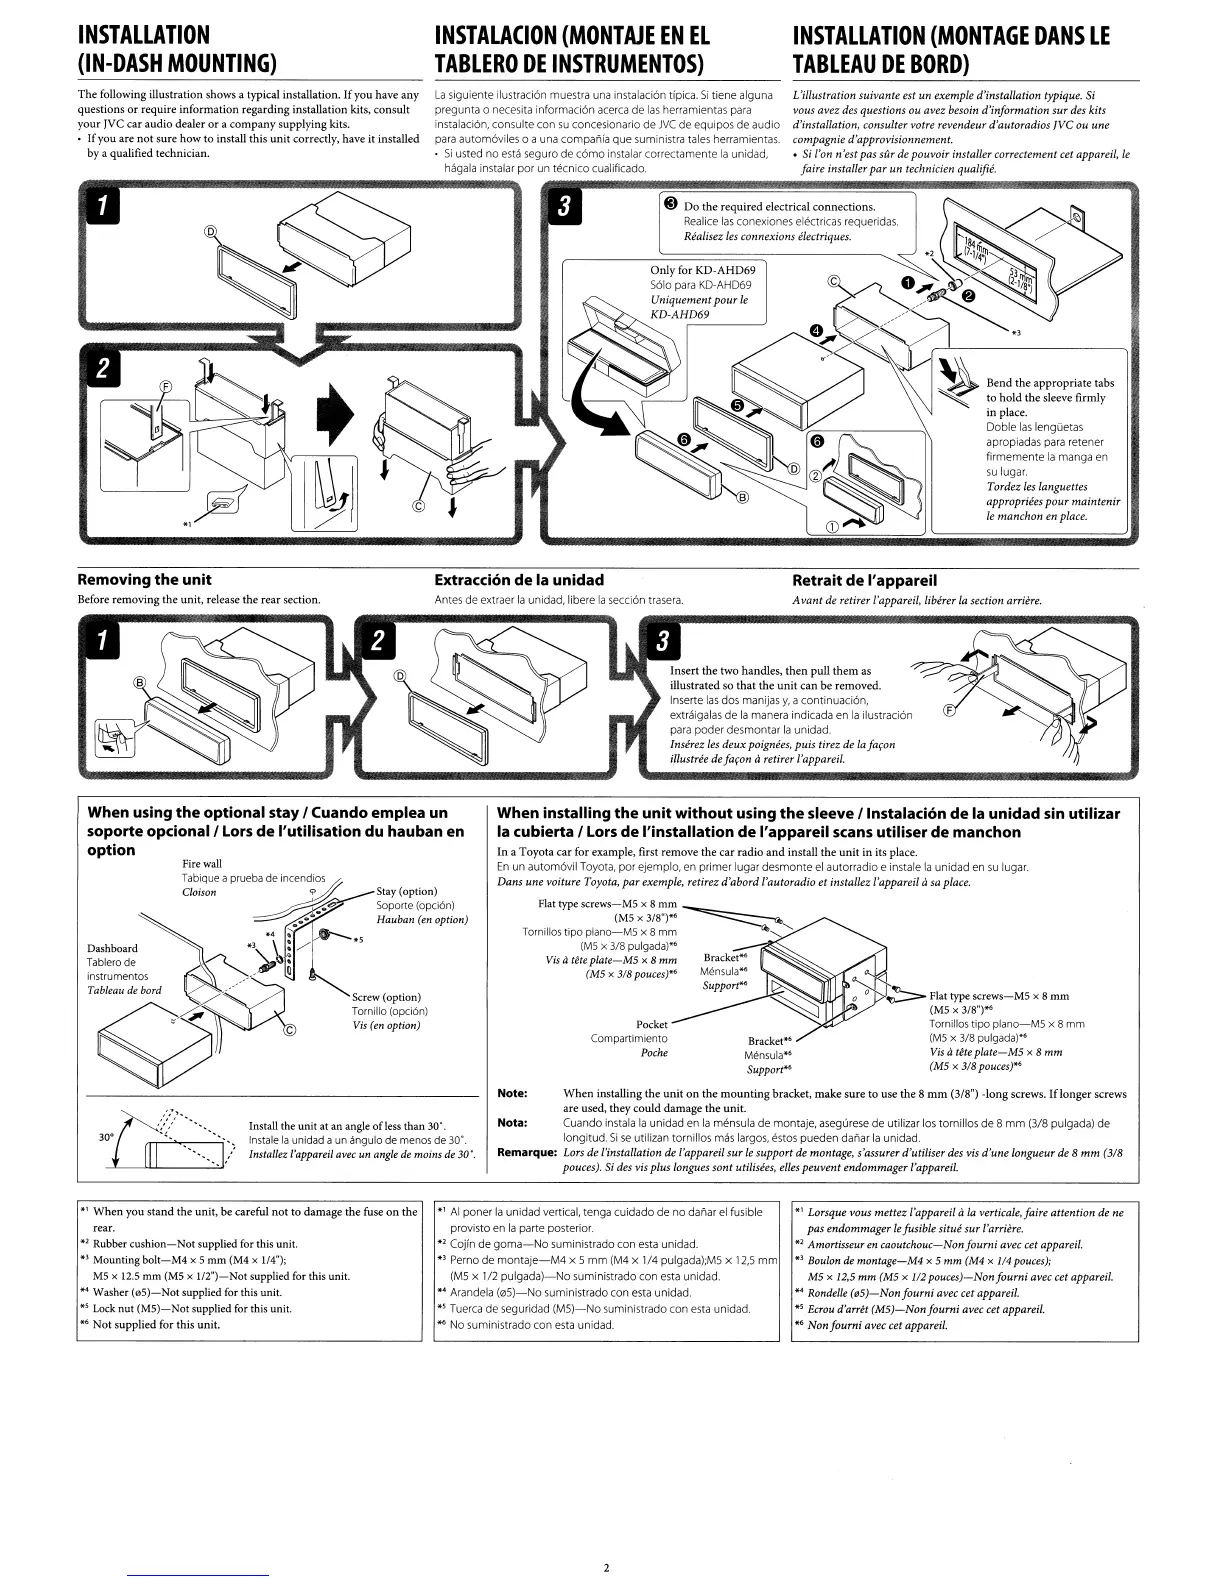
Bend the appropriate tabs
to hold the sleeve firmly
in place.
Doble
las
lenguetas
apropiadas para retener
firmemente
la
manga en
su
lugar
Tordez
Ies
Ianguettes
appropriees
pour
maintenir
Ie
manchon
en place.
~I
La
siguiente
i1ustraci6n
muestra
una
instalaci6n tfpica.
Si
tiene alguna L'i/lustratio11
suivante
est
un
exemple d'installation typique. Si
pregunta 0 necesita informaci6n acerca
de
las
herramientas para vous
avez
des questions au
avez
besoin
d'information
sur des kits
instalaci6n, consulte con
su
concesionario
de
JVe
de
equipos
de
audio d'installation, consulter volre revendeur d'autoradios
JVC
au
une
para
automoviles 0 a una compania que suministra tales herramientas. compagnie d'approvisionnement.
Si
usted
na
estc3
segura
de
como
instalar correctamente
la
unidad, • Si l'on n'est pas
sur
de
pouvoir
installer correctement cet appareil,
Ie
hagala instalar
por
un tecnico cualificado. faire installer
par
un
technicien qualifie.
-----~----~
.-~~~~~~~_
......
_-...,.
4D
Do
the required electrical connections.
Realice
las
conexiones electricas requeridas.
Realisez les connexiorlS electriques.
The
following illustration shows a typical installation.
If
you
have
any
questions
or
require information regarding installation kits, consult
your
Jve
car audio dealer
or
a
company
supplying kits.
•
If
you are
not
sure how to install this
unit
correctly, have it installed
by
a qualified technician.
Removing
the
unit
Before removing the unit, release the rear section.
Extraccion
de
la
unidad
Antes
de
extraer
la
unidad, Iibere
la
seccion trasera.
Retrait
de
I'appareil
A
vant
de retirer l'appareil, liberer
Ia
section arriere.
Insert the two handles. then pull
them
as
illustrated so
that
the
unit
can
be removed.
Inserte
las
dos manijas
y,
a continuaci6n,
extraigalas
de
la
manera indicada en
la
ilustracion
para poder desmontar
la
unidad.
Inserez
Ies
deux
poignees,
puis
tirez de la
ja~on
iUustree de
ja~on
aretirer l'appareil.
Stay (option)
Soporte (opci6n)
Hauban (en option)
Note:
When
installing the unit
on
the
mounting
bracket, make sure to use the 8
mm
(3/8") -long screws.
If
longer screws
are used, they could damage the unit.
Nota:
Cuando instala
la
unidad en
la
mensula
de
montaje, asegurese
de
utilizar los tornillos
de
8
mm
(3/8 pulgada)
de
longitud.
Si
se
utilizan tornillos mas largos, estes pueden danar
la
unidad.
Remarque: Lors de !'installation de l'appareil
sur
Ie
support de montage, s'assurer d'utiliser des vis
d'une
longueur de 8
mm
(3/8
pouces). Si des vis plus Iongues
sont
utilisees, elies
peuvent
endommager
l'appareil.
~
Flat type
screws-MS
x 8
mm
(MS
x
3/8")"
Tornillos tipo
plano-M5
x 8 mm
(MS
x 3/8 pulgada)"
Vis
atete
plate-MS
x 8
mm
(MS x
3/8
pouces)~
Pocket
(ompartimiento
Poche
When installing
the
unit
without
using
the
sleeve
Iinstalacion
de
la
unidad
sin utilizar
la
cubierta
I Lors
de
I'installation
de
I'appareil
scans
utiliser
de
manchon
In a Toyota
car
for example, first remove the
car
radio
and
install the
unit
in its place.
En
un
automovil Toyota, por ejemplo, en primer lugar desmonte el autorradio e instale
la
unidad
en
su
lugar.
Dans
une
voiture Toyota,
par
exemple, retirez d'abord l'autoradio
et
installez l'appareil asa place.
Flat type
screws-MS
x 8 mm
~
(MS
x
3/8")"
~
Tornillos tipo
plano-MS
x 8 mm
~
........
(MS
x3/8 pulgada)"
Vis
atete
plate-MS
x 8
mm
(MS x 3/8 pouces)*6
Install the unit at an angle ofless than 30·.
Instale
la
unidad a un angulo de menos de 30·
lnstallez l'appareil avec un angle
de
moins
de
30·.
When using
the
optional
stay
I
Cuando
emplea
un
soporte
opcionall
Lors
de
I'utilisation
du
hauban
en
option
Fire
wall
Tablque a prueba de
Incend~
ClolSon
~
~
.4.···~
Dashboard
*\,
~
: /
*S
Tablero
de
~
,b.
Instrumentos
~-'
0
Ta~~~1
C
~~~~~~~~~~I~n)
~
""',"~","I
*1
When you stand the unit, be careful
not
to damage the fuse
on
the
rear.
*2
Rubber
cushion-Not
supplied for this unit.
*3
Mounting
bolt-M4
x 5 mm (M4 x 1/4");
MS
x
12.5
mm
(MS
x
1/2")-Not
supplied for this unit.
*4
Washer
(0S)-Not
supplied for this unit.
*5
Lock
nut
(MS)-Not
supplied for this unit.
*6
Not supplied for this unit.
*1
AI
poner
la
unidad vertical, tenga cuidado
de
no
danar el
fUSible
provisto en
la
parte posterior.
*2
Cojin
de
goma-No
suministrado con esta unidad.
.,
Pemode
montaje-M4
x 5 mm
(M4
x 1/4 pulgada);M5 x
12.5
mm
(M5
x 1/2
pulgada)-No
suministrado con
esta
unidad.
*4
Arandela
(05)-No
suministrado con esta unidad.
*5
Tuerca
de
seguridad
(MS)-No
suministrado con esta unidad.
*6
No suministrado con esta unidad.
*1
Lorsque vous
mettez
l'appareil a
la
verticale,jaire attention de ne
pas
endommager
Ie
fusible situe
sur
l'arriere.
*2
Amortisseur en
caoutchouc-Non
fourni
avec eet appareil.
*3
Boulon de
montage-M4
x S
mm
(M4 x 1/4 pouces);
MS
x 12,5
mm
(MS x 1/2
pouces)-Nonfourni
aveccet
appareil.
*4
Rondelle
(eS)-Non
fourni
avec cet appareil.
*5
Ecrou d'arret
(MS)-Non
fourni
avec cet appareil.
*6
Non
fourni
avec cet appareil.
 Loading...