Do you have a question about the JVC RX-207TN and is the answer not in the manual?
Warnings to reduce risk of fire/electric shock by avoiding rain, moisture, and opening the unit.
Explanation of symbols for dangerous voltage and important instructions.
Guidelines for placing the receiver to ensure proper ventilation and avoid interference.
Instructions for safely connecting the power cord and unplugging the unit.
Precautions against inserting metallic objects and general safety advice.
Safety warnings regarding screws, covers, cabinets, rain, and moisture.
Enables remote control of equipment without a dedicated remote sensor via the receiver's sensor.
Automatically sets the source equipment to PLAY mode when a key is pressed.
Allows a tape deck to start recording automatically with a CD player or turntable.
Control of CD auto-changer with COMPU LINK-3 SYNCHRO terminal.
Important note regarding connecting JVC cassette decks to TAPE 2/VIDEO SOUND terminals.
Instructions for connecting a turntable's audio output to the receiver's PHONO jacks.
Instructions for connecting a CD player's audio output to the receiver's CD jacks.
Instructions for connecting a tape deck's IN/OUT jacks to the receiver's TAPE 1 jacks.
Instructions for connecting a second tape deck to TAPE 2/VIDEO SOUND jacks.
Instructions for connecting VCR or TV audio input/output to TAPE 2/VIDEO SOUND jacks.
Ensures correct stereo sound by matching left/right channels to receiver jacks.
Instructions on how to open and close speaker terminals to clamp wires.
Connecting the first pair of speakers to the LEFT and RIGHT terminals.
Connecting the second pair of speakers to the bottom LEFT and RIGHT terminals.
Ensure all components are connected before plugging in, and check wattage limits.
Turn off components before connecting/disconnecting power cords to prevent shock.
Plugging the receiver's power cord into a 120V/60Hz AC outlet.
Details on power supply from receiver's AC outlets for other components.
Instructions for connecting the included AM loop antenna to the receiver.
Connecting an AM outdoor antenna for improved reception, important note included.
Steps for connecting a 75-ohm coaxial antenna cable to the receiver.
Steps for connecting a 300-ohm flat antenna cable to the receiver.
Ensuring antenna conductors do not touch other terminals to prevent poor reception.
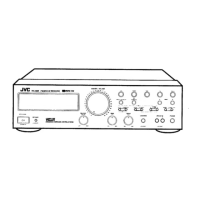
Turns the receiver on and off, or sets it to standby mode.
Selects which speaker pairs (1 or 2) are active.
Connect stereo headphones for private listening.
Buttons to choose audio sources like PHONO, CD, FM, AM, TAPE 1, TAPE 2.
Lights indicating which audio source is currently selected and playing.
Indicates when the surround sound effect is activated.
Displays tuning information and is used for setting/recalling preset stations.
Lights indicating remote signal reception or standby status.
Receives signals from the remote control unit; keep clear of obstructions.
Adjusts the low-frequency sound range (bass response).
Adjusts the high-frequency sound range (treble response).
Adjusts the volume balance between left and right speakers.
Adjusts the overall output sound level and is indicated by a light.
Activates or deactivates the surround sound effect.
Steps to turn on the receiver and activate the display.
How to select speaker outputs (Speakers 1, 2, or both).
Connecting headphones and disabling speakers for private listening.
Using Source Select buttons to choose the desired audio input.
Using the Volume control to set the listening level.
Using the Balance control to adjust sound distribution between speakers.
Using Bass and Treble controls to adjust sound frequencies.
Steps to tune in AM or FM stations using the TUNING key.
Assigning radio stations to memory channels (1-40) using MEMORY and Numeric keys.
Using the FM MODE/MUTE button for improved reception of weak FM signals.
Scanning radio frequencies and automatically presetting stations into memory.
Instructions on how to use numeric keys to select channel numbers for presets.
Using the receiver to record audio from various sources onto a tape deck.
Using a three-head tape deck to monitor recordings for sound quality comparison.
Connecting speakers and activating the SURROUND key for a surround effect.
Playing back stereo sources with the SURROUND key ON for an enhanced audio experience.
Notes on speaker system compatibility and limitations for surround sound playback.
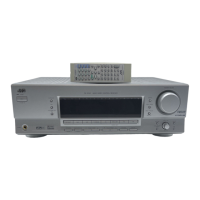
Aiming the remote at the sensor and basic usage instructions.
Explanation of key buttons for power, volume, and source selection.
Notes on remote control compatibility and Compu Link connection requirements.
Using the remote to select and preset FM/AM radio stations.
Using the remote to play or stop a turntable.
Using the remote to play, stop, and navigate tracks on a CD player.
Using the remote to select discs and play/stop the CD auto-changer.
Using the remote for playback, recording, and tape winding on Tape Deck 1.
Note that Tape Deck 2 cannot be operated with the remote; use unit buttons.
Using the remote to play, stop, record, and rewind video tapes.
Guidelines for replacing batteries in the remote control unit.
Important notes on mixing old/new batteries, using same brand, and removing batteries.
Solutions for when the receiver does not play and indicators do not light up.
Troubleshooting steps for when there is no sound from the speakers.
Diagnosing and fixing issues where sound only comes from a single speaker.
Solutions for continuous hiss/buzzing or cracking noise during FM reception.
Troubleshooting loud hum or howling noise during record playback.
Technical details for the amplifier section, including output power and distortion.
Technical details for the FM tuner section, including tuning range and sensitivity.
Technical details for the AM tuner section, including tuning range and sensitivity.
General specifications including power requirements, dimensions, and weight.