8
2. Taladre por el otro lado de la puerta
hasta terminar de cortar el agujero de 2
1
⁄
8
pulg. (54 mm).
3. Utilice un taladro con broca central de
guía para hacer un agujero de 1 pulg.
(25 mm) en la cara exterior de la puerta.
Los modelos con paso libre requieren un
agujero adicional de 1 pulg. (25 mm)
(véase A en la ilustración 2-1) en la cara
de la puerta (A) (repita el mismo proced-
imiento anterior).
4. Utilice brocas comunes para taladrar los
dos agujeros de
1
⁄4
pulg. (6 mm) donde van
los tornillos de montaje de 2
1
⁄
2 pulg. (64
mm).
5. Taladre el último agujero de 1 pulg.
(25 mm) para el pestillo, en el borde de la
puerta. Perfore hasta que pueda ver el
taladro desde el agujero de 2
1
⁄8 pulg.
(54 mm). Luego deténgase.
2. Drill through the other side of the door
until the 2
1
⁄
8
" (54 mm) circular hole is
completed.
3. Use a hole saw with a pilot drill bit to
drill the 1" (25 mm) hole in the door face.
Passage feature models require an
additional 1" (25 mm) hole in the door
face (see A in figure 2-1) (repeat same
drilling procedure as before).
4. Use standard drill bit to drill the two
1
⁄
4
" (6 mm) holes for the 2
1
⁄
2
" (64 mm)
mounting screws.
5. Drill the final 1" (25 mm) hole for the latch
through the edge of the door. Drill until the
hole saw is visible through the 2
1
⁄
8
" (54
mm) hole, then stop (see figure 2-1).
2
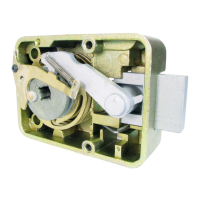
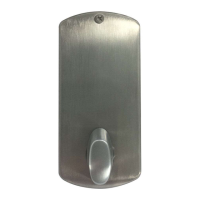
Instalación del pestillo
Installing the latch
1. Insert the latch into the 1" (25 mm) hole
until the face plate butts up against the
door edge. Make sure the bevel of the
latch bolt faces the same direction as the
door swings to close (A) (see figure 3-1).
2. Draw a line around the face plate, then
remove the latch. Use a sharp 1" (25
mm) wood chisel to remove
approximately
1
⁄
8
" (3 mm) of material or
enough so the face plate is perfectly flush
with the edge of the door (see figure 3-1).
3. Insert the latch into the 1" (25 mm) hole in
the door edge until the latch face plate is
flush with the door edge (see figure 3-2).
4. Secure the latch to the door with two of
the
3
⁄
4" (19 mm) screws provided (item “j”
on checklist).
1. Inserte el pestillo en el agujero de 1 pulg.
(25 mm) hasta que la placa de recubrim-
iento toque el borde de la puerta.
Asegúrese que el lado biselado del pestillo
va colocado en la misma dirección en que
gira la puerta para cerrarse (A) (véase la
ilustración 3-1).
2. Si es necesario, dibuje una línea alrededor
de la placa de recubrimiento y luego quite
el pestillo. Use un cincel puntiagudo para
madera de 1 pulg. (25 mm) y quite
aproximadamente
1
⁄
8 pulg. (3 mm) de
material o lo suficiente como para que la
placa de recubrimiento quede perfecta-
mente al ras con el borde de la puerta
(véase la ilustración 3-1).
3. Inserte el pestillo en el agujero de 1 pulg.
(25 mm) del borde de puerta hasta que la
placa de recubrimiento del pestillo quede
al ras con el borde de la puerta (véase la
ilustración 3-2).
4. Fije el pestillo a la puerta con dos de los
tornillos de
3
⁄
4
pulg. (19 mm) provistos
(artículo “j” en la hoja de verificación).
3
Perforación de los agujeros
Continuación
Drilling the holes
Continued

 Loading...