安裝方法
HOW TO INSTALL
5
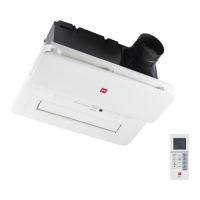
Connecting the duct pipe Refer to Section
3.Duct Pipe Connection on P.16.
連接管 道。
參考第16頁 3.管道的連接
6
連接電 源線 參考第9頁 電源線的連接
Use the supplied 4×30 self-tapping screw to fix
the adapter to the ceiling board.(The adapter
must cling to the ceiling edge.)
用附件 包所提供的1顆 4×30自攻螺 絲,將出風 口接頭
固定於 天花板上。(接頭必 須緊貼天花 板邊緣)
Connecting power cord Refer to Section
Power Cord Connection on P.9.
懸吊支 架的底部務必要緊貼天花板,否 則可能會導 致
機體無 法安裝。
提示事 項
Notice
懸吊支 架的安裝。
將懸吊 支架固定於吊桿。
調整吊 桿上的螺母,使懸吊 支架的底部 緊
貼天花 板。
(1)
(2)
Fix the suspension brackets to the
suspenders.
Adjust the nut on the suspenders to
make the suspension bracket bottom
cling to the ceiling board.
Install the suspension brackets.
Make sure that the suspension bracket
bottom clings to the ceiling board; otherwise
the main body cannot be installed successfully.
Self-tapping
screw 4 x30
自攻螺 絲
4x30
天花板 邊緣
Adapter
出風口 接頭
Ceiling edge
7
0 mm
Push the main body upward into the ceiling board
and wooden frame by closely leaning against the
adapter, clip the clipping position of the main body
into the locating slot of the adapter (otherwise, it
may have air leakage), and fix the main body with
three 4 x13 self- tapping screws.
將機體 緊靠出風口接頭往上推入天花板 與木框,
並使機 體上卡位卡入出風口接頭定位槽 中(否則漏風),
用3顆 4x13的自攻螺絲將機體牢固地固定 。
注意
CAUTION
固定機 體的螺絲,必須通過 懸吊支架螺 絲孔將機體 固定
於懸吊 支架和天花板,否則 產品有掉落 的危險。
出風口 接頭定位槽
懸吊支 架螺絲孔
自攻螺 絲 4×13(3顆)
機體卡 位
Clippingposition
ofthemainbody
Suspensionbracket
screwhole
Self-tapping screws
4×13 (3 pcs)
Locating slot of the adapter
The screws for fixing the main body to the ceiling
board should go through the hole of the suspension
brackets, otherwise, product may fall down.
12
5
5
安裝用 紙板
Installation cardboard
Suspender
吊桿
Ceiling
水泥板
Ceiling
board
天花板
Suspension
bracket bottom
懸吊支 架底部
螺母(另購)
Nut(not supply)
Nut(not
supply)
螺母(另購)
懸吊支 架
Suspension
bracket
Installation cardboard
安裝用紙板
墊片(另購)
Washer(not
supply)
墊片(另購)
Washer(not
supply)