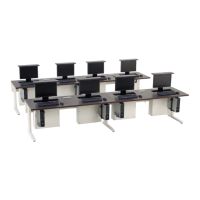
This document provides assembly instructions for the Smart Lift® Table System, a furniture solution designed to integrate technology seamlessly into a workspace. The system allows for the discreet storage and deployment of a flat screen monitor, keyboard, and mouse, enhancing the functionality and aesthetics of a desk or table.
Function Description
The Smart Lift® Table System is a motorized lift mechanism that allows a flat screen monitor to be raised and lowered into and out of a workstation. When not in use, the monitor, keyboard, and mouse are stored below the work surface, creating a clean and uncluttered environment. When needed, the system can be activated to smoothly raise the monitor to an ergonomic viewing height. The system includes features for cable management and power distribution, ensuring a tidy and functional setup.
The core function revolves around the motorized lift, which is controlled by either a manual lock mechanism or a remote control. The manual lock allows for direct operation by pressing down on the monitor until it locks or unlocks. The remote control provides a more convenient way to raise and lower the monitor, as well as to lock and unlock the system.
The system is designed to accommodate various flat screen monitors, keyboards, and mice, making it a versatile solution for different user needs. It also includes provisions for CPU holders and other electrical accessories, further integrating technology into the workspace.
Important Technical Specifications
Monitor Compatibility:
- Smart Lift units can accommodate a VESA compliant monitor with a maximum size of 23.6" deep x 19.0" high x 21.0" wide and a maximum weight of 15 lbs.
- The combined keyboard and monitor thickness must be less than 4.8" thick.
- The maximum depth of monitor tilt option is reduced by 6" to 3.0".
- Not all flat screen monitor styles are compatible with the monitor tilt kit.
Power Requirements:
- The transformer plug connects to a power source.
- The system operates on a low voltage power supply.
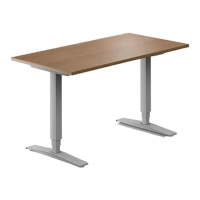
Dimensions:
- The system is designed to fit within standard desk or table work surfaces. Specific cutout dimensions are provided in the assembly instructions for proper installation.
- The monitor storage area is designed to accommodate monitors within the specified dimensions.
Materials:
- The system components are constructed from durable materials to ensure stability and longevity.
- Hardware includes various screws (e.g., #10 x ¾" screw, 4mm screw), nuts, and bolts.
Tools Required for Assembly:
- Screw Gun, Battery, Charger
- #25 Torx Drive Bit
- #2 Phillips Drive Bit
- ⁵⁄₁₆" Hex Allen Wrench
- ⁷⁄₁₆" Wrench
- ½" Wrench
Usage Features
Monitor Deployment and Storage:
- To Open: Press the "lock" button on the remote key FOB, then firmly push down on the center of the door until it reaches just below work surface level. The door should remain closed. Push down lightly on center of drawer and allow door to rise completely.
- To Close: Press the "lock" button on the remote key FOB, then firmly push down on the center of the door until it reaches just below work surface level. The door should remain closed.
- Manual Lock Operation: To open, push down firmly on center of door and release. The door should rise completely. To close, push down firmly on center of door or use the handle and push down until slightly below the work surface level. Release. The door should remain closed.
- Remote Lock Operation: The remote control can be re-programmed if it is experiencing problems.
Cable Management:
- The system incorporates cable management features to route power and data cables discreetly.
- Corrugated hoses and clamps are used to organize and protect cables, preventing tangles and damage.
- Excess wires within the garage housing should be neatly bundled to avoid interference with the mechanism.
Power Distribution:
- The system includes a transformer plug and control box for power distribution to the lift mechanism and potentially other integrated devices.
Keyboard and Mouse Integration:
- A keyboard/mouse tray is integrated into the system, which can be adjusted for optimal positioning.
- The tray is designed to hold the keyboard and mouse securely when the monitor is stored.
Monitor Tilt Installation (Optional):
- An optional monitor tilt kit allows for adjusting the monitor's viewing angle.
- Installation involves attaching the tilt bracket to the monitor and then to the lift mechanism.
- Not all flat screen monitor styles are compatible with the monitor tilt kit.
Maintenance Features
Assembly and Disassembly:
- The instructions emphasize the importance of securely tightening all screws, nuts, and bolts during assembly to prevent failure and personal injury.
- Regular checks of all fasteners are recommended to ensure they remain tight.
Troubleshooting:
- The manual provides guidance on verifying operation of the unit and troubleshooting remote lock issues.
- If the remote control is not working, it can be re-programmed.
Cleaning:
- While not explicitly detailed, regular cleaning of the visible surfaces of the table system and monitor is implied for maintaining appearance.
Component Replacement:
- The modular design suggests that individual components, such as the lift mechanism, control box, or remote control, could potentially be replaced if they malfunction.
Safety Precautions:
- A "CAUTION" warning is prominently displayed throughout the manual, reminding users that units must be assembled securely and checked periodically to prevent failure and injury.
- It advises against discarding important Smart Lift installer instructions, especially for IT/Computer Installer steps.
This Smart Lift® Table System offers a sophisticated and practical solution for modern workspaces, combining ergonomic design with efficient space utilization and advanced technology integration.