For )**+# models with 8#<+– 1:
<,
Ico
5
7
+
6
-
Power supply
16-30 Vdc
Vdc
A
-
+
Ico
5
7
+
6
-
Vdc
-
<,
+
A
<,
SETTINGS AND USE OF THE TRANSMITTER
➢
!674!5352,,
,,46,4
To configure the transmitter, unscrew the 4
screws of the housing then open it. DIP
switches allowing the different settings are
accessible.
1
2
3
4
...
...
...
...
Display/regulator/PLC
1
To set a measuring range, put the on-off switches 2, 3 and 4 as shown below :
➢
Display/regulator/PLC
1
+
-
On-off switch
Setting of
measuring range
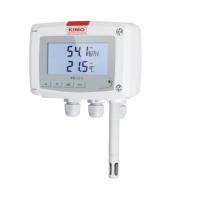
MOUNTING
To mount the transmitter, mount the ABS plate on the wall (drilling : Ø6 mm, screws and pins are
supplied).
Insert the transmitter on the fixing plate (see A on the drawing beside). Rotate the housing in
clockwise direction until you hear a “click” which confirms that the transmitter is correctly installed.
04
8054
34
16-30 Vdc
,,=
It is possible to configure intermediary ranges.
Attention : the minimum difference between the minimum scale and the maximum scale is 20.
Example: for a 0-500 ppm transmitter, the minimum delta is 20 ppm. So the transmitter could be configure from 0
to 70 ppm from 0 to 20 ppm.
• To access to the configuration via software :
- Set the switch as shown beside.
- Connect the cable of the LCC-S to the connection of the transmitter.
• To configure the transmitter, please refer to the LCC-S user manual.
Caution : The configuration of the parameters can be done either by DIP switch, or by software (you cannot combine both solutions).
CONFIGURATION VIA LCC-S SOFTWARE (optional)
1
2
3
4
(,*
1
+>++
;+*++ ;+<++
1
2
3
4
1
2
3
4
1
2
3
4
Off On
1
Active switch