5 of 12 2011-9-23
3.Basic Operation
1. Startup:
Press the red POWER button for a long time (programmable, default set 2
seconds) to switch the radio on/off
2. Volume
Press the “MONITOR” or “Squelch” button to listen to the background noise first,
and then adjust the volume by turning the volume control knob.
3. Channel
The radio can provide 256 conventional channels (16 Zones can be programmed, from
1 zone to 16 zone, 16 channels is in each zone at most; Zone 0, which cannot be
programmed, includes all the valid channels.)。
Press the “CHANNEL UP” or
“CHANNEL DOWN” button to select the channel. Press the “ZONE UP” or
“ZONE DOWN” button to select the group you require.
4. Transmission
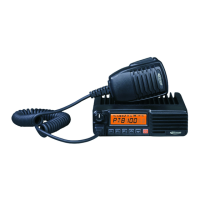
To send a call, press the PTT button and speak to the microphone in the normal
voice. Please keep the microphone about 3 or 4 cm far from your mouth. After
speaking, please loosen the PTT button.
5. Receive
The radio will return to the receiving state after you loosen the PTT button. The
distributor may have set the CTCSS/DCS signaling in the programmed radio of
your radio. On the channels with CTCSS/DCS are set, you can only hear the
call from other radio with the same CTCSS/DCS.
4. Programmable Button Function
/ , , , , can be programmed as one of the auxiliary functions.
Buttons Function Description
0. None No function
1. Channel Up Select the next channel
2. Channel Down Select the previous channel
3. Zone Up Select the next zone
4. Zone Down Select the previous zone
5. Display Channel
Frequency
Press this button and the LCD will show the frequency of the current channel.
6. Display Channel Name Press this button and the LCD will show the name of the current channel.
7. Display Mode Switch
Press this button and the LCD will show “Channel Number”, “Channel Name”,
“Zone Number, Zone Name” and “Channel Frequency” alternately.
8. OST Change the setup of preset CTCSS/DCS for the current channel.
9. Power level
Selection
Press this button to make selection among the high, medium and low
transmission power, and “H”, “M” and “L” will be shown on the LCD to represent
the current transmission power.
10. Squelch Level Selection
Press this button to enter the “Squelch Level Adjustment Mode” first, and then
press the
/ button to adjust the level. Press the button to
save the selected squelch level and quit this mode.
11. Key lock To toggle between locking/unlocking your radio’ keypad.
12. Scan Start/close the scanning function of system.
13. Nuisance Delete When one channel continually generated unwanted noise. This allows you