Do you have a question about the Kodak PS50 Series and is the answer not in the manual?
Safety guidelines and precautions for using the scanner.
Information on environmental compliance and disposal.
EU regulations regarding product disposal and REACH.
Information on noise emission levels from the scanner.
FCC compliance statements and interference guidelines.
Lists additional documentation available for the system.
Details available optional accessories for the scanner.
Details the accessory for scanning pages from albums.
Adds scanning capability for exception photos and documents.
Adds scanning capability for larger documents and exception photos.
Lists the items included in the scanner package.
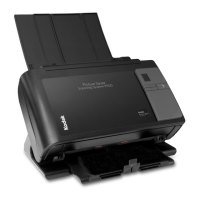
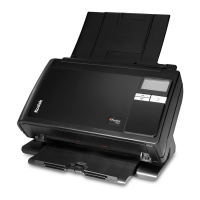
Illustrates and labels the front components of the PS50 Scanner.
Provides access to internal components like the imaging area.
Holds photos or documents for scanning.
Displays Smart Touch task numbers and status indicators.
Illuminates or flashes to indicate scanner status.
Used to select Smart Touch tasks.
Collects scanned photos or documents.
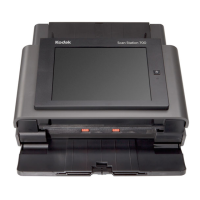
Illustrates and labels the internal components of the PS50 Scanner.
Adjust to accommodate different photo sizes.
Tracks the movement of paper and photos through the scanner.
Cover for cleaning or replacing feed module tires.
Ensures smooth feeding and separation of photos.
Area for scanning; needs to be kept clean.
Area for scanning; needs to be kept clean using approved supplies.
Lever to release the separation module for cleaning/replacement.
Adjusts space between feed/separation modules for special handling.
Opens the scanner for access to the paper path.
Detects photos or documents in the input tray.
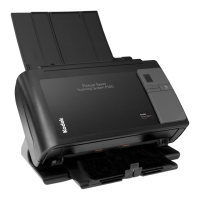
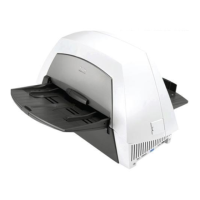
Illustrates and labels the rear components of the PS50 Scanner.
Connects power to the scanner.
Connects the scanner to the PC.
Secures cables when the scanner is moved.
Connects a security lock for the scanner.
Turns the scanner on and off.
Provides detailed steps for installing the scanner.
Notes for installing the scanner, especially on Windows 7/8.
Step-by-step guide to install the scanner software.
Step-by-step instructions for connecting power and USB cables.
Steps to power on the scanner and initial status.
Procedures for turning off the scanner using power switches.
How to launch the scanning application.
Methods to close the scanning application.
Specific message displayed during installation on Windows 7/8.
Details on inserting the CD and starting the software installation.
Requirements for registering the product, including internet connection.
Guidance on adjusting screen resolution for optimal display.
How to operate the toggle or rocker power switch.
Importance of the USB dongle and its placement.
The initial screen for entering customer and order details.
The main screen for placing and initiating scans.
Screen for selecting individual photos from flatbed scans.
Displays images during the scanning process.
Allows customization of scanning parameters.
Screen for editing and enhancing scanned images.
Allows preview of scanned photos before order completion.
Displays detailed preview of scanned images.
Final screen to review and output the scanned order.
Options for burning scanned data to CD or DVD.
Options for burning scanned data to a Kodak Picture CD.
Options for copying scanned data to other locations.
Attempts to eliminate streaks in scanned images.
Accesses the Scan Settings screen for parameter adjustments.
Indicates completion and moves to Order Preview.
Scan additional batches or use flatbed accessory.
Automatically rotates images to the correct orientation.
Enhances color, contrast, and brightness of scanned images.
Tools for zooming, adding, deleting, and resetting image selections.
Options for setting image resolution and compression.
Adjusts image focus and edges with None, Low, or High options.
Determines how scanned files are outputted to CD, DVD, or other media.
Details on icons used for image editing and enhancement.
Provides a summary of images within the order and folder.
Options for verification, burning, and formatting discs.
Dialog box for copying scanned orders to other locations.
Steps to prepare the scanner for scanning photos.
Guidelines for preparing photos before scanning.
Best practices for handling photos to ensure quality and prevent damage.
Detailed procedure for scanning batches of photos.
Recommends scanning in the downward position with the cover closed.
Sliding guides to accommodate photo width.
Adjusting trays for scanning needs; output tray extends to 14 inches.
Stacking photos with aligned edges for single-item feeding.
Removing foreign objects to prevent scanner damage.
Ensuring inks and correction fluids are dry before scanning.
Placing photos face up; tips for feeding large stacks.
Methods to scan photos in a specific sequence using Batch Scan.
Using face-down placement for automatic reordering by software.
Recommends clean hands or gloves and avoiding touching the surface.
Suggests using flatbed accessories to avoid automated handling damage.
Use in a clean, dust-free environment and cover when not in use.
Scanning both sides in separate batches, or selecting sides for rescanning.
Double-clicking the shortcut or selecting from Start menu.
Required field for identifying the order.
Placing photos face up in the input tray or on the flatbed.
Scanning with scanner tilted down and photos face up.
Eliminates streaks on back side images.
Changing scan settings like mode, resolution, and sharpening.
Initiating scans, including warming up scanner lamps.
Shows scanned images 1-up; can be paused for review.
Shown when using flatbed scan with Photo Selector Accessory.
Making changes like straightening, deleting, zooming.
Click to finish scanning and move to order preview.
Options for scanning more batches, using flatbed, auto-rotate, Perfect Touch, or redo scan.
Message asking if scanning is complete for the order.
The screen displayed after confirming scanning completion.
Allows manual rotation and editing of individual images.
Finalizes the order and allows selection of output options.
Procedure for opening the scanner cover.
General guidelines and procedures for cleaning the scanner.
Detailed steps for cleaning scanner rollers.
Steps to remove and clean the separation module.
Steps to remove and clean the feed module.
Instructions for vacuuming dust and debris from the scanner.
Steps for cleaning the upper and lower imaging areas.
Procedure for using a transport cleaning sheet.
Information on replaceable tires and their life.
Steps to replace the separation module and tires.
Steps to replace the pre-separation pad on the document separation module.
Steps to remove and replace feed module and tires.
Adjusting roller tension to fix jams or multi-feeds.
Contact information for ordering scanner supplies.
Recommendations for maintaining a clean scanning environment.
Guidelines for handling photos to ensure quality.
Importance of regular scanner cleaning.
Tips for optimal photo scanning results.
Methods to minimize streaks in scanned images.
Causes and solutions for horizontal bands in scanned images.
Recommends clean hands or gloves and avoiding touching the surface.
Suggests using flatbed accessories to avoid automated handling damage.
Use in a clean, dust-free environment and cover when not in use.
Scanning both sides in separate batches, or selecting sides for rescanning.
Guide to check possible solutions for scanner issues.
Solutions for photo jamming and multiple feeds.
Procedure for safely removing jammed photos.
Checks for power, connection, and photo placement issues.
Recommendations for display settings.
Checks photo placement and scanning orientation.
Adjusting side guides and background for batch/flatbed scans.
Suggests cleaning rollers for roller marks.
Cleaning scanner and using Image Cleaner tool.
Checks PC requirements and DPI settings.
Common issues encountered during software installation.
Notes on .NET Framework and security software during installation.
Known software conflicts affecting scanner operation.
Modifying PrintScan.ini for output paths and folder sizes.
Table of error codes and their possible solutions.
Explains codes displayed in the Function window and their remedies.
Location and purpose of the error log file.
How to contact Kodak for support and information.
Details on speed, technology, resolutions, and file formats.
Dimensions, weight, temperature, humidity, and noise levels.
Lists software included with the scanner package.
Recommended CPU, RAM, USB ports, and disk space.
List of compatible operating systems and installation privileges.
Required .NET Framework versions and internet connection for registration.
Overview of Kodak's limited warranty terms for scanners.
Conditions under which the warranty does not apply.
Disclaimer regarding consequential or incidental damages.
Instructions for packaging and shipping products for warranty return.
Steps to obtain RMA and return the scanner.
Purchaser's responsibilities regarding data backup and liability.
Descriptions of available Kodak service methods.
Details of the advance replacement program.
Procedures for using the Depot Repair Service.
Eligibility, consumables, and defective parts replacement policies.
Grants license to use software and outlines usage restrictions.
Details software copyright ownership and license term.
Warranty for software performance and policy for hardware keys.
Exclusions and limitations of Kodak's liability and customer remedies.
Specifies the governing laws for the software agreement based on purchase location.
Outlines government rights regarding software use and disclosure.
| Scan Speed (Simplex) | Up to 50 ppm |
|---|---|
| Scan Speed (Duplex) | Up to 100 ipm |
| Optical Resolution | 600 dpi |
| Duplex Scanning | Yes |
| Daily Duty Cycle | 5000 pages |
| Supported Operating Systems | Windows |
| Maximum Document Size | 8.5" x 14" |
| Color Depth | 24-bit |
| Scan Speed (Color, 200 dpi) | 50 ppm |
| Scan Speed (Black & White, 200 dpi) | 50 ppm |