7
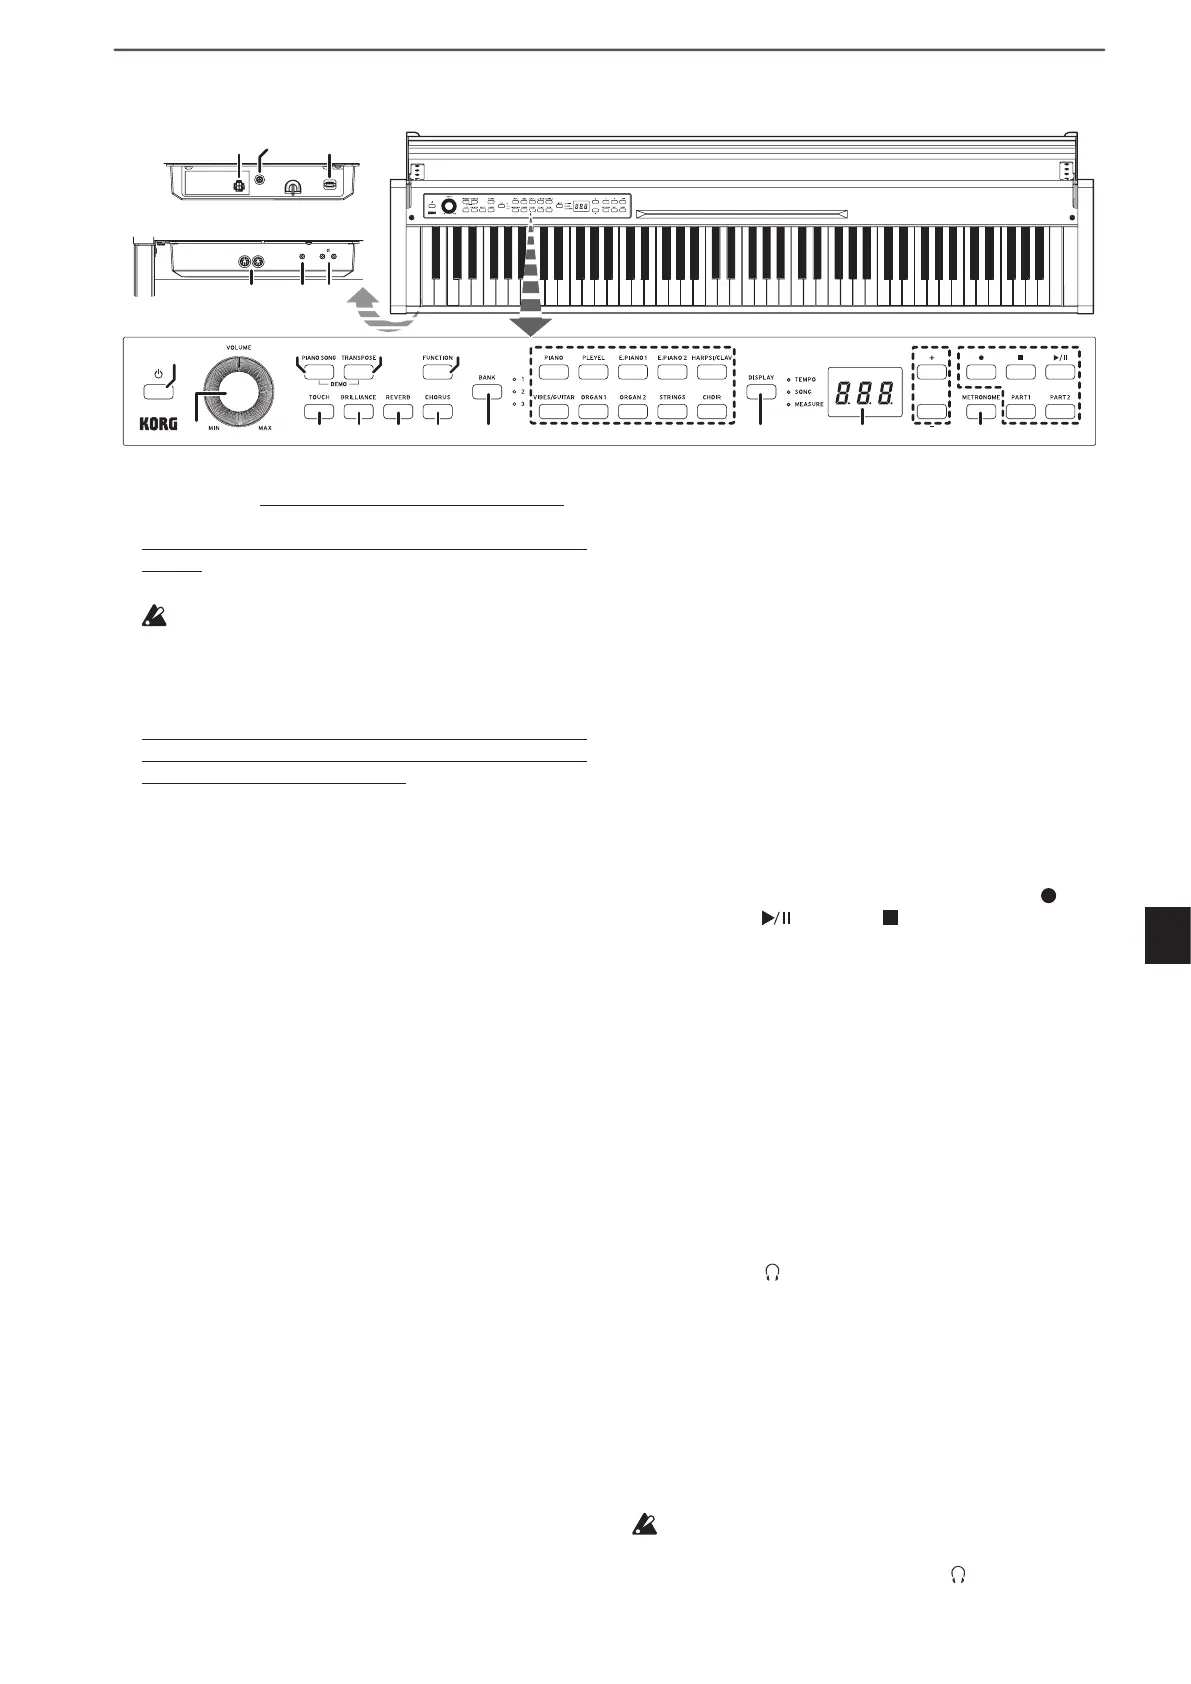
11. Sound buttons:Thesebuonsareusedtoselectfrom
30sounds(10×3banks).Twobuonscanbepressedto
play two sounds simultaneously (Layer mode).
12. DISPLAY button, LEDs:Thisbuonisusedtoselectthe
content of the multidisplay. The illuminated LED indi-
cates the current content.
13. Display: The LED display shows various information
aswellastheselectedseingforthemetronomeand
Function Mode parameter.
14. +, - buttons:Usethesebuonstospecifyaseing,value
or song.
15. METRONOME button:Usethisbuontostart/stopthe
metronome. While the metronome is being used, the
buonislit.Inaddition,holddownthebuontoenter
the Metronome seings mode, where various metro-
nomeseingscanbespecied(see page 12).
16. Recorder buttons:Usethesebuonstorecord( ), play
back/pause ( ) and stop ( ) performances as well as
to select the part to be recorded/played back (PART1
and PART2).
17. MIDI (IN, OUT) jacks: These jacks allow the Poetry to in-
teract with other MIDI equipped devices—keyboards,
drum machines, synthesizers, etc.
OUT (left):
Sends MIDI data OUT of the Poetry to the
MIDI IN of the other device.
IN (right):
Receives MIDI data being sent from the MIDI
Out of the other device.
18. LINE OUT jack: This stereo mini phone jack is the main
audio output jack. Using this jack, the output of the Po-
etry can be connected to the input of an external ampli-
er,poweredspeaker,audiointerfaceorrecorder,etc.
The VOLUME knob controls the output volume.
19. Headphone ( ) jacks (front of connector box): Two ste-
reo mini headphone jacks are located underneath the
keyboard to the left-hand side. Plugging headphones
into either of these jacks will mute the internal speakers.
20. Speaker connector: The cord from the speaker box
plugs into this connector (see “Assembling the Stand”
on page 4).
21. DC 24V jack: Connect the included AC adapter here.
22. Pedal connector:
The cord from the pedal unit plugs into
this connector (see “Assembling the Stand” on page 4).
For the following terminals, use a cable of 3 m or less to
prevent malfunction.
MIDI (IN, OUT) jacks, Headphone ( ) jacks
Parts and their functions
1. Power button: PressthisbuontoturnonthePoetry. At
thesametime,thedisplayandsoundbuonslightup.
ToturnothePoetry,holddownthisbuonforabout1
second.ThePoetrywillturnowhenthepowerbuon
is released.
When the Poetryis turnedo,allparameters re-
turntotheirfactorydefaultseings.However,the
Poetrycanbesettosavetheparameterseings(Re-
ferto“Saveparameterseings”onpage16).
Auto Power O
ThePoetrycanbesettoautomaticallyturnoafteraset
period of time has passed with no keys being played or
with no songs being played back. To disable this feature
referto“Autopowero”onpage16.
2. VOLUME knob: This knob adjusts the volume for the
speakers, the LINE OUT jack and the headphone jacks.
3. PIANO SONG button:ThisbuonisusedtoenterPiano
songmode.Inthatcase,thebuonlightsup.Simultane-
ouslypressingthisbuonandtheTRANSPOSEbuon
enters the Sound demo song mode.
4. TRANSPOSE button:Thisbuonisusedtoadjusttrans-
position.Whiletransposing,thebuonlightsup.Simul-
taneouslypressingthisbuonandthePIANOSONG
buonenterstheSounddemosongmode.
5. FUNCTION button: This buon is used to enter the
Function mode, where pitch, temperament and other
seingscanbespecied.Holddownthebuontoenter
theMIDIfunction mode,whereMIDIseings canbe
specied.ThebuonlightsupwhenthePoetryenters
the Function mode and blinks when it enters the MIDI
function mode.
6. TOUCH button:Thisbuonletsyouselectthekeyboard
sensitivity.
7. BRILLIANCE button: This buon is used to adjust the
brightness of the tone.
8. REVERB button:Thisbuonisusedtoturnon/othe
reverb, which adds ambience to the sound. When this
eectison,thebuonwillbelitup.
9. CHORUS button:Thisbuonisusedtoturnon/othe
chorus, which adds richness to the sound. When this
eectison,thebuonwillbelitup.
10. BANK button, LEDs:Thisbuonisusedtoselectthede-
sired sound bank. The LED for the bank that’s currently
selected will light up.
OUT -MIDI- IN LINEOUT12
1
3
4
5
6
7 8 9 10 11
12 13 14
15 16
17 18 19
Control panel
Connecter box
 Loading...