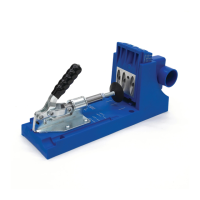
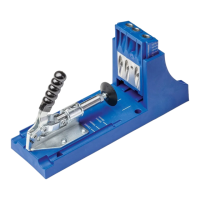
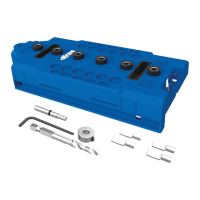
The Kreg Jig® HD is a heavy-duty pocket-hole jig designed for creating strong joints in 1½" (38mm) thick materials, particularly suited for outdoor projects like guardrails. This manual provides comprehensive instructions for setting up the jig, drilling pocket holes, and utilizing it for repair applications and mitered corners.
Function Description:
The Kreg Jig® HD facilitates the creation of pocket-hole joints, a robust method for joining wood pieces. It guides a specialized drill bit at a precise angle to create a pocket hole, into which a self-tapping screw is driven to pull the joint tightly together. The "HD" designation indicates its suitability for heavy-duty applications, specifically with thicker materials, making it ideal for structural outdoor projects where strength and durability are paramount. The system is designed to produce joints that meet International Residential Code (IRC) live-load requirements for guardrails when constructed as specified.
Important Technical Specifications:
- Material Thickness: Optimized for 1½" (38mm) thick material.
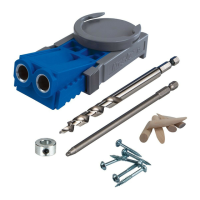
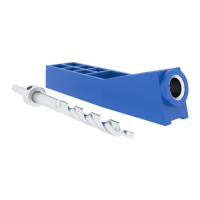
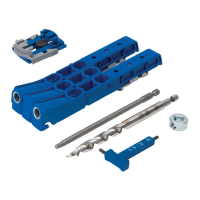
- Drill Bit: Kreg Jig® HD Drill Bit, designed for creating the specific pocket hole geometry required for HD screws. The stop collar on the drill bit is set to a depth of 4¾" (121mm) to ensure proper drilling depth for 1½" (38mm) material.
- Driver Bit: Kreg Jig® HD Driver Bit, a 6"-long #3 square drive bit, used for driving the HD screws.
- Screws: Kreg Jig® HD Screws, available in 30-count and 125-count packs, specifically designed for use with the Kreg Jig® HD to provide maximum holding power in heavy-duty applications.
- Compatibility: The Kreg Jig® HD drill guide is compatible with Kreg Jig® and Kreg Jig® Master System bases, allowing for enhanced functionality such as dust collection.
- Guardrail Compliance: Guardrail connections made with the Kreg Jig® HD and HD Screws, when executed exactly as shown in the manual using structurally sound materials, meet IRC live-load requirements for connections of railing members to posts.
Usage Features:
- Simple Setup: The jig setup involves three main steps: adjusting the stop collar on the drill bit, attaching the stop block to the drill guide, and checking the bit setting.
- Stop Collar Adjustment: The stop collar is adjusted on the Kreg Jig® HD Drill Bit to a specific depth (4¾" or 121mm) to ensure the correct pocket hole depth for 1½" (38mm) thick material. The bit shoulder should align with the 4¾" mark on the drill bit's scale.
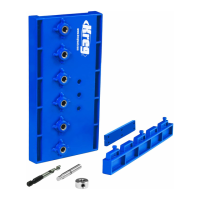
- Stop Block Attachment: The stop block is attached to the drill guide. When using a Kreg Wood Project Clamp (not included), the large clamp pad slides into the T-slot recess on the back of the drill guide and locks in place with the end stop. For F-style or C-clamps, only the end stop is installed, as these clamps do not lock onto the drill guide.
- Bit Setting Check: After attaching the stop block, the drill bit is inserted into the drill guide. The tip of the bit should extend approximately ⅜" (10mm) past the end of the drill guide when the stop collar is against the guide.
- Pocket-Hole Placement:
- General Spacing: For strong joints, pocket holes should be spaced evenly across the workpiece.
- 2x4 Material (3½" [89mm] wide): Two pocket holes are typically used, spaced 1" from each end. The drill guide is centered on the width of the workpiece, utilizing both bit guides.
- 2x6 Material (5½" [140mm] wide): Two pocket holes are typically used, spaced 1" from each end. For 2x6s and wider material, pocket-hole centerlines should be marked far enough from the end of the board (about 6" [152mm]) to clear the end of the drill guide. One bit guide is aligned with each marked centerline.
- 2x8 Material (7¼" [184mm] wide): Three pocket holes are typically used, spaced 1" from each end and 2⅝" from the center. Similar to 2x6s, centerlines are marked, and bit guides are aligned accordingly.
- Drilling Pocket Holes:
- Place the stop block against the end of the board, position the drill guide, and clamp it in place. For 2x4s, center the drill guide. For wider materials, align one bit guide with each marked centerline.
- Before drilling, insert the drill bit into the drill guide until the tip touches the workpiece, then withdraw it about ¼" (6mm).
- Turn on the drill and feed the bit into the workpiece, withdrawing the bit as needed to clear chips.
- Stop drilling when the stop collar contacts the drill guide. Wait for the drill to stop rotating before withdrawing the bit.
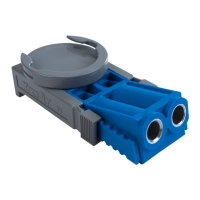
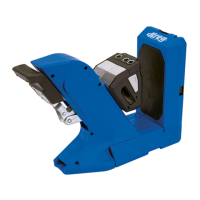
- Repair Applications: The removable stop block allows the Kreg Jig® HD to be used for repairing or reinforcing existing joints. For these applications, the stop block is removed, and the drill guide is clamped directly to the workpiece. The stop collar position on the drill bit remains unchanged. If clamping is not possible, the drill guide can be fastened directly to the workpiece by driving a screw through the hole in the center of the guide.
- Mitered Corners:
- To secure miter joints with HD Screws, drill one pocket hole approximately ½" (13mm) from the miter "heel."
- To place a screw close to the miter "toe" while keeping the pocket hole entirely on the face of the part, remove the stop block from the drill guide. Position the drill guide on the workpiece, angled away from the miter toe (e.g., 30 degrees). Clamp the drill guide and drill the pocket hole. This allows for a pocket hole placement approximately 2½" (64mm) from the toe.
- For longer miter joints, if the distance between pocket holes approaches 6" (152mm), drill an additional pocket hole midway between the two. Generally, space pocket holes about 3" (76mm) center-to-center along a joint. Pocket holes can be drilled in both parts or all in one part.
- Additional Components:
- Kreg Wood Project Clamps: Recommended for keeping workpieces perfectly flush. Center the clamp pads on the joint line with the large pad on the face opposite the pocket holes.
- Kreg Jig® Base: The Kreg Jig® HD is compatible with Kreg Jig® and Kreg Jig® Master System bases. The Master System's dust collection attachment helps maintain a clean shop and extends drill bit life by efficiently removing chips.
Maintenance Features:
- Drill Bit Care: The drill bit is sharp and should be handled with care. Efficient chip removal during drilling (by withdrawing the bit as necessary) helps extend the life of the drill bit.
- Work Area: Keep the work area well-lit, un-cluttered, and clean for safety and efficiency.
- Guardrail Inspection: For guardrails constructed with the Kreg Jig® HD, it is the homeowner's responsibility to periodically inspect the guardrail and perform any required maintenance to ensure continued compliance with IRC live-load requirements, as materials and fasteners are exposed to weather and subject to degradation over time.
- Replacement Parts: Replacement Kreg Jig® HD Driver Bits, Kreg Jig® HD Drill Bits (which include a stop collar and hex wrench), and Kreg Jig® HD Screws are available to ensure continued functionality and performance of the system.