EasyManua.ls Logo

Kverneland ES - User Manual

Kverneland ES
82 pages
Print Icon
To Next Page IconTo Next Page
Loading...
ES/LS
Operator‘s manual
Original operator‘s manual
Edition 06.2015
Date of printing 06.2015
Language EN
Machine number
Model ES/LS
Document number A133309940.EN

Questions and Answers

  • T
    Troy Wong PhDAug 13, 2025
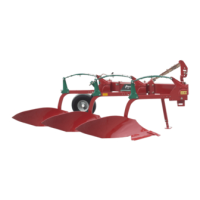
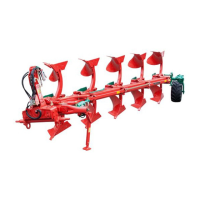
    Why is the first furrow width different on each side when plowing with Kverneland ES Farm Equipment?
    • R
      richardsonrebeccaAug 13, 2025
      The first furrow width may differ due to several reasons: * The cross shaft might not be placed centrally under the headstock; ensure it's correctly positioned. * The tractor’s rear tires might have unequal pressure; adjust the air pressure in the tires. * The sideways leveling could be incorrect; adjust the leveling accordingly.
  • L
    Linda WagnerAug 17, 2025
    What to do if rotation is slow or incomplete on heavy Kverneland ES Farm Equipment plows?
    • S
      Shannon ClarkAug 17, 2025
      If rotation is slow or incomplete on heavy plows, the issue might be related to the oil flow. Test whether different oil flow speeds affect the rotation by adjusting the engine speed or the flow speed of the motor-operated valve. Change-over valves operate optimally with 25–35 l/min (6.6-9.2 gpm). High flow speeds can return pressure and cause weaker rotating performance.
  • R
    rebecca79Aug 21, 2025
    Why does the swing cylinder creep during plowing or transport with Kverneland Farm Equipment?
    • B
      Benjamin ColonAug 21, 2025
      Cylinder creep can occur for a few reasons: * The swing phase may not be fully completed, leaving the cylinder unlocked. Ensure you complete the swing phase before applying valve pressure. On plows with a memory system, make all working width adjustments using the variable-width lever, not the rotation lever. * Gasket(s) in the turnover cylinder leak. In this case, contact your dealer. * Leakage in the change-over valve. In this case, contact your dealer.
  • L
    Lisa GrayAug 25, 2025
    What to do if my Kverneland ES plow turns halfway and stops?
    • C
      Cynthia EstradaAug 26, 2025
      If the plow turns halfway and stops, or returns to its original position, it could be due to: * The restrictor regulation being installed on the wrong port. Change the restrictor position. * Incorrect valve pressure. Increase or reduce the valve pressure.
  • K
    Karen SheltonAug 28, 2025
    Why Kverneland Farm Equipment plow reacts abruptly when reversing?
    • B
      bowensandraAug 28, 2025
      If the plow reacts with an abrupt start only when the oil pressure to the change-over valve is increased, the valve pressure is likely incorrect. Increase the valve pressure by turning the change-over valve clockwise a couple of turns.
  • R
    Ruth LopezSep 1, 2025
    Why does the rotation stop on the first swing cycle on Kverneland ES Farm Equipment?
    • R
      Rebecca HutchinsonSep 1, 2025
      If the rotation stops on the first swing cycle with a plow with Packomat, or when rotating the plow with the bodies under the main frame, it is likely that the transfer is taking place too early, shortly before the dead point is reached. Increase the valve pressure by a couple of turns clockwise and ensure that the restrictor in the turnover cylinder is correctly located.
  • N
    Nathan BakerSep 4, 2025
    How to stop vibration during rotation of Kverneland Farm Equipment?
    • K
      Kevin GomezSep 5, 2025
      If you experience vibration during rotation, the restrictor might be installed on the wrong port. Change the restrictor position.
  • E
    emilyfergusonSep 9, 2025
    How to fix a Kverneland Farm Equipment plow that won't reverse?
    • L
      Leonard TerrySep 9, 2025
      If the plow will not start reversing, the connections to the tractor may have been installed incorrectly. Ensure that the quick connections have been correctly connected, paying attention to the color coding on the hoses.

Summary

Machine Identification

Product Details

Details of the plow model, designation, and manufacturer information.

Preface

Target Group for Operators Manual

Identifies the intended audience and purpose of the manual.

Safety Introduction

Highlights the importance of reading the manual for operator safety.

Symbols Used in the Manual

Explains symbols and expressions used throughout the operator's manual.

Terminology Used in the Manual

Defines key terms like 'right hand position' and 'turning with bodies'.

Safety

California Proposition 65 Warning

Informs about chemicals known to cause cancer and reproductive harm.

Safety Alert Symbol and Definitions

Explains the 'Safety Alert Symbol' and definitions of DANGER, WARNING, CAUTION.

Safety Decals on the Plow

Illustrates and describes safety decals placed on important parts of the plow.

General Safety Information

Provides essential general safety guidelines for operating the plow.

Coupling Safety Precautions

Details safety measures and risks associated with coupling the plow to the tractor.

Hydraulic System Safety

Covers safety aspects of connecting/disconnecting hydraulic hoses and pressure.

Maintenance and Working Safety

Guidelines on regular maintenance, protective clothing, and spare parts.

Component and Transport Safety

Covers safety related to welding, bolts, cross shafts, and tire pressure.

Driving on the Road Safety

Safety rules and considerations for transporting the plow on public roads.

Hydraulics Safety

Details on hydraulic connections, pressure, and hose replacement safety.

Warranty Information

Warranty Conditions

Explains warranty conditions and liability concerning maintenance and usage.

Getting to know the plow

Proper Use of the Plow

Defines the intended use of the plow and liabilities for improper use.

Key Plow Features

Describes features like stone release systems, variable working width, and bodies.

Components Overview

Illustrates and labels the main components of the ES and LS plow models.

Headstock and Body Details

Provides detailed views and labels for the headstock and plow body components.

Technical Specifications

Presents detailed technical data for different ES and LS plow models.

Cross Shaft Specifications

Details specifications for different types and sizes of cross shafts.

Tire Pressure Recommendations

Provides recommended tire pressures for specific tire sizes.

Information Plate Details

Explains the information found on the machine's identification plate.

Optional equipment

Skimmer and Trash Board Options

Describes optional skimmers and trash boards for improved plowing.

Disc Coulters and Share Knives Options

Details optional disc coulters and share knives for soil engagement.

Landside Knife and Plowshare Options

Covers optional landside knives and different types of plowshares.

Share with Flush Fit Point Option

Describes the share with flush fit point for sticky soil conditions.

Quick-Fit and Knock-on Points Options

Explains optional points for faster replacement and good ground penetration.

Furrow Splitter and Mouldboard Extension Options

Details optional furrow splitters and mouldboard extensions.

Furrow Opener and Wear Plate Options

Covers optional furrow openers and wear plates for the landsides.

Depth Wheel Options

Describes available depth wheels made from steel or rubber.

Depth;Transport Wheel Options

Details depth/transport wheels for plowing and road use.

Lighting and Packomat Options

Covers optional lighting for transport and the Kverneland Packomat soil packer.

Hydraulic Auto-Reset System Option

Explains the hydraulic release system as an alternative to leaf springs.

Preparation for use

Tractor Hydraulic Connections

Shows required tractor hydraulic connections for plow functions.

Depth Control Settings

Recommends tractor depth control settings for plowing.

Tire Pressure and Front Weights

Guidance on tire pressure and front weights for safe driving.

Lower Links and Paint Removal

Instructions for adjusting lower links and removing paint before use.

Connecting

Coupling Safety Precautions

Details safety measures and risks associated with coupling the plow to the tractor.

Connecting the Plow to the Tractor

Step-by-step guide for connecting the plow's lower and top links.

Connection Geometry

Explains the correct pulling point and cross shaft for stable first furrow width.

Clearance Checks After Coupling

Checks for clearance between depth wheel/plow and tractor/plow.

Transport

General Transport Safety

Safety warnings for stabilizing lower links and using transport wheels.

Speed and Visibility During Transport

Guidelines on speed limits and maintaining rear visibility during transport.

Preparation for Transport

Steps for preparing the plow before transport, including cleaning and stabilizing.

Stabilizing the Rotating Cross Shaft

Instructions on how to stabilize the rotating cross shaft for transport.

Putting Plow into Transport Position

Steps for moving the plow to its transport position, with or without a transport wheel.

Transport Wheel Adjustment for Butterfly Position

Details on adjusting the transport wheel for the butterfly transport position.

Transport Wheel Adjustment for Plowing Position

Instructions for adjusting the transport wheel back to the plowing position.

Hydraulic Depth Wheel for Transport

Steps for changing the hydraulic depth wheel to transport position.

Setting Plow into Plowing Position

Procedure for returning the plow from transport to working (plowing) position.

Transport Wheel to Plowing Position

Detailed steps for setting the transport wheel to the plowing position.

Hydraulic Depth Wheel to Plowing Position

Instructions for changing the hydraulic depth wheel to the working position.

Adjust the plow

Recommended Adjustment Procedure

Outlines the recommended order for adjusting working width, depth, and leveling.

Working Width Adjustment

Explains how to adjust the plow's working width.

Mechanically and Hydraulically Adjusting Working Width

Details methods for adjusting working width using mechanical or hydraulic systems.

First Furrow Width Adjustment

Instructions for setting the first furrow width correctly.

Working Depth Adjustment

Guidance on adjusting the plowing depth using the depth wheel.

Depth Wheel Adjustment

Specific steps for adjusting the depth wheel and its stops.

Hydraulic Depth Wheel Adjustment

Details on adjusting working depth using the hydraulic depth wheel.

Levelling the Plow

Instructions for ensuring the plow beams are at right angles to the ground.

Deep or Shallow Plowing Caution

Warning about potential collision between rotating system and frame.

Disc Coulter Adjustment (ES)

Adjusting disc coulters for depth and side position on ES models.

Disc Coulter Adjustment (LS)

Adjusting disc coulters for depth and side position on LS models.

Skimmer Adjustment

Details on adjusting skimmers for depth and forward position.

Trash Board Adjustment

Instructions for positioning the trash board for optimal plowing.

Soil Packer Arm Adjustment

Guidance on adjusting the soil packer arm for proper operation.

Packer Arm Direction Adjustment

Details on setting the packer arm angle and positions.

Plowing

Plowing Safety Precautions

Warnings for reversing, plowing on slopes, and general plowing safety.

Before and During Plowing Checks

Steps to take before plowing and checks to perform during plowing.

Reversing the Plow

Instructions and cautions for reversing the plow with different valve systems.

Care and maintenance

Maintenance Safety Precautions

Safety measures before performing any maintenance on the plow.

Use of Original Spare Parts

Emphasizes using genuine Kverneland spare parts for safety and warranty.

Maintenance Table

Provides intervals for various maintenance procedures and checks.

Cleaning the Plow

Guidelines for thorough cleaning to ensure plow longevity.

Lubrication Guidelines

Instructions on using appropriate grease and lubricating all points.

Lubrication Points Overview (Headstock, Disc Coulter, etc.)

Diagrams showing lubrication points on various plow components.

Lubrication Points Overview (Wheels)

Diagrams showing lubrication points on depth and transport wheels.

Replacing Hydraulic Hoses

Instructions for replacing worn or defective hydraulic hoses.

Replacing Worn Parts

Guidance on replacing parts that contact the ground or are worn/damaged.

Replacing Quick-Fit Points

Steps for safely removing and fitting Quick-Fit points, with safety warnings.

Replacing Knock-on Points

Instructions for replacing Knock-on® points, including safety advice.

Tightening Bolts and Nuts

Provides a table of specific tightening torques for bolts and nuts.

Specific Tightening Torques (LS Beam)

Details specific tightening torques for the LS beam and headstock bolts.

Replacing Shear Bolts [LS]

Instructions for replacing shear bolts on LS models.

Checking Spring Length

Procedure for checking and adjusting spring length for optimal tension.

Tire Pressure Check

Ensures tires are inflated to the necessary pressure.

Setting the Plow Bodies

Guide on checking and adjusting the alignment of plow bodies.

Hydraulic Release System Preload Pressure Check

How to check and ensure correct nitrogen preload pressure in the hydraulic release system.

Refilling Hydraulic Release System

Procedure for refilling the hydraulic release system with nitrogen.

Possible modifications

Changing Reversing Direction

Explains how to change reversing direction via hydraulics and valve configuration.

Restrictor Position Adjustment

Details on fitting restrictors to the turnover cylinder for smoother reversing.

Spring Release System [ES] - Beam Adjustment

Instructions for fitting or removing automatic beams and adjusting spring tension.

Spring Tension Adjustment Diagram

Diagram illustrating the transfer mechanism for spring power adjustment.

Releasing and Increasing Spring Tension

Steps for releasing and increasing spring tension on automatic beams.

Changing Release Force Setting

How to change release force by adding/removing spring leaves or using double springs.

Hydraulic Release System Configurations

Illustrates different spring leaf configurations for hydraulic release systems.

Hydraulic Release System - Hose Connection

Guidance on connecting and disconnecting the filling hose for the hydraulic release system.

Transferring Pressure in Change-over Valve

Adjusting valve pressure for smooth plow rotation and troubleshooting.

Cross Shaft Position Adjustment

Details on changing the cross shaft's forward position for clearance and lifting.

Parking and storage

Parking Stand and Surface Requirements

Guidelines for using the parking stand and parking on a firm, level surface.

Plow Parking Procedure

Steps for parking the plow, including hydraulic pressure and lubrication.

Storage Recommendations

Advice on storing the plow to protect components from sunlight and weather.

Troubleshooting

Troubleshooting Rotating System Issues

Solutions for common problems with the plow's rotating system.

Troubleshooting Operational Issues

Addresses issues like uneven furrow width and sideways leveling.

Checklist

Tractor and Fitting Checklist

Pre-operation checks for the tractor and plow connection.

Driving on the Road and Plowing Checklist

Checklists for safe transport and proper plowing setup.

Daily and Regular Maintenance Checklist

Checklist items for daily, regular, and storage maintenance.

Disposing of the plow

Disposal Guidelines for Materials

Instructions for environmentally sound disposal of plow components.

EU goods certificate

EU Declaration of Conformity

Certifies that the product meets EU health and safety requirements.

Kverneland ES Specifications

General IconGeneral
BrandKverneland
ModelES
CategoryFarm Equipment
LanguageEnglish

Related product manuals