LAUNCH X-431Diagun User's Manual
14
Installation Procedure:
1) Take out the TF card from the box, as shown in Figure 3-1a.
2) Insert the TF card into the X-431Diagun TF card slot
perpendicularly. Make sure that the printed "micro" is upward
and in the right place, as shown in Figure 3-1b, 3-2c and 3-3d.
Note: You can hear a clicking sound when you insert the TF card in the right
place. If you want to take it out, press the TF card slightly, and it will pop up
automatically with a clicking sound.
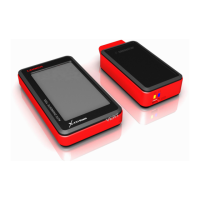
3.1.3 Connect X-431Diagun
X-431Diagun can also diagnose two cars at the same time (test with the
diagnosis connectors by wire/wireless connection, one is OEM and the other
is optional), so wire and wireless connections are the two different methods.
Wire Connection Procedure of X-431Diagun:
z Insert the TF card into the slot;
z Connect one end (20PIN Male) of the X-431Diagun main unit
diagnosis cable and X-431Diagun main unit diagnosis interface;
z Connect the other end (USB terminal) of X-431Diagun main unit
diagnosis cable and one end (USB port) of selected X-431Diagnun
connector.
z Find the vehicle DLC;
z Connect the X-431Diagun diagnosis connector and the vehicle DLC.
Wireless Connection Procedure of X-431Diagun