3Rod Eye Basic
EN
DE
FR
IT
ES
PT
NL
DA
NO
SV
FI
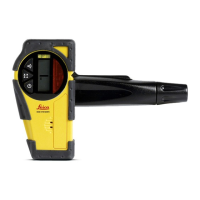
Detector Bracket {C} inside front cover
1. Attachment Knob – Attaches the clamp to the back of the detector.
2. On-Grade Reference – The top edge of the bar aligns with the on-
grade position.
3. Rod Locking Knob – Turn to tighten the locking clamp to the grade
rod.
4. Rod Locking Clamp – Moves to tighten onto securely onto the grade
rod.
5. Level Vial – The aids to keep the rod plumb when taking readings.
Care and Transport
Transport
)
When transporting the receiver always use the original carton or
the laser transmitter case.
Storage
)
Respect the temperature limits, -40° to +70°C (-40° to +158°F),
when storing the instrument.
If the detector will not be used for a month or more, it is rec-
ommended to remove the batteries.
Cleaning
)
Do not wipe dust or dirt off the detector reception window or
display windows with a dry cloth or other abrasive material as
scratching could occur, reducing visibility through these win-dows.
A soft cloth and mild soap and water are effective. The unit may
be submerged under water or sprayed with a low pressure hose if
necessary. Do not use any fluids other than water, as they may
attack the polymer components.