8
lippert.com 432-LIPPERT (432-547-7378) Rev: 10.20.23
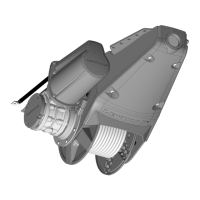
Venta
TM
Pontoon
Anchor Winch
Installation and Owner’s Manual
(For Aftermarket Applications)
CCD-0007416
NOTE: Printer settings may vary. To ensure the printed
template is accurate, measure the diameter of the holes
when printed. The diameter should be 70mm (~2 ¾”). It
is recommeded to also verify the template against the
actual switch prior to starting installation.
1. Print or remove the Switch Mounting Template page
included in this manual and place it on the deck where
there is sucient space and no underlying equipment or
wiring will be damaged by installation. Once satised
with switch position, tape the template to the intended
mounting location using painter’s tape.
2. Using an electric drill and 5.5mm (⁄”) drill bit, drill
holes at the three marked locations on the switch
template (Fig. 13A).
3. Using a 70mm (2 ¾”) drill or hole saw, cut two
holes where indicated by the template for either side
of the switch (Fig. 13B).
4. Use a jigsaw to connect the two 70mm (~2 ¾”) holes
into one hole following the template (Fig. 13C).
5. De-burr and sand any rough edges.
6. Place the switch in the hole to test its t, adjusting as
needed.
7. Install the switch to the deck using the provided M5
nuts and bolts. Do not over tighten.
8. Wire the switch to the controller using the included
5m (16’) harness.
NOTE: Do not loosen any existing screws on the
deck switch.
Installing the Anchor
NOTE: Controller and switch must be fully installed and
wired before installing an anchor.
1. Firmly hold the winch chain, and release it from the
winch by cutting the transit cable tie.
NOTE: Make sure you have a firm grip before cutting the
tie to prevent the chain from sliding back into the winch.
NOTE: Only once the winch and bow roller is installed
and the anchor is on-hand should the chain be released
from the winch by cutting the transit cable tie.
2. Run the chain over the top of the bow roller.
3. Place the anchor inside the bow roller and connect it
DO NOT TOUCH CHAIN OR MOVING PARTS. DO NOT
PLACE HANDS NEAR THE ANCHORING EQUIPMENT
DURING OPERATION.
UNLESS THERE IS NOT SUFFICIENT CHAIN TO
REACH THE ANCHOR, DO NOT ATTEMPT TO
POWER ON OR OPERATE THE WINCH UNTIL THE
BOW ROLLER AND ANCHOR ARE INSTALLED TO
COMPLETE THE ANCHOR SYSTEM.
to the chain using a suitable shackle or swivel.
4. Installation is complete.
NOTE: If there is not sufficient chain to connect to the
anchor, more chain will need to be released from the
winch. Refer to the “Releasing Additional Chain From the
Winch for Anchor Installation” section in this manual.
Releasing Additional Chain From the Winch for
Anchor Installation
ONLY Follow these steps if more chain is needed to
install the anchor. Keep in mind the winch will need to be
fully wired to the switch, control box, and power supply
before performing this procedure.
1. Check that all fasteners are tight before operating the
winch.
2. Make sure all persons are clear of the winch, and
maintain a safe distance until anchor is properly attached
to the chain.
3. Switch on the boat’s battery or power supply.
4. Open both protective lids of the deck switch. Use a
quick pulse on the “Down” button to verify the spooling
direction is correct and wiring is correct.
5. If wiring and spooling is correct, release the required
amount of chain needed to reach the anchor.
6. Cover the switch buttons with their respective lids.
7. Turn the power o and disconnect the isolator before
approaching the anchor and chain.
8. Place the anchor inside the bow roller and connect it
to the chain using a suitable shackle or swivel.
9. Installation is complete.