,.,Acc HOLE
nlAT
.
f'ACESAWAVFI'lOM
.I11iC::OND
STAGERQTOR
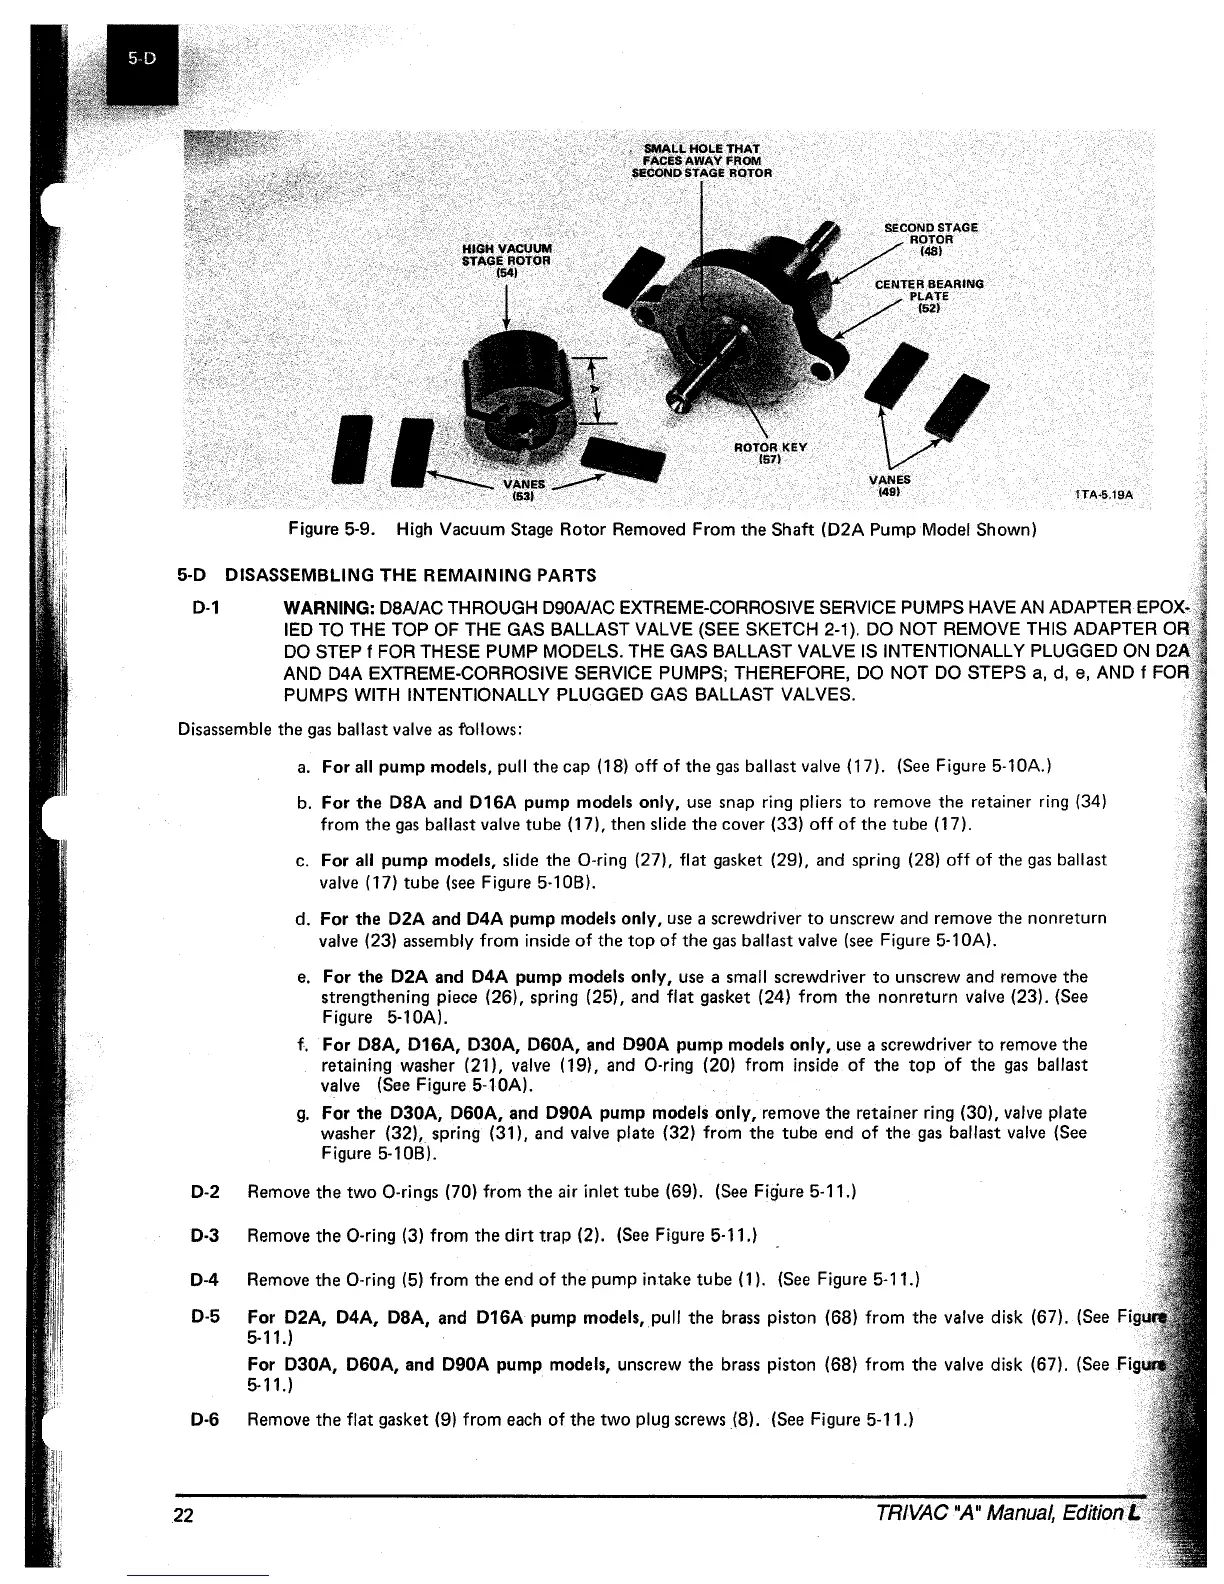
Figure 5-9. High Vacuum Stage
Rotor
Removed From
the
Shaft
(D2A Pump Model Shown)
5-D DISASSEMBLING THE REMAINING PARTS
tTA·5.19A
D-1
WARNING: DaAlAC THROUGH D90AlAC EXTREME-CORROSIVE SERVICE PUMPS HAVE
AN
ADAPTER EPOX-,'
lED TO THE TOP OF THE GAS BALLAST VALVE (SEE SKETCH 2-1). DO NOT REMOVE THIS ADAPTER OR
DO STEP
f FOR THESE PUMP MODELS. THE GAS BALLAST VALVE IS INTENTIONALLY PLUGGED ON
AND D4A EXTREME-CORROSIVE SERVICE PUMPS; THEREFORE, DO NOT DO STEPS
a,
d,
e,
AND f FOR
PUMPS WITH INTENTIONALLY
PLUGGED GAS BALLAST VALVES.
Disassemble
the
gas ballast valve as follows:
a.
For
all
pump
models, pull
the
cap (18) off
of
the
gas
ballast valve (17). (See Figure 5-10A.)
b.
For
the
DBA
and D16A
pump
models only, use snap ring pliers
to
remove
the
retainer ring (34)
from
the
gas
ballast valve
tube
(17), then slide
the
cover (33)
off
of
the
tube
(17).
c. For
all
pump
models, slide
the
O-ring (27), flat gasket (29), and spring (28)
off
of the
gas
ballast
valve (17)
tube
(see Figure 5·10B).
d.
For
the
D2A
and
D4A
pump
models only, use a screwdriver
to
unscrew and remove the nonreturn
valve (23) assembly from inside
of
the
top
of
the
gas ballast valve (see Figure 5-10A).
e.
For
the
D2A and D4A
pump
models only, use a small screwdriver
to
unscrew and remove
the
strengthening piece (26), spring (25), and flat gasket (24) from
the
nonreturn
valve (23). (See
Figure 5-10A).
f.
For
D8A, D16A, D30A, D60A, and D90A
pump
models only, use a screwdriver
to
remove
the
retaining washer (21), valve (19), and O-ring (20) from inside
of
the
top
of
the
gas
ballast
valve (See Figure
5-1
OA).
g.
For
the
D30A, D60A,
and
D90A
pump
models
only,
remove
the
retainer ring (30), valve plate
washer (32), spring
(31), and valve plate (32) from
the
tube
end
of
the
gas
ballast valve (See
Figure 5-10B).
0-2
Remove
the
two
O·rings (70) from
the
air inlet
tube
(69). (See Figure 5-11.)
D·3 Remove
the
O-ring (3) from
the
dirt
trap
(2). (See Figure 5-11.)
D-4 Remove
the
O-ring (5) from
the
end
of
the
pump
intake
tube
(1). (See Figure 5-11.)
0-5
For D2A, D4A, DBA, and
D16A
pump
models, pull
the
brass piston (68) from
the
valve disk (67). (See
5·11.)
For D30A, D60A, and D90A
pump
models, unscrew
the
brass piston (68) from
the
valve disk (67). (See
5-11.)
D·6
Remove
the
flat gasket (9) from each
of
the
two
plug screws (8). (See Figure 5-11.)
22 TRIVAC "A" Manual, Edition
 Loading...