? Reporting
Incorrect
Shipment
If the item received is not the item ordered, contact our Order Services Department.
3-2
INITIAL FILLING WITH PUMP FLUID
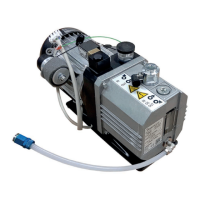
The larger pump models are shipped filled with pump fluid; the smaller pump models are shipped with the pump
fluid
in
a separate container. Ensure that the oil is in the middle to upper third
of
the sight glass before starting
the pump (see Figure 1-1).
3-3
CONNECTING THE PUMP
TO
THE SYSTEM
KF® clamp rings are supplied for the intake and exhaust ports of the pump. A centering ring
with
dirt trap
(2)
is suppHed for the
intake tube
(1)
and a centering ring with O-ring
(7)
is supplied for the exhaust port
(6).
Leybold
also
has
a complete line
of
components, fittings,
and
adapters'to connect
your
pump
to
any system.
See
our catalog
for
a list
of
these
components.
See
Table
4-1
for
the intake and exhaust flange dimensions
of
your
pump
model.
All
connections must be vacuum tight for your pump to achieve its ultimate pressure. The O-ring on the centering
rings must be
clean to avoid leaks.
Your pump
will
perform better and last longer
if
it
is
protected by the correct
inlet
filter
and/or
oil
filtering
sys-
tem.
See
our catalog or contact
your
nearest
sales
office for the recommended
filter
for
your
application.
Any accessories, such as coaxial traps, dust separators, exhaust filters, or inlet filters should be connected after
Step 2 below. Use the manual that comes with each accessory for installing, maintaining, and operating the ac-
cessory (see the Leybold c.atalog for additional information
on
accessories).
CAUTION: IF YOU ARE PURGING THE GAS BALLAST VALVE, DO NOT EXCEED AN INERT GAS PRESSURE
OF
2 psig; IF YOU ARE PURGING THE OIL CASE
OR
EXHAUST LINE WITH INERT GAS, DO NOT RAISE THE
PRESSURE
IN
THE OIL CASING ABOVE 3 psig. EXCEEDING THESE PRESSURES WILL DEGRADE THE PUMP'S
PERFORMANCE.
Connect the pump to your system
as
follows:
1.
Set
the pump on a horizontal surface.
It
need
not
be
permanently mounted
on
the surface
(See
Figure 1-1).
2.
CAUTION:
FAILURE
TO REMOVE THE SHIPPING WEDGE
OR
EXHAUST PORT COVER
BEFORE STARTING
THE
PUMP
COULD RESULT IN DAMAGE
TO
THE PUMP.
Remove
and discard the protective cover from the pump intake tube (1) and exhaust
port
(6) and
the metal shipping disc from the exhaust
port
(see
Figure 7-2, the
foldout).
Also remove
and
dis-
card the red plastic shipping
wedge
from underneath the coupling housing (11). A Day-Glo orange
tag
attached
to
the pump contains instructions for removing the shipping wedge.
3,
CAUTION: ENSURE
THAT
THE VACUUM LINE
IS
CONNECTED TO THE
INTAKE
TUBE
(1)
AND NOT
TO
THE EXHAUST PORT
(6)
(see
Figure 1-1), CONNECTING THE VACUUM LINE
TO
THE EXHAUST PORT
(6)
COULD RESULT IN DAMAGE TO THE
PUMP
OR
TO
YOUR
SYSTEM.
NOTE: Ideally,
the inside diameter (10)
of
the vacuum line should
be
the
same
size
or larger than
the
10
of
the intake tube (1).
If
the vacuum line
is
too narrow,
it
will reduce the pumping
speed.
REQUIRED ACTION: Using the KF clamp ring
and
the centering ring
with
dirt
trap (2)
and
a-ring (3), connect the pump intake tube (1) to the vacuum line.
®KF
is a registered trademark of Leybold
TRIVAC
HAlt
MSrtulJl,Edition L
9
 Loading...