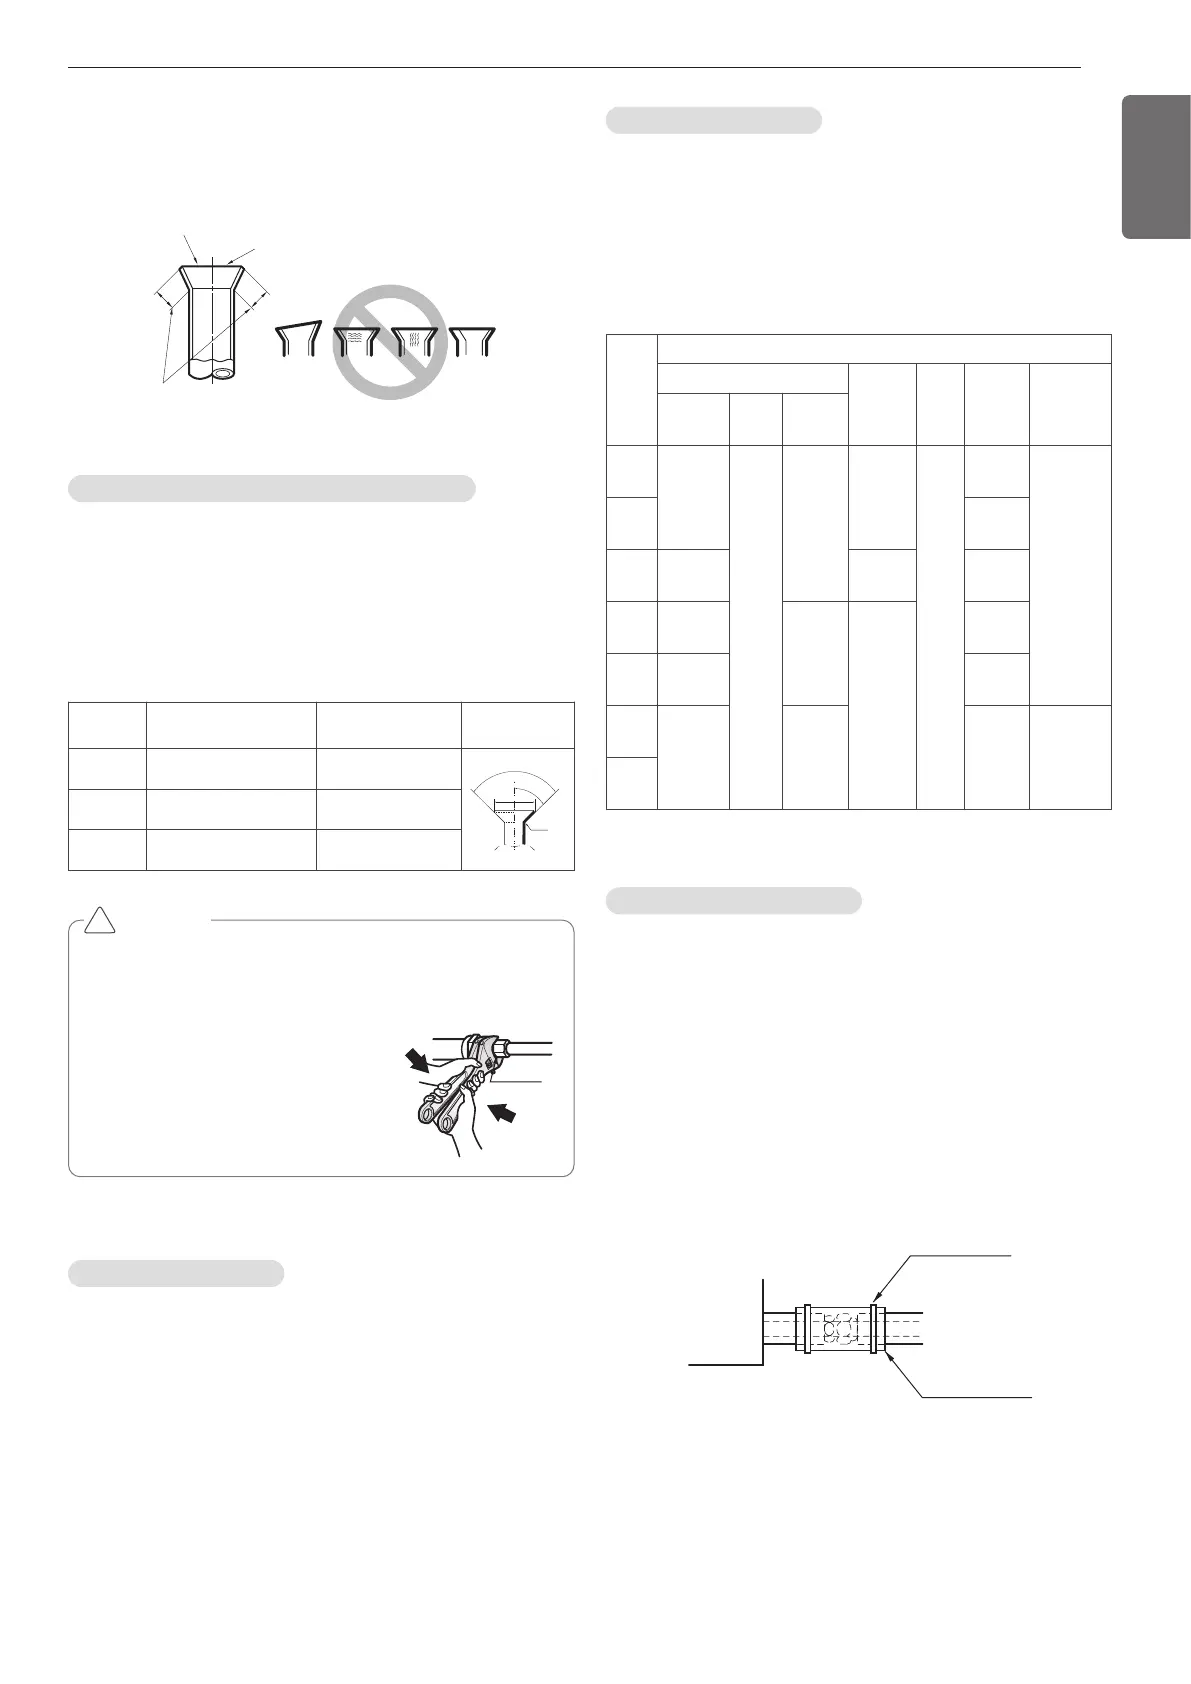
Flare shape and flare nut tightening torque
Opening shutoff valve
Precautions when connecting pipes
- See the following table for flare part machining dimensions.
- When connecting the flare nuts, apply refrigerant oil to the inside and
outside of the flares and turn them three or four times at first. (Use
ester oil or ether oil.)
-
See the following table for tightening torque.(Applying too much torque may
cause the flares to crack.)
- After all the piping has been connected, use nitrogen to perform a
gas leak check.
1. Remove the cap and turn the valve counter clockwise with the hexa-
gon wrench.
2. Turn it until the shaft stops.
Do not apply excessive force to the shutoff valve. Doing so may
break the valve body, as the valve is not a backseat type. Always
use the special tool.
3. Make sure to tighten the cap securely.
CAUTION
• Always use a charge hose for service port connection.
• After tightening the cap, check that no refrigerant leaks are present.
• When loosening a flare nut, always use two wrenches in
combination, When connecting the piping,
always use a spanner and torque wrench
in combination to tighten the flare nut.
• When connecting a flare nut, coat the
flare(inner and outer faces) with oil for
R410A(PVE) and hand tighten the nut
3 to 4 turns as the initial tightening.
!
Insulation of shutoff valve
1. Use the heat insulation material for the refrigerant piping which has
an excellent heat-resistance (over 120 °C (248 °F)).
2. Precautions in high humidity circumstance:
This air conditioner has been tested according to the "ISO Conditions
with Mist" and confirmed that there is not any default. However, if it
is operated for a long time in high humid atmosphere (dew point
temperature: more than 23 °C (73 °F)), water drops are liable to fall.
In this case, add heat insulation material according to the following
procedure:
- EPDM (Ethylene Propylene Diene Methylene), NBR (Nitrile Butadi-
ene Rubber) – over 120 °C (248 °F) the heat-resistance tempera-
ture.
- Add the insulation over 10 mm (13/32 inch) thickness at high hu-
midity environment.
Closing shutoff valve
1. Remove the cap and turn the valve clockwise with the hexagon
wrench.
2. Securely tighten the valve until the shaft contacts the main body
seal.
3. Make sure to tighten the cap securely.
* For the tightening torque, refer to the table on the below.
Tightening torque
Shutoff
valve
size
Tightening torque (Turn clockwise to close) [N·m(lbf·ft)]
Shaft(valve body)
Cap
(Valve lid)
Service
port
Flare nut
Gas line pip-
ing attached
to unit
Closed Opend
Hexagonal
wrench
Ø6.35
(1/4)
6.0 (4.4)
±0.6 (0.44)
5.0(3.7)
±0.0
4mm
(0.16 inch)
17.6 (13.0)
±2.0 (1.5)
-
25.0 (18.4)
±2.5 (1.8)
-
Ø9.52
(3/8)
25.0 (18.4)
±2.5 (1.8)
Ø12.7
(1/2)
10.0 (7.4)
±1.0 (0.74)
20.0 (14.8)
±2.0 (1.5)
55 (40.6)
±6 (4.4)
Ø15.88
(5/8)
14.0 (10.3)
±1.4 (1.03)
5mm
(0.2 inch)
25.0 (18.4)
±2.5 (1.8)
75 (55.3)
±7 (5.16)
Ø19.05
(3/4)
14.0 (10.3)
±1.4 (1.03)
110 (81.1)
±10 (7.4)
Ø22.2
(7/8)
30.0 (22.1)
±3.0 (2.2)
8mm
(0.31 inch)
25.0 (18.4)
±3 (2.2)
Ø25.4
(11/8)
Pipe size
Tightening torque
[N·m(lbf·ft)]
A [mm(inch)] Flare shape
Ø9.52(3/8) 32.7(24.12)-39.9(29.43) 12.8(0.5)-13.2(0.52)
 Loading...