9
1. Place the seat and backrest horizontally on a flat surface. Picture 2 Place the hooks on the backrest in the
openings of the seat. Picture 2a Squeeze with hand the hooks on the backrest (2.1) and press firmly, lift the
seat in a vertical position (2.2).
Warning: Failure to comply with this instruction leads to breaking the hooks on the backrest, which is not
subject to warranty!
Notice: During assembling or dismantling in the vehicle, it is possible that the backrest of the seat moves from
the vertical position. This is not a defect in the seat, because the position of the backrest is determined by the
position of the backrest of the car seat!
Pull back up to make sure it is fastened to the seat.
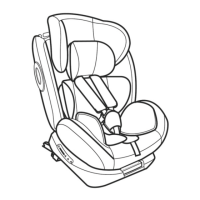
Assembling the car seat
8. Seat
2. Guide for the belt
3. Belts
1. Backrest
7. Strap for belts adjustment
4. Belts softener
Parts
Picture 1
6. Button to adjust the belt (under the cover)
5. Belt buckles
9. Bracket for positioning the belt in the car
15. ISO FIX Connector
10. Metal clamp
13.. TT Release button
14. ISO FIX Release button
17. Head Pillow
18. Baby Insert
12. Top Tether Strap
11. Bracket for shoulder belts
16. ISO FIX Adjustment Handle
1.Take out the belts from hooks behind the seat. Picture 3.1
2. Pull out the belts of the holes on the backrest. Picture 3.2
3. Place back belts in the desired holes on the backrest. Picture4.1 Make sure the straps are placed on the
same level and are not twisted.
4. Place the belt in the central metal bracket behind the back. Picture 4.2.1 Connect the hook of the shoulder
belt softeners. Pull the softeners to make sure they are securely attached.
5. Select the height of the straps according to the child's height (Picture 5). The position of the straps should
be at or slightly above the shoulders of the child. (Picture 5B) Do not use seat belts if the openings for the belts
are under the child's shoulders or if the child is over 18 kg. In this case, use the belt of the car.
Adjusting the height of seat belts
Possibility to install ONLY on seats with 3-point seat belts!
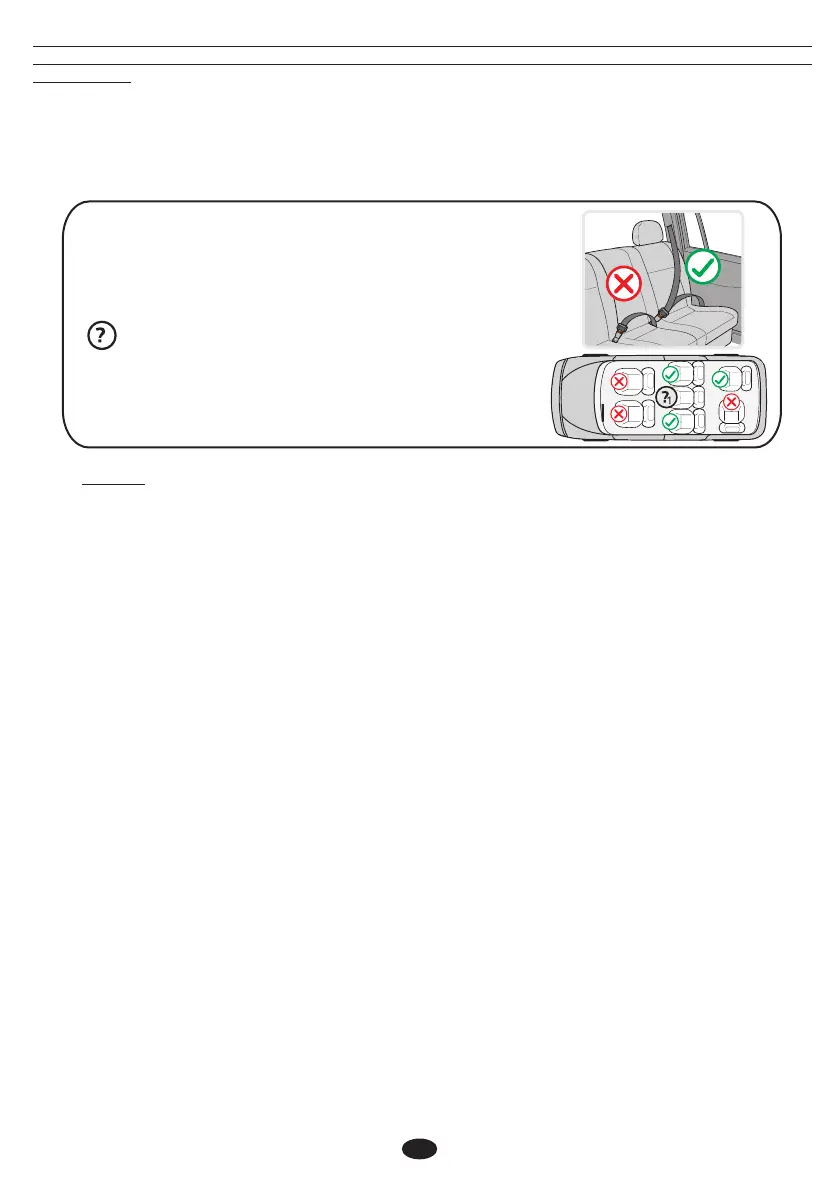
TYPES OF APPROVED BELTS TO HAVE IN THE CAR
Your child seat can be installed ONLY in the direction of
movement of the car with the help of 3-point belts!!!
Your child seat can be installed with ISOFIX anchorages and top
tether, in the direction of movement for Groups 1;2;3 ( 9-36kg.)
CAN NOT BE USED FOR SEATS with 2-point belt!
1
WASHING INSTRUCTIONS
1. The car seat can be cleaned using lukewarm water and soap. Do not use aggressive cleaners like
abrasives or thinner.
3. The plastic parts can be cleaned by using a wet cloth. Please, do not use any solvate.
o
2. The cover should be washed by hand at a maximum temperature of 30 C. Do not put in the dryer, just
airing it.
WARNING! Store this child seat in a safe place when it is not being used. Avoid placing heavy
objects on top of it. Do not allow your child seat to come into contact with corrosive substances e.g.
battery acid.
ECE R44/04
Adjust the length of the belt
1. Loosen the belt: Press the button for adjustment of the straps (Picture 6a) and at the same time pull out both
shoulder straps (Picture 6b).
2. Tightening the belt: Place your child in the seat, fasten both belts in the buckle in the center and pull the bar
in the middle of the seat. (Picture 12).
Removing the upholstery
1. Remove all belts as shown in Fig. 13
2. Remove the upholstery of the seat and backrest as shown in Fig.16