LOUP ELECTRONICS
•
1-877-489-5687
•
WWW.LOUPELECTRONICS.COM
3
1.0 SySTem overview
e Loup Elite Yield Monitor is a color touchscreen display designed to provide accurate Yield, % Moisture, and Mapping information
for any model combine. is manual will familiarize you with operation, calibration and technical information. All aspects and
features are detailed but may not be applicable to your specic system conguration.
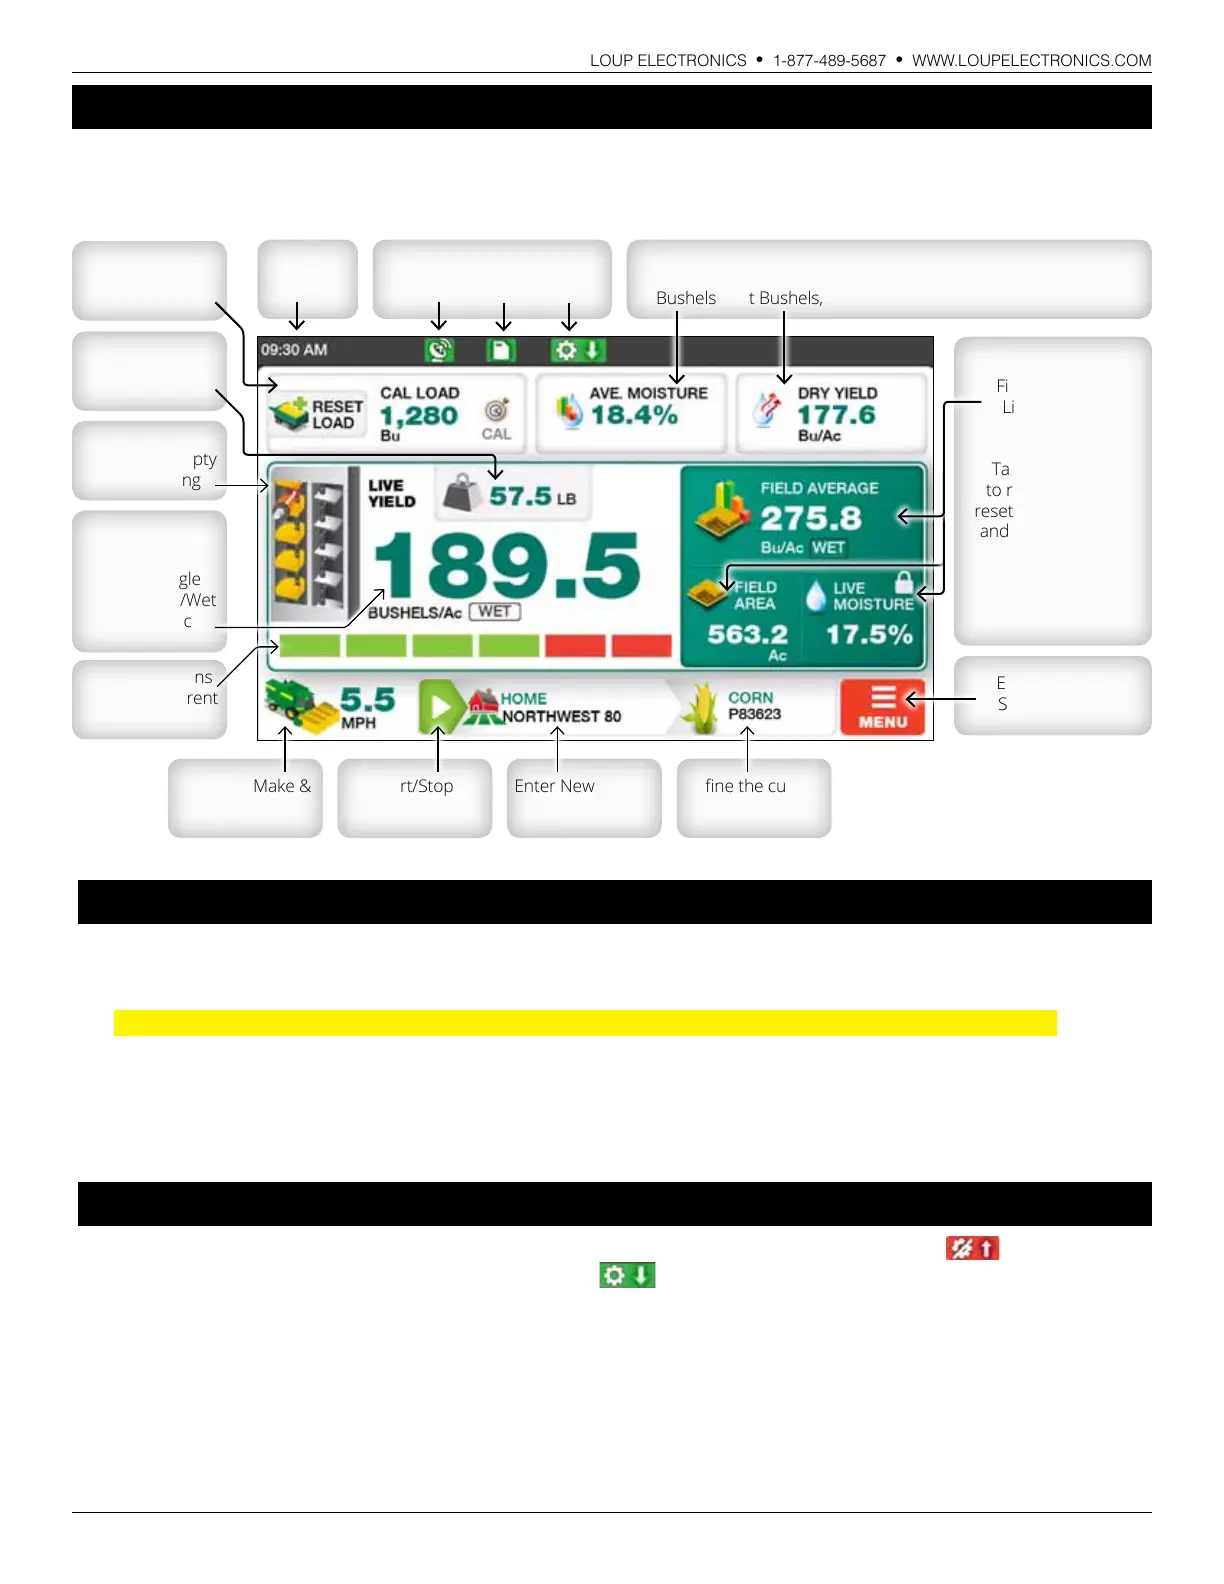
Reset Load
or Add Load*
Button
Current Test
Weight for Crop
Harvesting
Header Sections
& Reduce Current
Cut Width.
Visual Indication
of Elevator Empty
or Harvesting
Live Average
Bushels/Ac.
Tap to Toggle
between Dry/Wet
Bushels/Ac
Enter the Main
Settings Menu
Dene the current
Crop and Variety
Enter New Task or
Resume Previous
Start/Stop
Current Task
Combine Make &
Speed Readout
Time
GPS, Data Logging and
Header Up/Down Status
Field Average,
Field Area and
Live/Average
Moisture.
Tap “Field Area”
to reset, this also
resets Field Average
and Ave. Moisture.
% Moisture changes
between Live & Ave.
with Header Position.
Two Customizable Windows. Select from Dry Yield, Wet Yield,
Ave. Moisture, Dry Weight, Wet Weight, Field Area, Total Area, Dry
Bushels, Wet Bushels, Shaft RPM, Work Rate and Grain Loss.
1.1 iniTial FirST-Time SeTup
1. Select the proper Make/Model combine as well as the Header Switch/Sensor from the Combine Setup screen. (Section 6.1) Note:
If your combine type is set to “Other”, you will need to go through the Auto Cal process. (Section 9.2).
Note: If your Yield Monitor came new from Loup Electronics, the combine make/model has been pre-set by Loup.
2. Run Elevator at full speed empty and set the Elevator Tare (Section 8.1)
3. Set Zero for Angle Sensor (Section 10.0)
4. Dene the Header Widths and Sections for each Crop (Section 5.3)
1.2 operaTion checkliST
1. Ensure the Header Up/Down indication is working properly. A raised header should display the Red Up
icon in the top
bar while the down position should display the Green Down icon. If not, set the Raised and Lowered points of the header
switch from the “Combine Setup” - “Header Switch” menu.
2. Ensure Speed is displaying the correct MPH in lower le corner of the display. If no Speed/GPS signal is shown, ensure the proper
Baud Rate is dened for the type of receiver you’re using. See Section 7.1 for GPS Settings and Baud Rate.
3. From the Crop Select screen, ensure the proper crop are selected as well as correct header width for that crop. (Section 2.11)
4. If eld mapping, ensure SD card is inserted and the correct Task name, Field, Farm, Crop and Variety (optional) is dened.
(Section 3.0)
*Add Load button only used when Loads Management Enabled.
 Loading...