EasyManua.ls Logo

Mag-ic Probe WiFi - User Manual

Mag-ic Probe WiFi
13 pages
Print Icon
To Next Page IconTo Next Page
Loading...
Some users prefer to use a rice paper or other thin protective paper. You can also calibrate MAG-ic probe with
the rice paper inserted between the magnet and the probe. In this way the zero (0.00) value would include the
paper thickness and all measurements must be performed with the paper included.
You can also use the OFFSET function in the MAG-ic Probe Software to compensate for a thicker protective
cloth if required
MAG-ic Probe Device Overview
USB
Connector
Disclaimer:
Electronic Thickness Gauge
WiFi
WARNING !! - This device uses extremely strong NEODYMIUM magnets. These magnets can cause injury or
damage if misused. KEEP AWAY FROM CHILDREN!!. DO NOT OPEN or USE if you have a pacemaker or
other medical condition that may be affected by magnetic fields. The strong magnetic fields can erase computer
hard drives, magnetic access and credit cards, Use at your own RISK.
MAG-ic Tech or its owners neither assumes nor accepts any liability for damages resulting from the handling or
use of this equipment. With your purchase, the buyer agrees that he/she is responsible for all damages and
injuries caused by the use of this product , which include personal injuries , property damages and any other
damage whatsoever. The buyer must agree with the terms before using the product.
Pay special attention when using this device to measure finished instruments. The probe tip is fabricated from
Plastic and may scratch or leave marks on finished surfaces.
DO NOT DRAG THE PROBE TIP OVER FINISHED SURFACES!! To avoid scratches and marks, you should
slightly lift the probe before moving it. A good method is to lift the tip and place a piece of soft cloth under before
moving and removing the cloth at the new measuring location.
MAG-ic Probe uses magnetism to penetrate the material to be measured. A
probe is applied to one surface of the plate and a ball is applied to the opposite
side. These attract each other so when the probe is moved along the surface of
the material, the magnetic ball follows underneath and the MAG-ic Probe tool
will measure and display the thickness in both mils (1/1000th inch) and
millimeters (mm)
MAG-ic Probe WiFi is the newest variation of the MAG-ic Probe product line.
MAG-ic Probe WiFi features wireless communication to any device that has
WiFi capability including Smartphones, Computers and Tablets.
The device features -
All in one construction - less wear & tear
a USB connection for power and connection to a computer for use with the
MAG-ic Probe Software or to a battery for mobile use.
MAG-ic Probe WiFi is supplied with -
USB Cable
USB Battery pack for mobile use when not near a computer.
1/2” Sphere magnet
1/4” x 1/2” cylinder magnet
MAG-ic Probe can measure 0-600mils (0.6”) (0-15mm) using the 1/2” Sphere
magnet and 0-420mils (0.42”) (0-10mm) using the 1/4” cylinder. The cylinder is
used where access is restricted for example in violins, mandolins and violas.
Use the 1/2” sphere wherever possible.
1
Question and Answer IconNeed help?

Do you have a question about the Mag-ic Probe WiFi and is the answer not in the manual?

Mag-ic Probe WiFi Specifications

General IconGeneral
BrandMag-ic Probe
ModelWiFi
CategoryMeasuring Instruments
LanguageEnglish

Summary

Disclaimer and Safety Warnings

General Safety Warnings

Device uses strong magnets; keep away from children, pacemakers. Avoid data erasure.

Surface Protection and Calibration

Avoid scratching surfaces by lifting probe. Use paper for calibration or offset.

MAG-ic Probe Device Overview

Working Principle

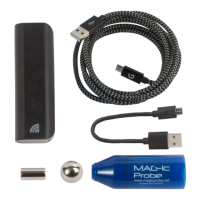
Probe uses magnetism to measure material thickness via magnetic attraction between probe and ball.

WiFi Connectivity Feature

Wireless communication to Smartphones, Computers, Tablets via WiFi.

MAG-ic Probe WiFi Operation Modes

Computer Software Integration

Connect to computer via USB to use MAG-ic Probe Software for saving measurements.

Real-time Display Options

Use WiFi for real-time measurements on phone/tablet or with the MAG-ic Probe Display unit.

MAG-ic Probe Startup Sequence

Understanding Operation Messages

Probe initiates automatic startup sequence; understand messages like 'Connecting WiFi', 'Attach Ball'.

Calibration Startup Best Practices

Warm up probe for 3 mins. Start without magnet to complete connections before attaching it.

MAG-ic Probe Software Options

MAG-ic Probe Lite Software

Upload instrument pictures, record measurements, save/print for reference.

MAG-ic Probe PRO Software

Create color contour maps for surface visualization and comparison.

USB Serial Connection Setup

Automatic Driver Installation

Driver should auto-install. Note the displayed COM Port # for software use.

Manual Driver Installation

Download VCP Drivers from FTDI website if auto-install fails. Follow installation guides.

Software COM Port Configuration

Select Serial Port in software, enter correct COM Port #. Green 'Comms' light indicates success.

MAC USB Serial Connection Guide

Finding Serial Ports on macOS

Use Terminal to find serial ports like /dev/cu.usbserial-xxxxx. Copy the string.

Software Connection Configuration

In software, select Serial Port and enter the full macOS serial port string. Check for green 'Comms' light.

Understanding Calibration and Magnetics

Magnetic Field Principles

Fields vary with distance, temperature, and external objects. Friction can affect readings.

Magnet Handling and Care

Magnets are brittle; avoid snapping together or to steel. Handle carefully to prevent chipping.

Performing Initial Calibration

Software Calibration Steps

Select Serial Port, enter COM Port #. Attach, then remove magnet during countdowns.

Calibration Completion and Readiness

Display shows detected magnet and measurement (0.00). Device is calibrated and ready for use.

Advanced Calibration Procedures

Calibration Tolerance Notes

0.00 is ideal, but 1-3 mil deviation is acceptable. Re-calibrate if power is cycled.

Two-Step Calibration Method

Warm up probe with hand, then calibrate. Repeat if conditions change for prolonged use.

Environmental Interference Control

Remove all metal objects within 1m to prevent magnetic field interference and ensure accurate measurements.

Connecting to Phone;Tablet via WiFi

WiFi Access Point Mode

Probe acts as an Access Point with IP 10.10.10.10 for direct connection from devices.

Initial WiFi Connection Steps

Power probe, select 'MAG-ic Probe' network, then open browser to 10.10.10.10 to access device.

WiFi Connection Workflow

Connecting to MAG-ic Probe AP

Select 'MAG-ic Probe' WiFi, then open browser to 10.10.10.10 to access device.

WiFi Calibration Steps

Follow on-screen prompts: Attach Ball, Remove Ball, wait for countdowns and calibration completion.

Advanced WiFi to Home Network

Joining Home WiFi Network

Select home WiFi network and enter password via probe's interface to join.

Access via Home Network IP

Note the new IP address. Connect to this IP via browser after phone reconnects to home WiFi.

Usage Tips and Best Practices

Measurement Techniques

Ensure probe is square. Use HOLD function for lowest measurement at location.

Environmental and Calibration Advice

Handle magnets carefully. Re-calibrate after significant temperature changes or interference.

Technical Specifications

Details measuring range, resolution, accuracy, battery voltage, and power consumption.