15. Remove the left fan assembly
Use the 2.5 mm hex wrench to remove the bolts, fan guard, fan, spacers and
heat sink of the left extruder as one piece.
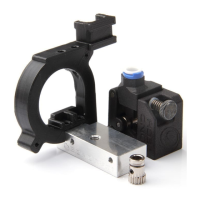
16. Bolt the new extruders onto the extruder carriage
Angle the dual extruders into the extruder carriage. The fans should face the
front of the 3D printer and the motors should face the back. Bolt them into
place using the 2.5 mm hex wrench and the two bolts you set aside earlier.
17. Reattach the left fan assembly
Now that the extruders are on the extruder carriage, you can bolt the fan
assembly into place using the 2.5 mm hex wrench.
18. Push the extruder cable into place
Push the extruders all the way to the front left of the MakerBot Replicator 2X to
ensure that there’s enough slack. Then push the cable into the brackets at the
back of your 3D printer.
That’s it—the new extruders are installed. You can plug in your MakerBot
Replicator 2X, turn it on, load filament and return to printing.