7
MakerBot Replicator
MakerBot
7
MakerBot Replicator
MakerBot
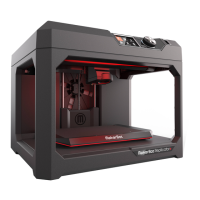
Remove the six (6) Torx button
heads that hold the Spool Drawer
Alignment Brackets to the Z-Case.
Pull Alignment Brackets away
from the body of the Replicator.
Step 10-Remove Spool Drawer
Alignment Brackets
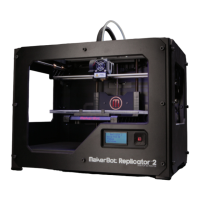
Unplug the HDMI Cable and
remove the Electrostatic Discharge
Cover (ESD) by removing the two
(2) Torx button heads using a T20.
Remove the one (1) Torx button
head attaching the PCB Adapter
Plate to the Base Plate
Gently lift the ESD cover and
unplug the WiFi Antenna, next
open the white cable clip located
on the top of the ESD cover and
remove the Motor Cable Harness.
Unplug the Z-Motor and set aside.
Pull the Brooklyn PCB towards
yourself to give some slack, press
down the white tab on the 20 pin
Power Supply connector and pull
out of Brooklyn PCB, slide out of
metal slot to remove.
Step 11 -Remove Brooklyn PCB
•
•