7ENGLISH
FUNCTIONAL
DESCRIPTION
CAUTION: Always be sure that the tool is
switched off and the battery cartridge is removed
before adjusting or checking function on the tool.
Installing or removing battery
cartridge
CAUTION: Always switch off the tool before
installing or removing of the battery cartridge.
CAUTION: Hold the tool and the battery car-
tridge rmly when installing or removing battery
cartridge.Failuretoholdthetoolandthebattery
cartridgermlymaycausethemtoslipoffyourhands
andresultindamagetothetoolandbatterycartridge
andapersonalinjury.
►Fig.1: 1. Red indicator 2. Button 3. Battery
cartridge
Toremovethebatterycartridge,slideitfromthetool
whileslidingthebuttononthefrontofthecartridge.
Toinstallthebatterycartridge,alignthetongueonthe
batterycartridgewiththegrooveinthehousingandslip
it into place. Insert it all the way until it locks in place
with a little click. If you can see the red indicator on the
uppersideofthebutton,itisnotlockedcompletely.
CAUTION: Always install the battery cartridge
fully until the red indicator cannot be seen. If not,
itmayaccidentallyfalloutofthetool,causinginjuryto
you or someone around you.
CAUTION: Do not install the battery cartridge
forcibly. If the cartridge does not slide in easily, it is
notbeinginsertedcorrectly.
Battery protection system
Lithium-ionbatterywithstarmarking
►Fig.2: 1. Star marking
Lithium-ionbatterieswithastarmarkingareequipped
withaprotectionsystem.Thissystemautomatically
cutsoffpowertothetooltoextendbatterylife.
Thetoolwillautomaticallystopduringoperationifthe
tooland/orbatteryareplacedunderoneofthefollowing
conditions:
Overloaded:
Thetoolisoperatedinamannerthatcausesittodraw
anabnormallyhighcurrent.
In this situation, release the switch trigger on the tool
andstoptheapplicationthatcausedthetooltobecome
overloaded.Thenpulltheswitchtriggeragaintorestart.
Ifthetooldoesnotstart,thebatteryisoverheated.
Inthissituation,letthebatterycoolbeforepullingthe
switch trigger again.
Low battery voltage:
Theremainingbatterycapacityistoolowandthetool
will not operate. In this situation, remove and recharge
thebattery.
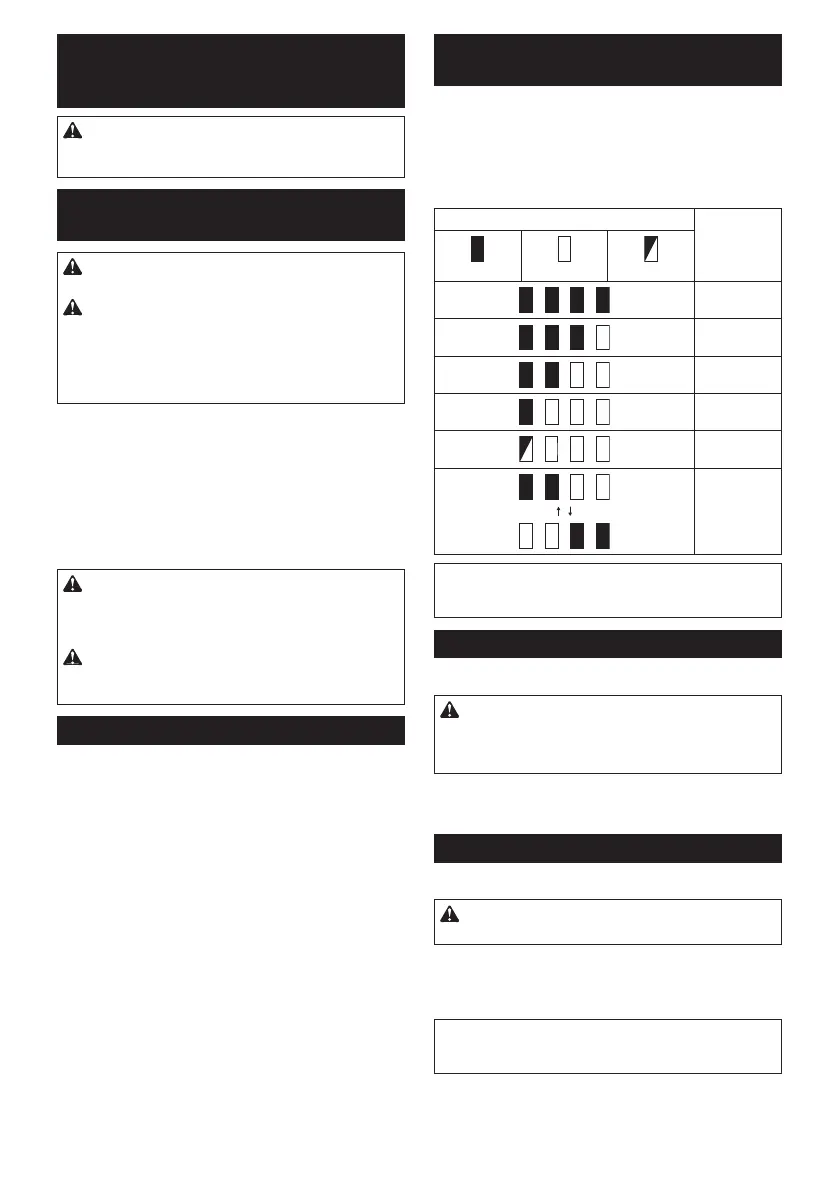
Indicating the remaining battery
capacity
Onlyforbatterycartridgeswith"B"attheendofthe
modelnumber
►Fig.3: 1.Indicatorlamps 2.Checkbutton
Pressthecheckbuttononthebatterycartridgetoindi-
catetheremainingbatterycapacity.Theindicatorlamps
light up for few seconds.
Indicator lamps Remaining
capacity
Lighted Off Blinking
75% to 100%
50% to 75%
25% to 50%
0% to 25%
Charge the
battery.
Thebattery
may have
malfunctioned.
NOTE: Depending on the conditions of use and the
ambienttemperature,theindicationmaydifferslightly
from the actual capacity.
Switch action
►Fig.4: 1. Switch trigger
CAUTION: Before inserting the battery car-
tridge into the tool, always check to see that the
switch trigger actuates properly and returns to
the "OFF" position when released.
Tostartthetool,simplypulltheswitchtrigger.Tool
speedisincreasedbyincreasingpressureontheswitch
trigger. Release the switch trigger to stop.
Lighting up the front lamp
►Fig.5: 1. Lamp
CAUTION: Do not look in the light or see the
source of light directly.
Pulltheswitchtriggertolightupthelamp.Thelamp
keepsonlightingwhiletheswitchtriggerisbeingpulled.
Thelampgoesout10-15secondsafterreleasingthe
trigger.
NOTE: Use a dry cloth to wipe the dirt off the lens of
the lamp. Be careful not to scratch the lens of lamp, or
it may lower the illumination.

 Loading...